Voice Controlled Home Automation using Google Assistant
This tutorial we will learn to make IOT based Home automation then we will add google assistant to control it over voice commands.

Hello friends, today we are going to learn how to make home automation system, in which your home appliances are get controlled by your voice command.
Isn't it cool when you say turn on the light and light will turn and the light will turn on with your voice command, No it's not " JARVIS ", it’s the NodeMCU and Google Assistance. Yes you can do this amazing project with a very cost-effective electronic parts.
Here's a video that'll take you step by step to complete your home automation.
All you Required is:
- Light bulb with light bulb holder and wire.
- DC to AC relay board.
- AC pin without ground.
- NodeMCU Board.
- Jumper Cable.
- And Google Assistant On your smartphone.
That’s it, your project will be completed with this few things, now let us move towards the next step.
This project will be done under this 4 Major Steps.
Step 1 : Downloading and Setting up Arduino IDE and Blynk Libraries.
Step 2 : Install and Configure Blynk App.
Step 3 : Hardware Assembly.
Step 4 : Configure IFTTT.
Software Installation Steps:
- First, you have to download Arduino IDE for programming NodeMCU module.
https://www.arduino.cc/en/Main/Software
here is the link provided for downloading your Arduino IDE for you on your Respective OS.
- Now we need to install ESP8266 board in your IDE.
For that, you need to open your ARDUINO IDE first and paste the URL Provided below.
File/preferences/Additional board manager URL
http://arduino.esp8266.com/stable/package_esp8266com_index.json
It will appear like this on your Screen preference tab.
[caption id="attachment_749992" align="aligncenter" width="563"]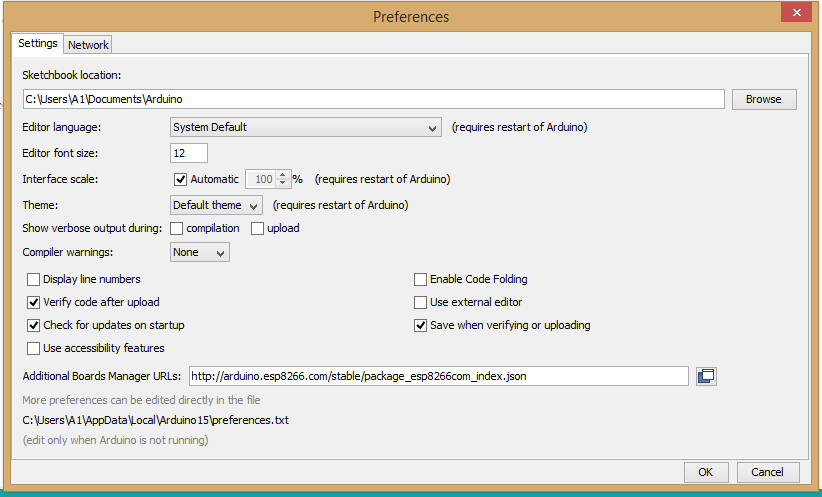 preference tab.[/caption]
- Then follow the path Tools/board/board manager and Type ESP8266, you will find a board of ESP8266 click on install option.
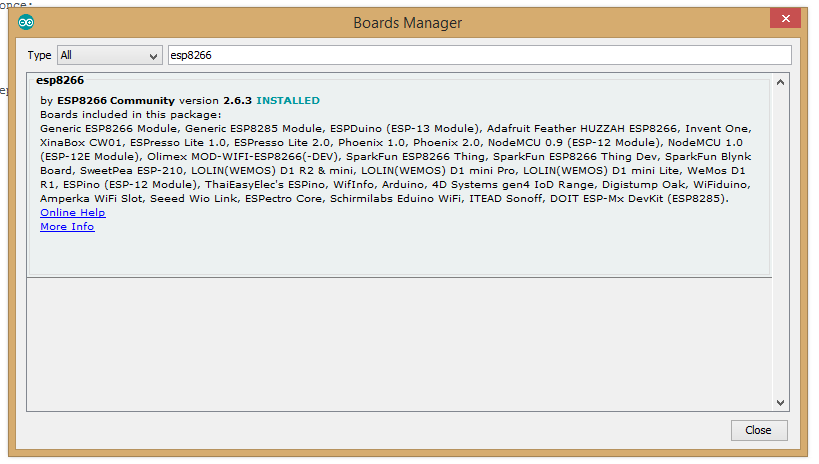 Board Manager.[/caption]
So this is how your board of NodeMCU gets installed.
Library Installation:
- Next thing, We need to install blynk library in our Arduino IDE from here..
- To install this library, Go to Arduino library/sketch/include library
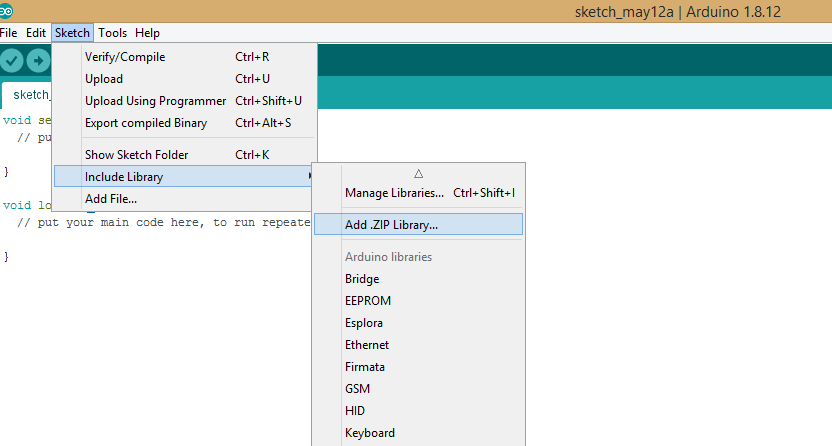 ArduinoIDE.[/caption]
-
Then add the blynk library though the procedure shown above.
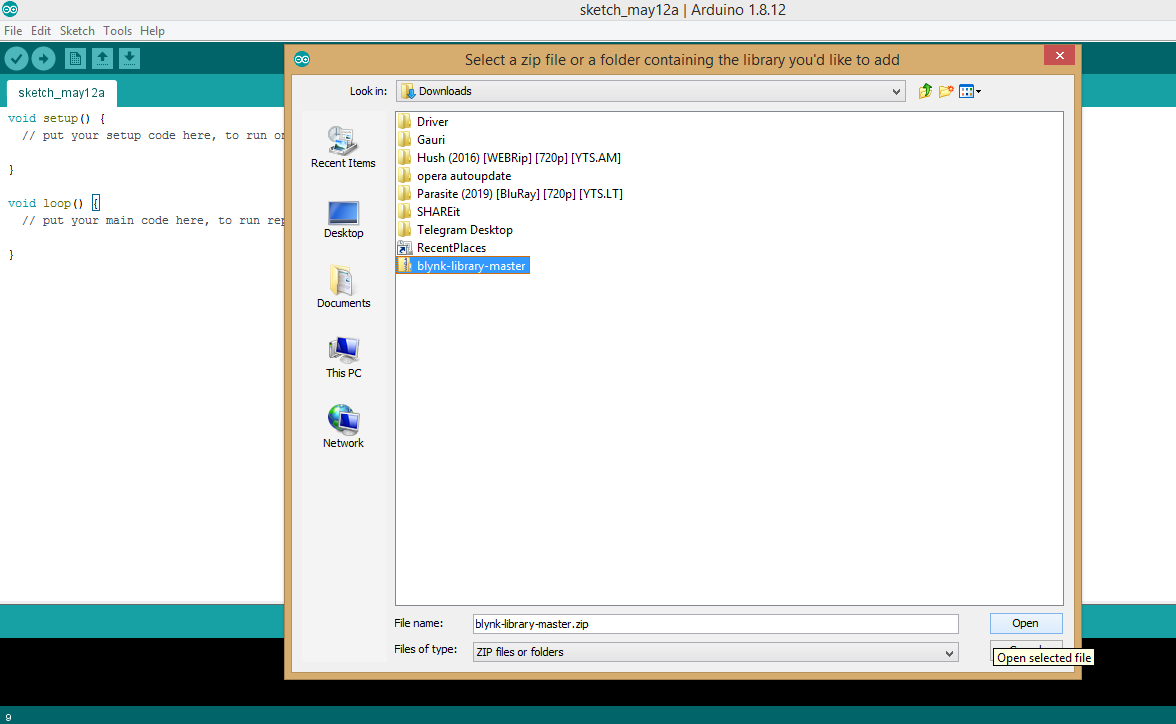 Addinglibrary[/caption]
Now Software Installation, Board Installation, and Library Installation process completed on your PC.
- Next process is you have to go to path file/Example/blynk/boardWifi/ESP8266_Standalone.
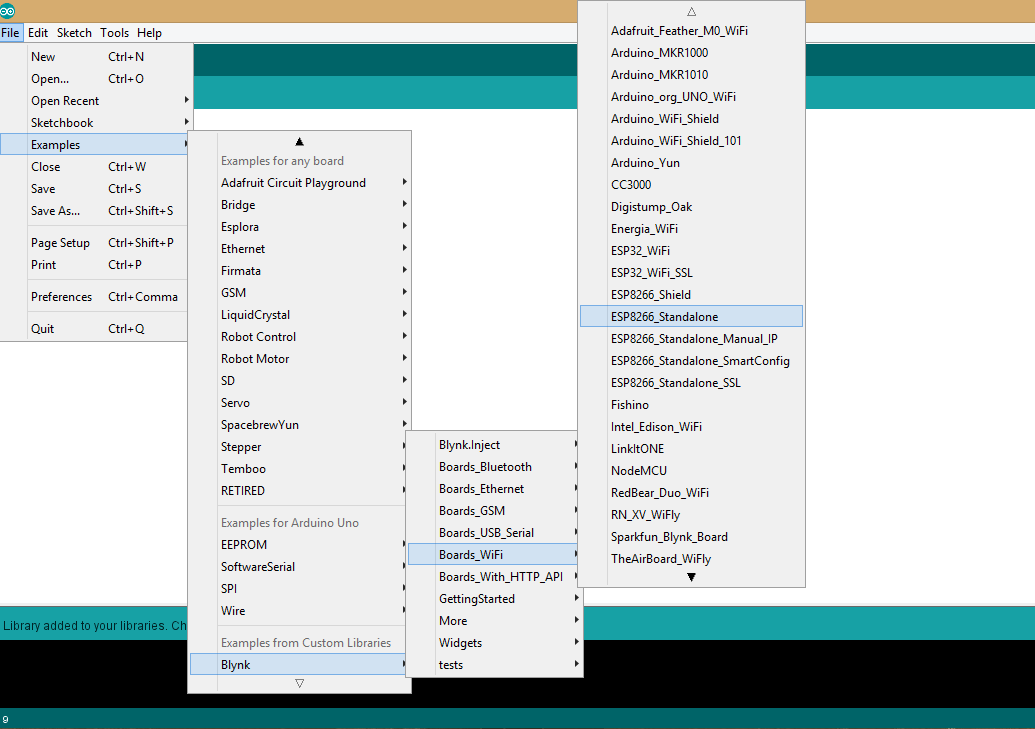 path[/caption]
- Open ESP8266_standalone sketch and upload into your NodeMCU board.
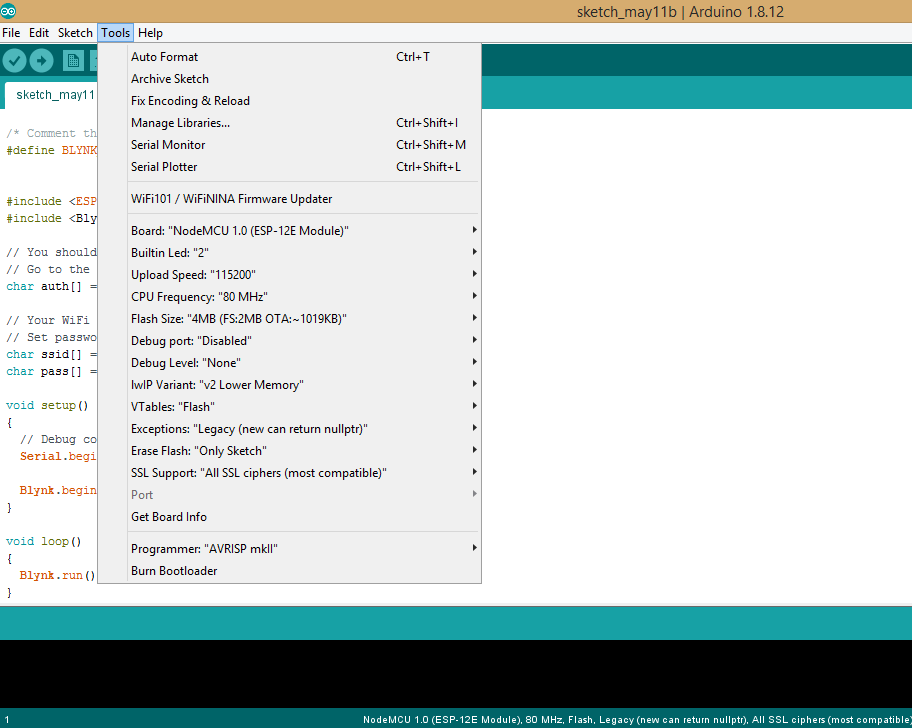 tools.[/caption]
here the code has been uploaded into your NodeMCU board, now you have to make the connection as shown below.
[caption id="attachment_750039" align="aligncenter" width="525"] Fig. block diagram of system.[/caption]
Application Installation and Configuration:
- Go to play store/app store and type blynk, you will find green color icon for blynk app, then install it on your device.
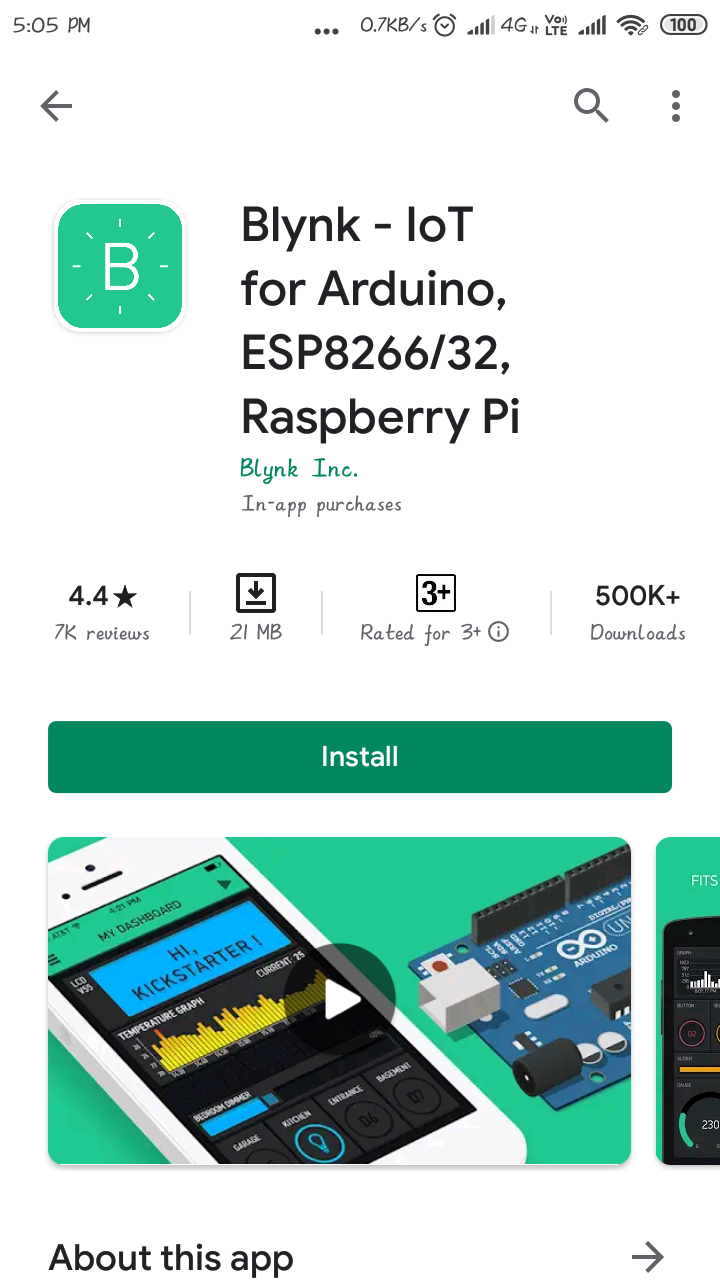 blynk app.[/caption]
- Sign up with a gmailid and then create a new project.
- then click on create option and fill the details like project name, device used and connection type.
[caption id="attachment_750050" align="aligncenter" width="363"]
 Create New project.[/caption]
- Auth token will be generated this auth token you will get in the settings option of this project and on your Gmail Account.
 AuthToken Notification.[/caption]
- Once your project is created, you have to insert different types of widget into it, For example I will be adding two buttons from widget box shown below.
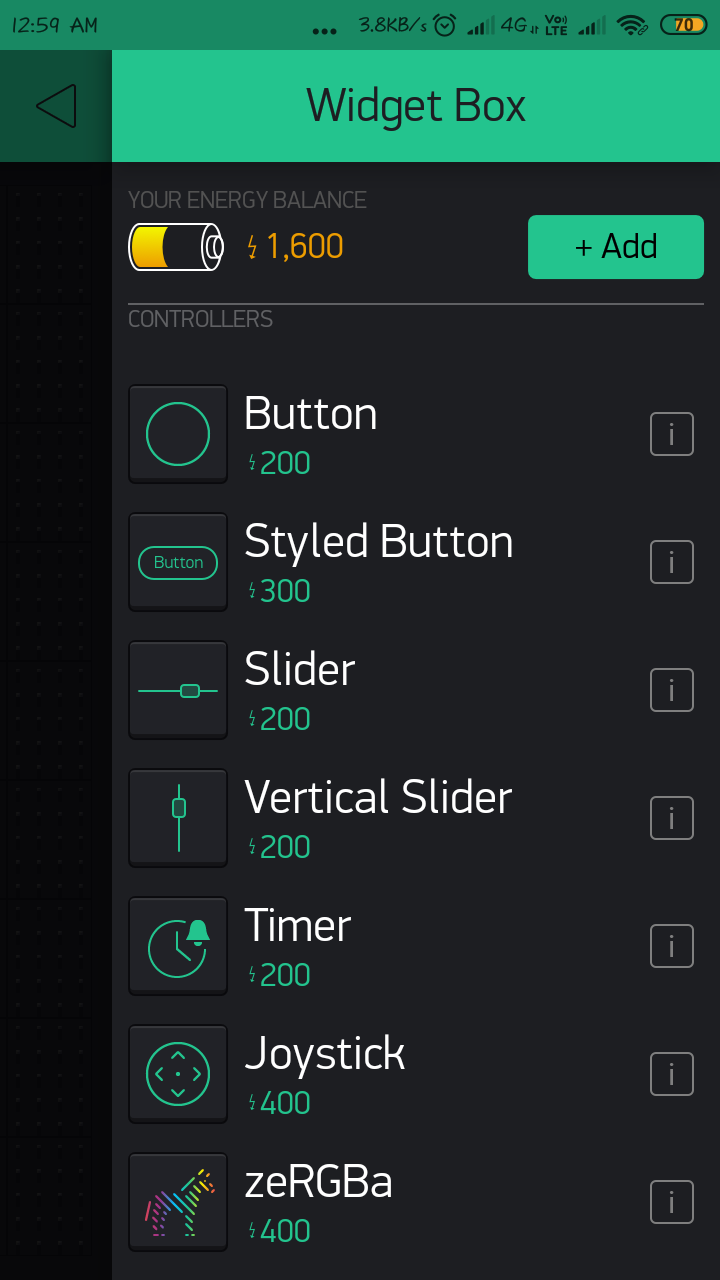 widgetBox.[/caption]
- After selecting two buttons click on the Settings button and fill the details like i did in following image.
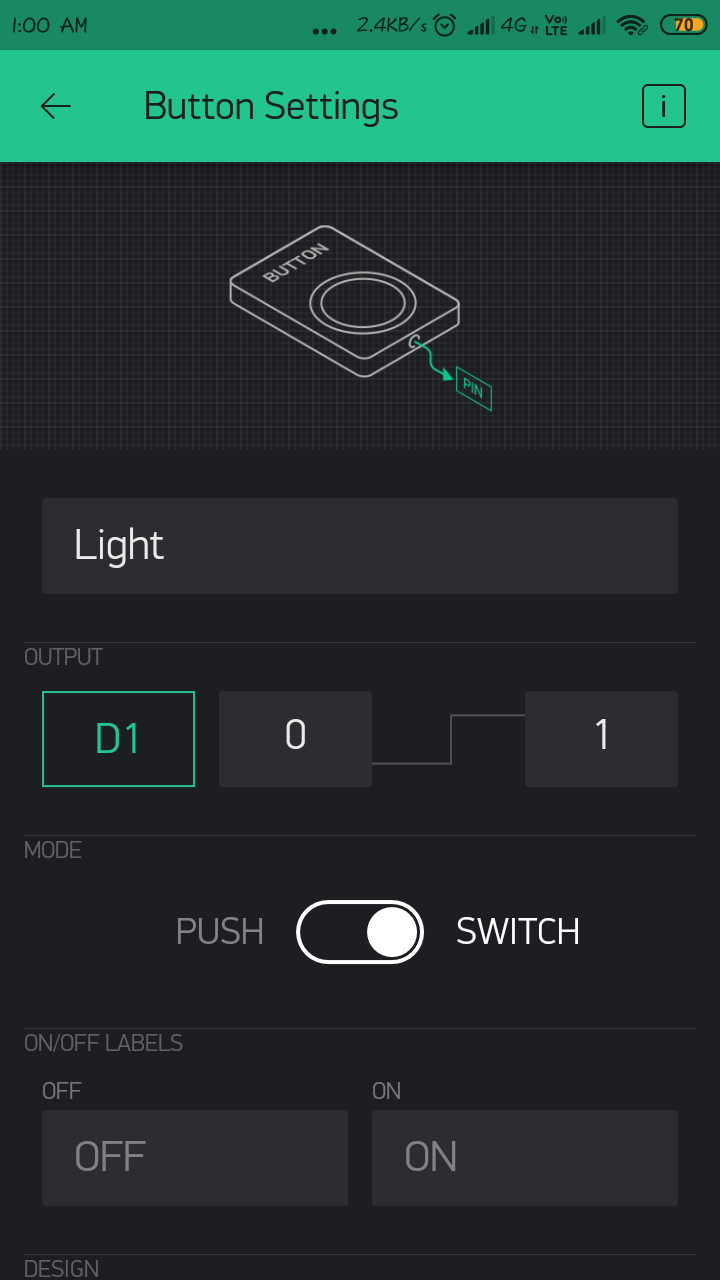 The button setting.[/caption]
[caption id="attachment_750057" align="aligncenter" width="371"]
 ButtonSetting.[/caption]
- After all the process with this settings your Dashboard will look appear like this.
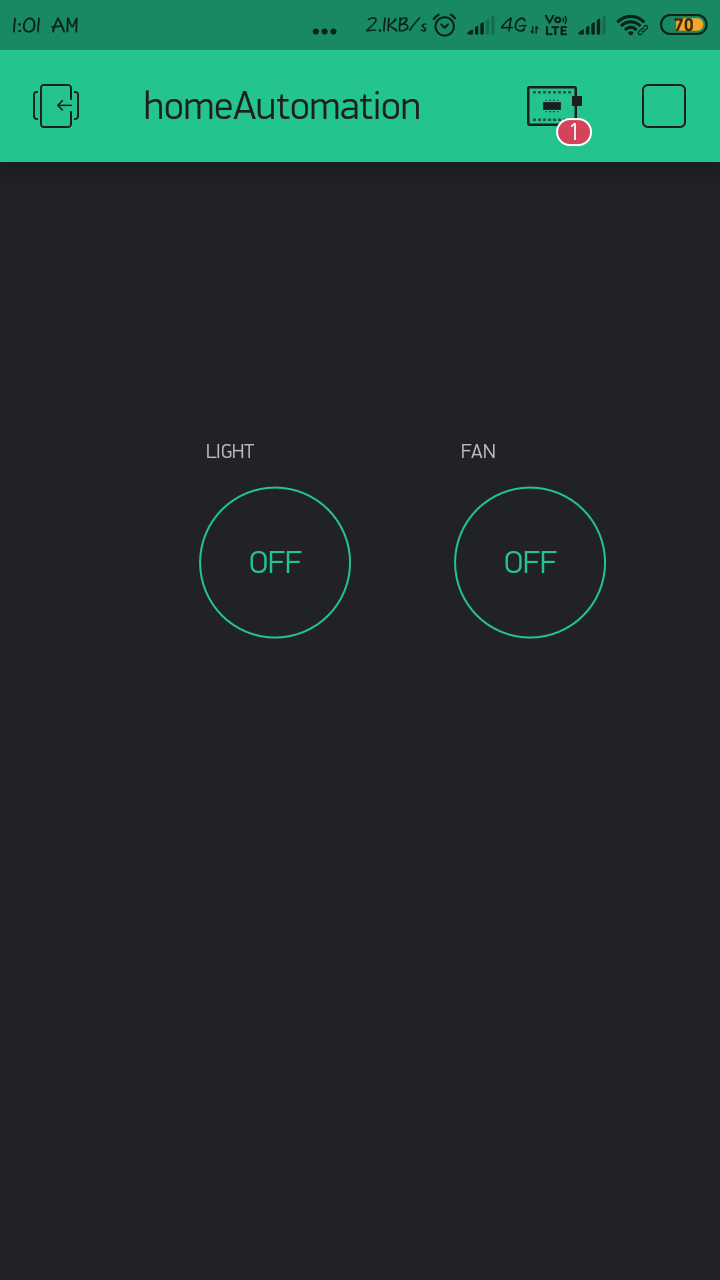 Home Automation.[/caption]
- The board icon shown in brown circle has One Red Notification like symbol on it, because the app is not connected with board for that you have to follow some steps.
- First, you have to open your blynk registered Gmail acc open the mail from blynk app which gives you AUTH token for your project"HomeAutomation", copy that auth code to Auth type in the code box.
- Insert your Hotspot ID password into your SSID and Password on your Arduino Sketch.
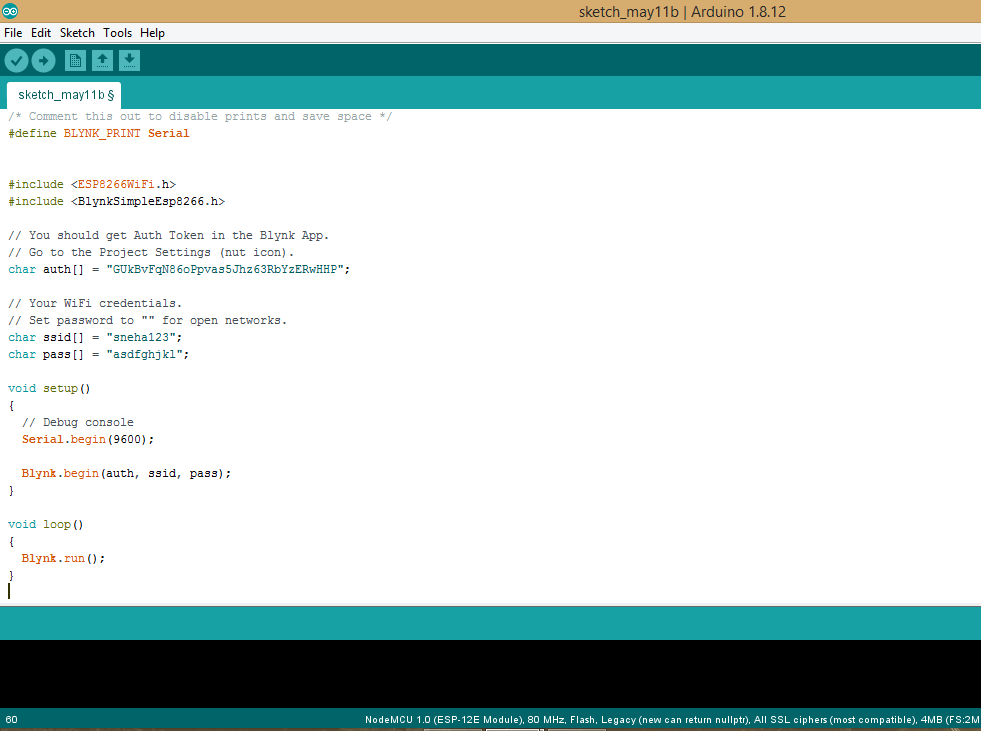 final Code.[/caption]
- Select your NodeMCU board and click on upload.
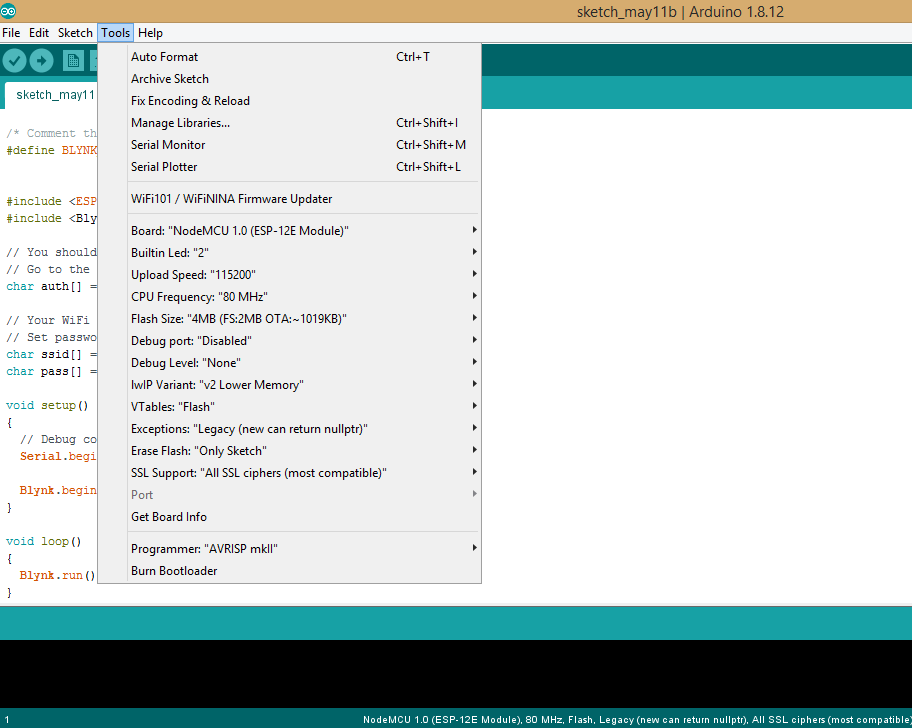 Tools.[/caption]
And that’s it ,Now you can control your home appliances with a touch on your fingers with the help of blynk app.
But, this tutorial is all about controlling your appliances on your voice commands. So now we will move towards the Magic Steps now.
IFTTT Configuration:
We cannot connect the Google Assistant to the NodeMCU directly, and that is the only reason we are using the Blynk app. Blynk app can directly connect to the NodeMCU and send data from it.
So, if we can send the voice commands interpreted by Google Aassistant directly to the Blynk app, the Blynk app can then forward those commands to the NodeMCU.
But the problem is Google Assistant cannot directly understand foreign commands like “turn on the fan” or “turn on relay one” etc. on its own. So, to solve this we use another intermediate app/website called ‘IFTTT’.
So, in the end what will happen is, when we say a voice command like “ok google turn on the light” to the Google Assistant, Google Assistant sends that this foreign command to IFTTT.
IFTTT interprets this command and sends an On or Off signal to the Blynk app via the Blynk Server. Blynk will then send this signal to the NodeMCU and then to our electrical appliances.
Journey of connecting Google Assistance with your home appliances:
Google Assistant cannot Send command directly to NodeMCU, So we use intermidiate tool called IFTTT, takes the input from Google Assistant and sends the output to blynk app for specific command, lets see how.
If I say, "turn on light" then IFTTT takes this command as a input as we have registered this command as a condition in its applet ,and based on that condition we write the what output should we send to blynk app. Enough discussions and saying now lets move towards actual procedure.
- Go to official website of IFTTT and sign up with your gmail account.
[caption id="attachment_751122" align="aligncenter" width="411"]
 SignIn.[/caption]
- At this point IFTTT will ask you permission to use your google account to add voice commands to it. Which you simply allow by clicking on ‘Allow’ button.
[caption id="attachment_751197" align="aligncenter" width="379"]
 permission.[/caption]
- Now go to the account and click on my applet, then click on create your own, then you will find a sentence "IF THIS THEN THAT".
[caption id="attachment_751164" align="aligncenter" width="504"]
 IFTTT[/caption]
- Click on IF option(+ option).
- Type Google Assistance in search box, after clicking on google assistance select the option , you will see a box where you have to put the input what you want to give to Google Assistant.
[caption id="attachment_751168" align="aligncenter" width="465"]
 Google Assistant.[/caption]
- And with respect of your input what output you want from it, So as you can see in the image below I wrote what input I will feed and what output I want to listen from the Google Assistant, as you can see in the image below.
[caption id="attachment_751189" align="aligncenter" width="442"]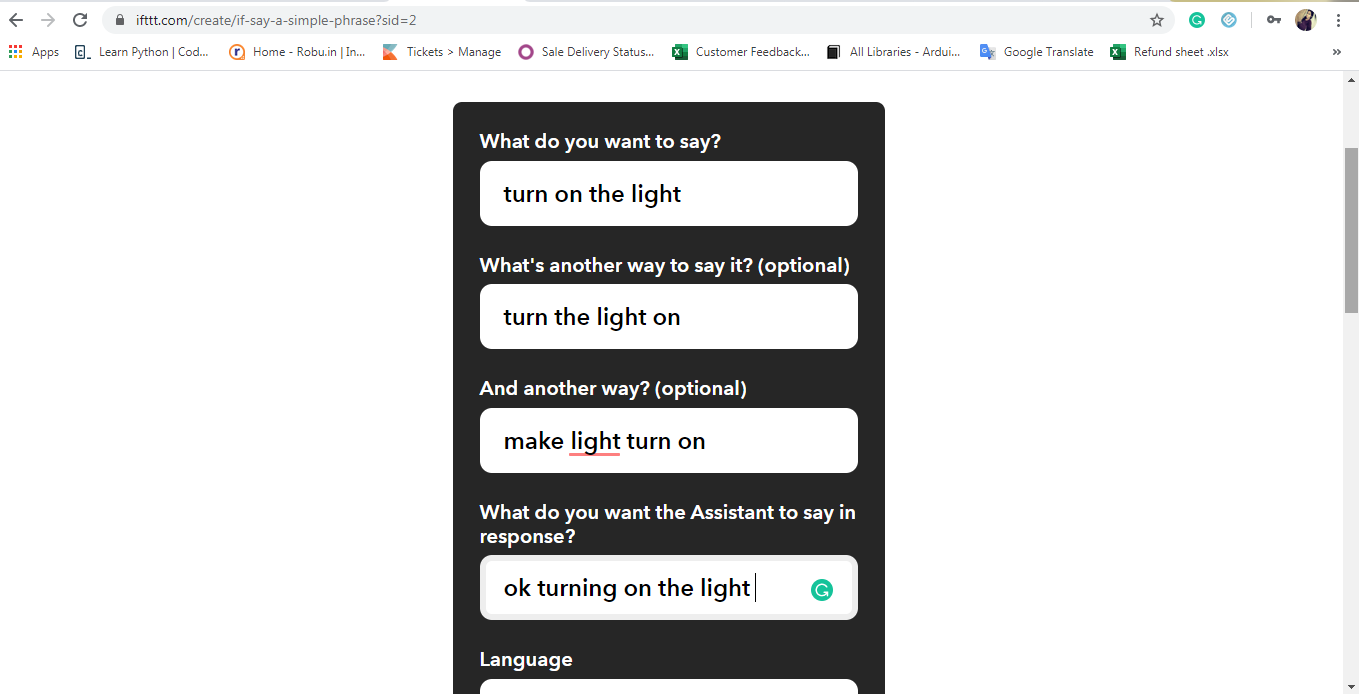 MyApplet[/caption]
- Select the Language English and hit on create trigger.
[caption id="attachment_751190" align="aligncenter" width="449"]
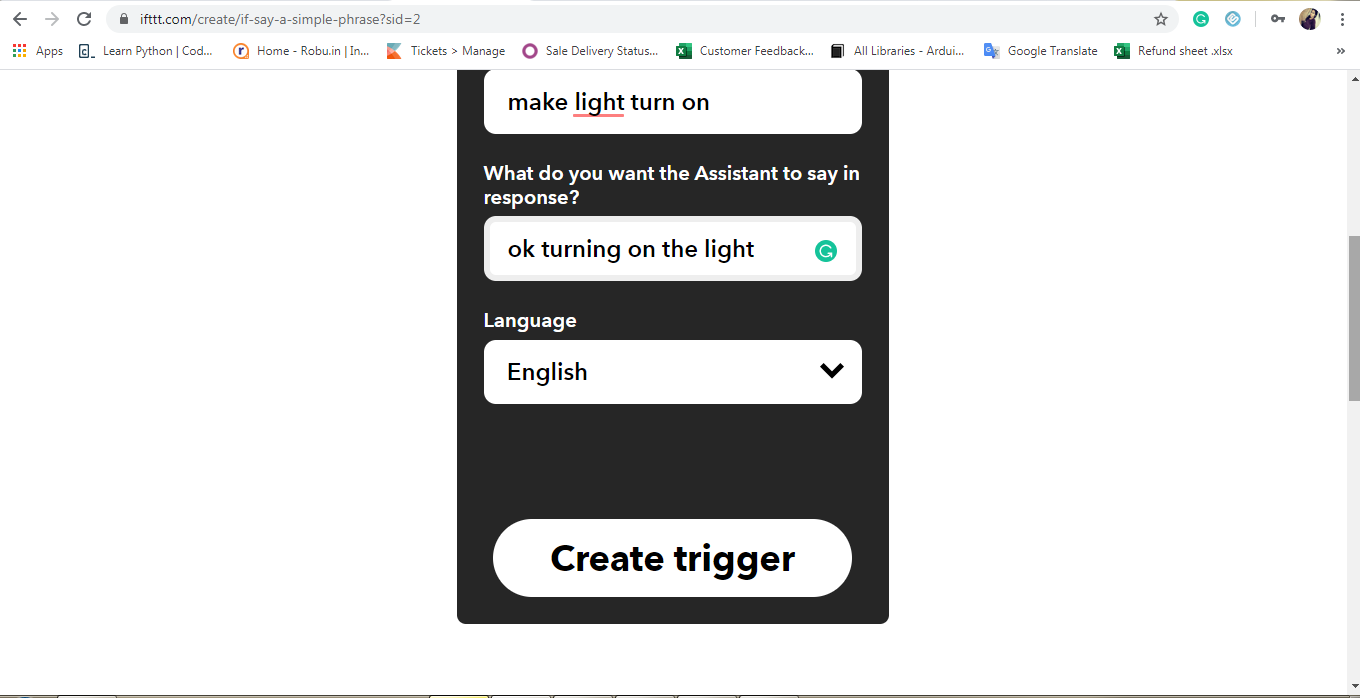 createTrigger[/caption]
- "IF" procedure is complete now now jump on "that" procedure
- Click on that option and type webhooks select it, and click on connect. Webhooks will allow us to send commands to the Blynk Server.
[caption id="attachment_751174" align="aligncenter" width="456"]
 ThatSevice[/caption]
- Now, in the URL field type the URL provided below:
[caption id="attachment_751176" align="aligncenter" width="413"]
 WEbhooksTab[/caption]
http://188.166.206.43/ YourAuthTokenHere / update / DigitalPinToBeUpdateHere.
This is the URL of Blynk Server of India, but it should work on other places as well. Replace the “YourAuthTokenHere” part with your Blynk Auth token that you received in the E-mail.
-
And “DigitalPinToBeUpdateHere” part with the Digital pin of NodeMCU that is to be updated. So, as we assigned the Digital Pin D1 of NodeMCU to relay one we must write D1 in place of “DigitalPinToBeUpdateHere”. But wait, we cannot write D1 there, because when Blynk Server receives this command from IFTTT it assumes as if the command it received was to be sent to an ‘Arduino Uno’ board, but in this case, we are sending it to NodeMCU.
-
To solve this, we must type the Digital pin of Arduino which corresponds with the NodeMCU. You can find the mapping in the image below.
[caption id="attachment_751180" align="aligncenter" width="457"] NodeMCU Pinout[/caption]
- As you can see in the image, Digital Pin D1 of NodeMCU corresponds to Pin D5 of Arduino. So instead of D1, I’ll write D1 as the pin. In the end the URL should appear something like this:
http://188.166.206.43/ d5*********************d8 / update / D5 - Next, Select the ‘Method’ field as PUT.
- Select the ‘Content type’ as Application/JSON.
- For the ‘Body’ type this: [“1”]
Here ‘1’ means to turn on, so we are basically saying Blynk to turn on relay that is connected to pin D1, which in our case is Relay one. [caption id="attachment_751183" align="aligncenter" width="461"]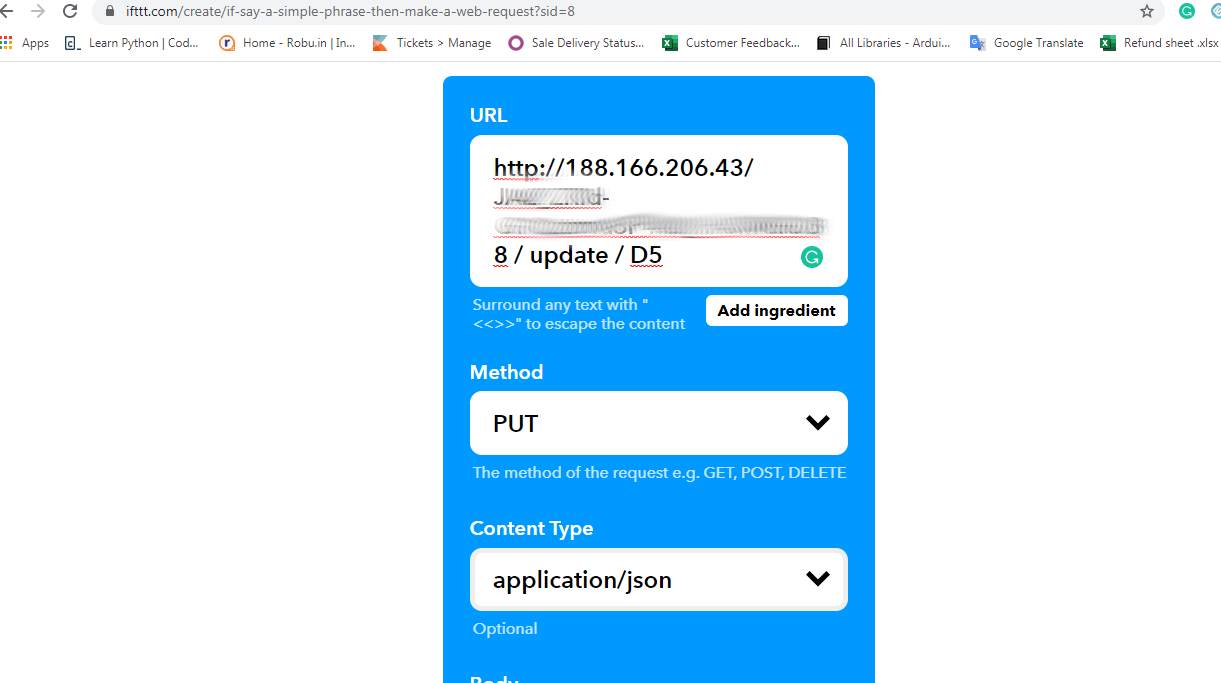 applet[/caption]
- Now click on ‘Create Action’ and then Finish.
- Similarly, we create another applet to turn off the relay. Repeat all the steps above from Step 4 Except the following changes. 1) In the Step 6 and Step 7, instead of writing “Turn on the light”, type “Turn off the light”. 2) In step 13, instead of [“1”], type [“0”].
- So now we have successfully created two triggers to Turn On and Off one Relay. So Similarly, we create triggers for the remaining 3 relays. Just change the phrase and Digital pin for each Relay. All the other steps will remain the same. So, in the end for 2 relays, we should have 4 triggers to turn each of them On or Off.
-
When this it is all done, you will be able to generate the voice commands with your Google Assistant and it should work like a charm! So now, you have your own voice controlled with the application.
I hope you enjoyed learning this cool project. If you want to know more about its parameter in details please click on the links given below


Good work
Keep up the good work. You will get resounding success in coming months.