In this blog, we will learn about the ultrasonic sensor working principle and its applications.

In industrial applications, an ultrasonic detection used to detect hidden tracks, discontinuities in metals, composites, plastics, ceramics, and for water level detection. For this purpose, the laws of physics which are indicating the propagation of sound waves through solid materials have been used since ultrasonic sensors using sound instead of light for detection. In this blog, we are going to learn about the ultrasonic sensor working principle and its applications.
Introduction to Ultrasonic Sensor
Ultrasonic sensors work by emitting sound waves at a frequency which is too high for humans to hear.

An above image shows the HC-SR-04 ultrasonic sensor which has a transmitter, receiver. The pin configuration is,
- VCC - +5 V supply
- TRIG – Trigger input of the sensor. Microcontroller applies 10 us trigger pulse to the HC-SR04 ultrasonic module.
- ECHO–Echo output of the sensor. Microcontroller reads/monitors this pin to detect the obstacle or to find the distance.
- GND – Ground
Sound is a mechanical wave travelling through the mediums, which may be a solid, or liquid or gas. Sound waves can travel through the mediums with specific velocity depends on the medium of propagation. The sound waves which are having high frequency reflect from boundaries and produce distinctive echo patterns.
Features of an Ultrasonic Sensor
- Supply voltage: 5V (DC).
- Supply current: 15mA.
- Modulation frequency: 40Hz.
- Output: 0 – 5V (Output high when obstacle detected in range).
- Beam Angle: Max 15 degrees.
- Distance: 2 cm – 400 cm.
- Accuracy: 0.3cm.
- Communication: Positive TTL pulse.
Ultrasonic Sensor Working Principle
Ultrasonic sensors emit short, high-frequency sound pulses at regular intervals. These propagate in the air at the velocity of sound. If they strike an object, then they reflected back as an echo signal to the sensor, which itself computes the distance to the target based on the time-span between emitting the signal and receiving the echo.
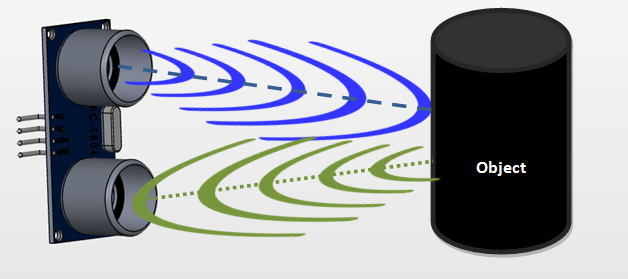
Ultrasonic sensors are excellent at suppressing background interference. Virtually all materials which reflect sound can be detected, regardless of their colour. Even transparent materials or thin foils represent no problem for an ultrasonic sensor.
microsonic ultrasonic sensors are suitable for target distances from 20 mm to 10 m and as they measure the time of flight they can ascertain a measurement with pinpoint accuracy. Some of our sensors can even resolve the signal to an accuracy of 0.025 mm. Ultrasonic sensors can see through dust-laden air and ink mists. Even thin deposits on the sensor membrane do not impair its function.
Timing Diagram of Ultrasonic Sensor
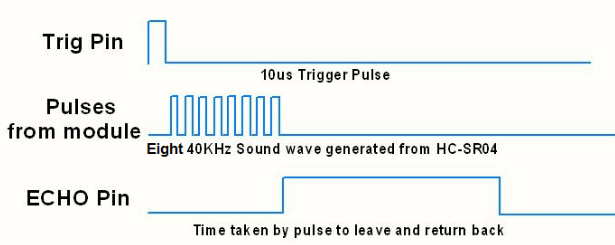
- First, need to transmit trigger pulse of at least 10 us to the HC-SR04 Trig Pin.
- Then the HC-SR04 automatically sends Eight 40 kHz sound wave and wait for rising edge output at Echo pin.
- When the rising edge capture occurs at Echo pin, start the Timer and wait for a falling edge on Echo pin.
- As soon as the falling edge captures at the Echo pin, read the count of the Timer. This time count is the time required by the sensor to detect an object and return back from an object.
How to calculate Distance?
If you need to measure the specific distance from your sensor, this can be calculated based on this formula:
We know that, Distance= Speed* Time. The speed of sound waves is 343 m/s. So,
Total Distance= (343 * Time of hight(Echo) pulse)/2
Total distance is divided by 2 because the signal travels from HC-SR04 to object and returns to the module HC-SR-04.
Interfacing of Ultrasonic Sensor with Arduino
Below, the image shows the interfacing of the ultrasonic sensor with Arduino. The components required for the interfacing are,
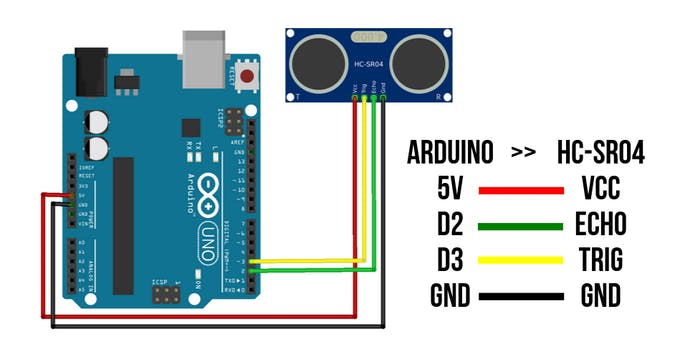
Kindly download the Arduino IDE for your system and upload the below code in your Arduino Uno,
#define echoPin 2 // attach pin D2 Arduino to pin Echo of HC-SR04
#define trigPin 3 //attach pin D3 Arduino to pin Trig of HC-SR04

// defines variables
long duration; // variable for the duration of sound wave travel
int distance; // variable for the distance measurement

void setup() {
  pinMode(trigPin, OUTPUT); // Sets the trigPin as an OUTPUT
  pinMode(echoPin, INPUT); // Sets the echoPin as an INPUT
  Serial.begin(9600); // // Serial Communication is starting with 9600 of baudrate speed
  Serial.println("Ultrasonic Sensor HC-SR04 Test"); // print some text in Serial Monitor
  Serial.println("with Arduino UNO R3");
}
void loop() {
  // Clears the trigPin condition
  digitalWrite(trigPin, LOW);
  delayMicroseconds(2);
  // Sets the trigPin HIGH (ACTIVE) for 10 microseconds
  digitalWrite(trigPin, HIGH);
  delayMicroseconds(10);
  digitalWrite(trigPin, LOW);
  // Reads the echoPin, returns the sound wave travel time in microseconds
  duration = pulseIn(echoPin, HIGH);
  // Calculating the distance
  distance = duration * 0.034 / 2; // Speed of sound wave divided by 2 (go and back)
  // Displays the distance on the Serial Monitor
  Serial.print("Distance: ");
  Serial.print(distance);
  Serial.println(" cm");
}
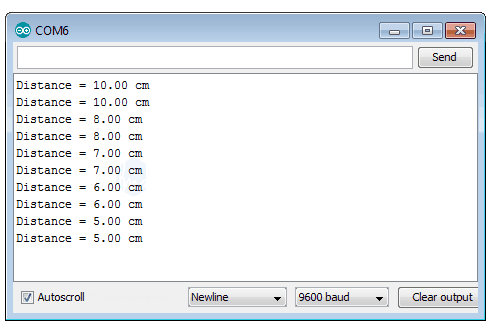
You can see the output on the serial monitor and it looks like,
Applications of an Ultrasonic Sensor
- It Uses to avoid and detect obstacles with robots like biped robot, obstacle avoider robot, pathfinding robot etc.
- Used to measure the distance within a wide range of 2cm to 400cm.
- Used to map the objects surrounding the sensor by rotating it.
- Depth of certain places like wells, pits etc can be measured since the waves can penetrate through the water.
Hope this article helps you to understand the applications and ultrasonic sensor working principle. To know more, refer the below blogs,
Using Ultrasonic (HC SR-04) with Raspberry Pi
Raspberry Pi Ultrasonic Sensor Interface Tutorial
We also have a video that explains the same.


Great writing! Proper information is been posted. Helped me a lot. Thanks!