Tilt Sensor Interfacing With Raspberry Pi
The article will cover the tilt sensor basics and understand its interfacing with Raspberry Pi.

Tilt sensors allow you to detect orientation or tilt. In this tutorial, you will learn about the tilt sensor and understand the interfacing of the tilt sensor with Raspberry Pi.
Before proceeding to learn the tilt sensor with Raspberry Pi, we understand the tilt sensor and the working principle of its operation.

Working Principle of Tilt Sensor
The working principle of tilt sensors is very simple. The tilt sensor produces electrical signals that vary with changes in angular moment. These sensors have a rolling ball, this rolling ball is wrapped in conductive material.
Now you might be thinking, Hey but what I have got is in cylindrical shape !! Mate, you're right! What you have got is cylindrical in shape, but it is the outer part of the sensor. The outer part of the tilt sensor is made of cylindrical shape and the inner part consists of cavities and rolling balls.
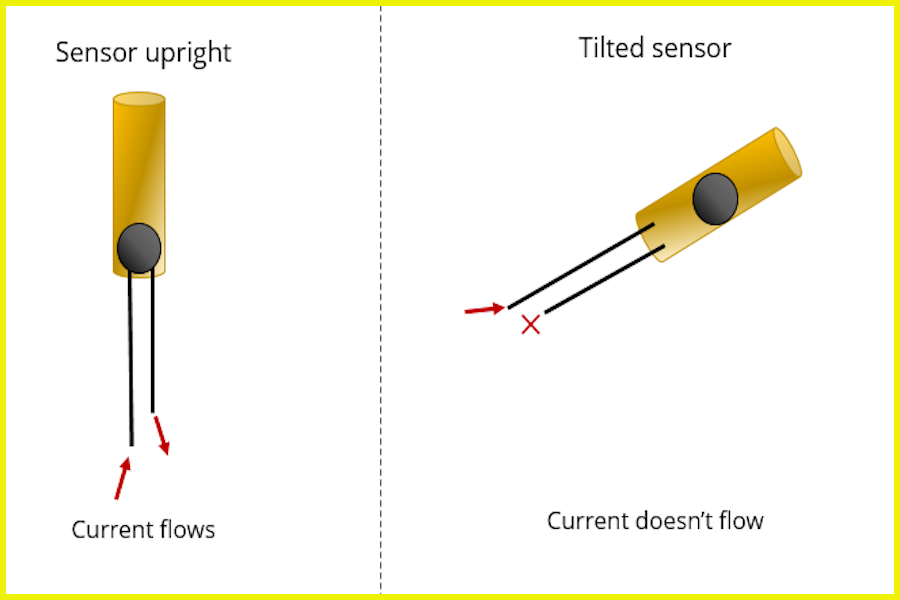
When the sensor is on, and in the horizontal direction, the rolling ball falls downward and an electrical connection occurs. And when the sensor is tilted the rolling ball does not go down and there is no electrical connection.
The Following image will clear your doubt.

By this point, you have learned the working principle of tilt sensor, in our next part of this blog we will learn how to use tilt sensor with Raspberry Pi. To understand the basics of all things, you will need the following things.
Interfacing The Tilt sensor With Raspberry Pi
By now, I believe you have an idea of what a tilt sensor is and how it works. The tilt sensor is just a switch with some modifications.
By reading the above line? You might be thinking that if this is the switch, we can connect this tilt sensor to the Raspberry Pi in the same way that we connect the switch to the Raspberry Pi.
Yes, you are right As I told you earlier, the tilt switch is just a switch and we can interface it with Raspberry Pi in the same way that we interface a switch with Raspberry Pi.
I connected my tilt sensor to Raspberry Pi in the following way. I connected the signal pin of the tilt sensor to the 27 pin number of the Raspberry Pi and the Vcc pin of the Tilt sensor to the 5v of the Raspberry, while the gnd pin of the Raspberry Pi to the Gnd pin of the tilt sensor.
Python Code For Our Project- Tilt Sensor Interfacing With Raspberry Pi
import RPi.GPIO as GPIO
import time

GPIO.setmode(GPIO.BCM)

# The input pin of the Sensor will be declared. Additional to that the pullup resistor will be activated
tiltpin = 27
ledpin = 17
GPIO.setup(tiltpin, GPIO.IN)
GPIO.setup(ledpin,GPIO.OUT)

print "Sensor-test [press ctrl+c to end]"

# This output function will be started at signal detection
def outFunction(null):
print("Signal detected")
GPIO.output(ledpin,1)

# The output function will be activated after a signal was detected ( falling signal edge ).
GPIO.add_event_detect(tiltpin, GPIO.FALLING, callback=outFunction, bouncetime=100)

# main program loop
try:
while True:
time.sleep(1)

# Scavenging work after the end of the program
except KeyboardInterrupt:
GPIO.cleanup()
Python Code Explanation
I know that you have tried the above code and now you are interested to know what is going on in the above code? Then this section is for you.
In the first four lines of our Python code, we imported a GPIO library designed specifically for Raspberry Pi and then we set gpio's mode to gpio.BCM. If you want to know what GPIO.BCM mode is, then we request you to check this blog.
Then we initialized the pin and set the pinmode of the GPIO pin. After setting PinMode, we created a function and named it as the Ontilt function.
This function will called whenever the raspberry pi will detect angular moment. We created a python function but this function has to be called in order to process the instruction that are stored in this function.
So to call this function we used the add_event_detect method of the GPIO pin. Whenever Raspberry Pi detects the angular moment, this method will call the Ontilt function.


