Hello geeks, so as you are here, I assume you know about LEDs, Everyone knows these days what is LED, Let’s assume that. So I’m here to give you a

Hello geeks, so as you are here, I assume you know about LEDs, Everyone knows these days what is LED, Let's assume that. So I’m here to give you a little info on what is the future of LED. You might have heard about many phones using AMOLED displays. Many flagship phones are using this AMOLED display. So let's go into the introduction of OLED and see what are OLEDs basically, we will also see how to interface it with an Arduino board. I will be covering from basics to the intermediate.
Introduction
OLEDs (Organic light-emitting diode) are manufactured by placing a series of thin organic film between two conductors. The conductors are nothing but electrodes out of which at least one is a transparent one. It emits light when current is passed through, they are emitting type display they don’t require a backlight for emission. OLEDs are thinner and brighter compared to LCD and other LED displays. Not only thinner and brighter they provide better image quality as well with great energy efficiency.
[caption id="attachment_632207" align="aligncenter" width="400"]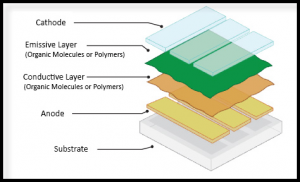 Fig.1.0 Basic OLED Diagram[/caption]
So now you know the basics of OLED, But did you wonder why it replaced LED and LCD displays?
Below is the reason for it to replace the LED and LCDs.
Why an OLED?
There are many reasons why to choose an OLED above standard LED/LCD:
- OLEDs are thinner, lighter and more flexible.
- OLED substrates can be plastic.
- OLEDs are brighter than LEDs. Because the organic layers of an OLED are much thinner than the corresponding inorganic crystal layers of an LED, the conductive and emissive layers of an OLED can be multi-layered.
- LEDs and LCDs require glass for support, and glass absorbs some light. OLEDs do not require glass.
- They do not require backlighting like LCDs. OLEDs generate light themselves. Because OLEDs do not require backlighting, they consume much less power than LCDs (most of the LCD power goes to the backlighting). This is especially important for battery-operated devices such as cell phones.
- OLEDs have large fields of view, about 170 degrees.
Well there now you know why it replaced LED and LCD.
Let’s now jump into the types of OLEDs. What are the subtypes of OLED?
Types of OLED
- Passive-matrix OLED
- Active-matrix OLED
- Transparent OLED
- Top-emitting OLED
- Foldable OLED
- White OLED
Passive-matrix OLED (PMOLED)
- PMOLED has strips of the cathode, organic layers, and strips of the anode. The anode strips are arranged perpendicular to the cathode strips. The intersections of the cathode and anode make up the pixels where light is emitted. External circuitry applies current to selected strips of anode and cathode, determining which pixels get turned on and which pixels remain off. Again, the brightness of each pixel is proportional to the amount of applied current.
- PMOLEDs are easy to make, but they consume more power than other types of OLED, mainly due to the power needed for the external circuitry. PMOLEDs are most efficient for text and icons and are best suited for small screens (2- to 3-inch diagonal) such as those you find in cell phones, PDAs and MP3 players. Even with the external circuitry, passive-matrix OLEDs consume less battery power than the LCDs that currently power these devices.
Active-matrix OLED (AMOLED)
- AMOLEDs have full layers of cathode, organic molecules and anode, but the anode layer overlays a thin film transistor (TFT) array that forms a matrix. The TFT array itself is the circuitry that determines which pixels get turned on to form an image.
- AMOLEDs consume less power than PMOLEDs because the TFT array requires less power than external circuitry, so they are efficient for large displays. AMOLEDs also have faster refresh rates suitable for video. The best uses for AMOLEDs are computer monitors, large-screen TVs, and electronic signs or billboards.
Well everyone knows about AMOLED, right? Samsung, One plus, and many other flagship brands are using AMOLED these days.
Transparent OLED
Transparent OLEDs have only transparent components (substrate, cathode, and anode) and, when turned off, are up to 85 percent as transparent as to their substrate. When a transparent OLED display is turned on, it allows light to pass in both directions. A transparent OLED display can be either active- or passive-matrix. This technology can be used for heads-up displays.
Top-emitting OLED
Top-emitting OLEDs have a substrate that is either opaque or reflective. They are best suited for active-matrix design. Manufacturers may use top-emitting OLED displays in smart
Foldable OLED
Foldable OLEDs have substrates made of very flexible metallic foils or plastics. They are very lightweight and durable. Their use in devices such as cell phones and PDAs can reduce breakage, a major cause for return or repair.
Potentially, foldable OLED displays can be attached to fabrics to create "smart" clothing, such as outdoor survival clothing with an integrated computer chip, cell phone, GPS receiver and OLED display sewn into it.
You might have heard about the Samsung Galaxy Fold, Motorola Razr and many other foldable phones. They use the same technology.
White OLED
White OLEDs emit a uniform bright white light that is more efficient than fluorescent lights. They also have the true-color qualities of incandescent lighting. Because OLEDs can be made in large sheets, they can replace fluorescent lights that are currently used in homes and buildings. Their use could potentially reduce energy costs for lighting.
Getting tired this early? There’s a whole tutorial of interfacing OLED with Arduino below and how you can use it to display your name.
On customer demands and high requirement, we have selected a few OLED display’s which are available for purchase on our website. Please have a look if you're interested in buying an OLED module.
Types of OLED available online
0.91 inch 128×32 Blue OLED Display Module with I2C/IIC Serial Interface
0.96″ OLED Display Module – SPI/I2C – 128×64 – 7 Pin (Blue)
1.3 Inch 128×64 OLED Display Screen Module with SPI Serial Interface – V2
Let's see quick interfacing of an 0.91 inch 128x32 blue OLED display with Arduino
What I will be showing?
I will be showing a quick scroll program on how you can scroll and display basic things.
I will be attaching the program below as well which will help you in particular.
Interfacing an OLED(I2C) with Arduino
If you don’t wanna read you can watch the video on the top of the blog.
1. Things required
[caption id="attachment_632153" align="alignnone" width="680"]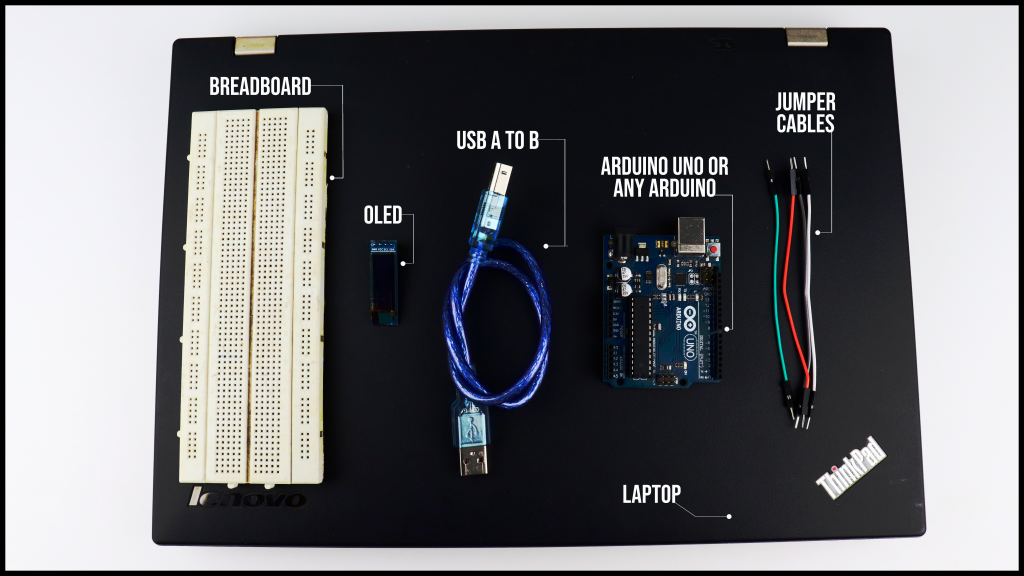 Fig.1.1 Things Required to interface[/caption]
- Breadboard
- OLED
- USB A to B
- Arduino Uno or similar
- Jumper Cables
- Laptop
2. Software required
- Arduino IDE
- Library of OLED Adafruit_SSD1306
- GFX Library Adafruit
3. Connection diagram
[caption id="attachment_632170" align="alignnone" width="680"]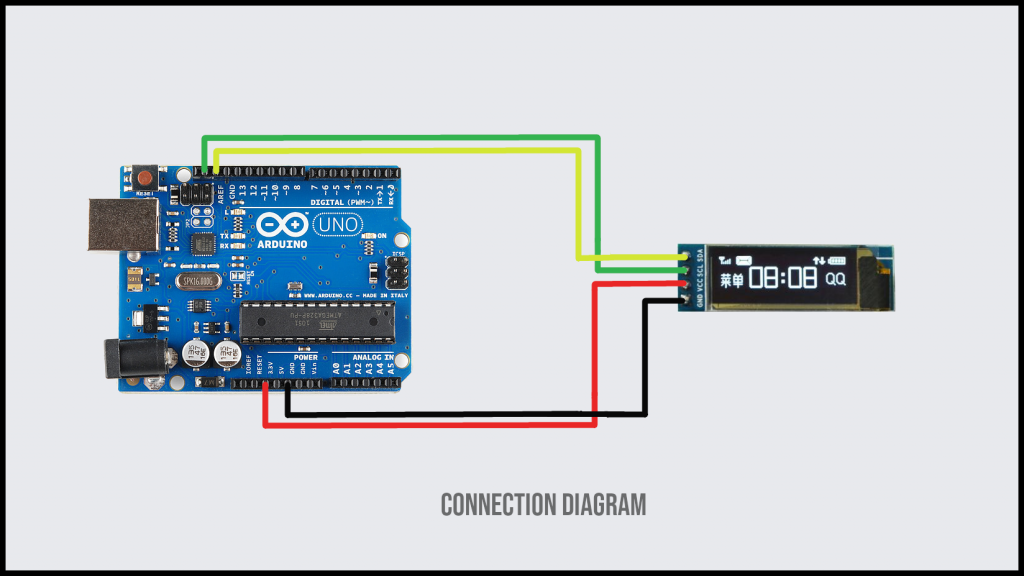 Fig.1.2. Connection Diagram of OLED with Arduino[/caption]
VCC connected to 3.3 Volt. Ground to Ground.
SCL to SCL and SDA to SDA( Check your SCL and SDA pin written behind the Board)
4. Program
#include <SPI.h>
#include <Wire.h>
#include <Adafruit_GFX.h>
#include <Adafruit_SSD1306.h>

Adafruit_SSD1306 display(-1);

void setup()
{
// initialize with the I2C addr 0x3C
display.begin(SSD1306_SWITCHCAPVCC, 0x3C);

// Clear the buffer.
display.clearDisplay();

// Display Text
display.setTextSize(2);
display.setTextColor(WHITE);
display.setCursor(0,15);
display.println("Robu.in!");
display.display();
delay(1000);
display.clearDisplay();

// Display Inverted Text
display.setTextColor(BLACK, WHITE); // 'inverted' text
display.setCursor(0,15);
display.println("Robu.in!");
display.display();
delay(1000);
display.clearDisplay();

// Changing Font Size
display.setTextColor(WHITE);
display.setCursor(0,15);
display.setTextSize(2);
display.println("Hello!");
display.display();
delay(2000);
display.clearDisplay();

// Display Numbers
display.setTextSize(2);
display.setCursor(0,15);
display.println("SKU:62312");
display.display();
delay(2000);
display.clearDisplay();

// Display ASCII Characters
display.setCursor(0,0);
display.setTextSize(3);
display.write(3);
display.write(3);
display.write(3);
display.write(3);
display.write(3);
display.write(3);
display.write(3);
display.display();
delay(2000);
display.clearDisplay();

// Scroll full screen
display.setCursor(0,0);
display.setTextSize(1);
display.println("Made with");
display.println("Love");
display.println("by Apurva");
display.display();
display.startscrollright(0x00, 0x07);
delay(2000);
display.stopscroll();
delay(1000);
display.startscrollleft(0x00, 0x07);
delay(2000);
display.stopscroll();
delay(1000);
display.startscrolldiagright(0x00, 0x07);
delay(2000);
display.startscrolldiagleft(0x00, 0x07);
delay(2000);
display.stopscroll();
display.clearDisplay();

// Scroll part of the screen
display.setCursor(0,0);
display.setTextSize(1);
display.println("Robu.in");
display.println("Follow on IG");
display.println("Subscribe on Youtube");
display.println("Like On Facebook");
display.display();
display.startscrollright(0x00, 0x00);
}

void loop() {}
5.Output
[caption id="attachment_632162" align="alignnone" width="680"]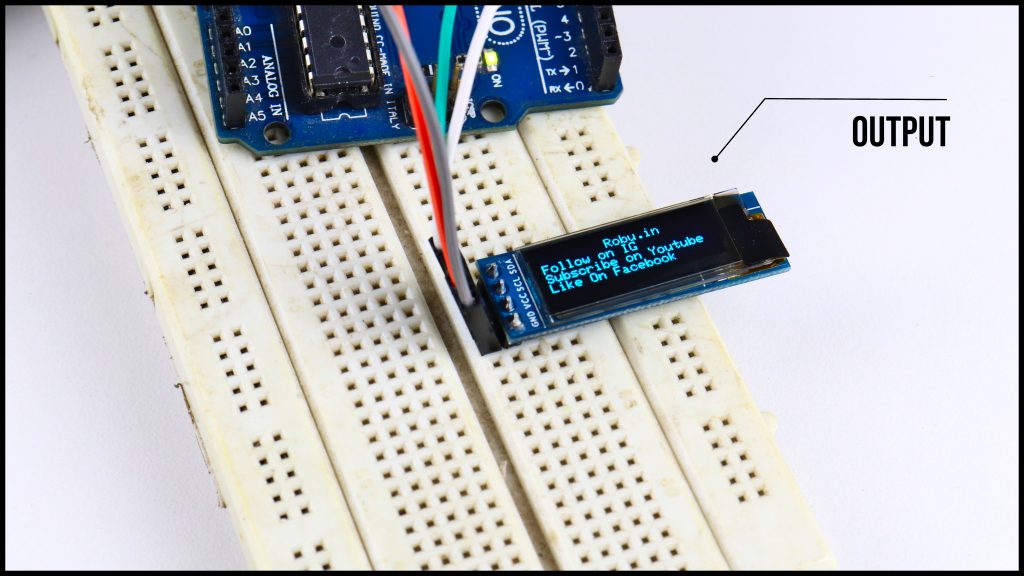 Fig.1.3 Output of the Code[/caption]
You can watch a video of interfacing an OLED with a Arduino
Now we will compare OLED straight with Standard LED and will see how the comparison goes.
Comparison

So What you think? who is the winner here?
So what did you learn today?
Conclusion
As we went through some short detail about OLEDs and how to interface it with an arduino. We can say that it is the technology that will be staying for a longer time, being energy efficient, brighter and having simpler construction. It’s a green technology that will empower the future.
So It was nice to see you people read till here!
See you next time.
If you still have any doubts please let us know in the comment section


