How to Work on Raspberry Pi 4 GPIO Using Python Language?
This article tells you how to work on Raspberry Pi GPIO using Python language.

The Raspberry Pi has two rows of GPIO pins, which are connections between the Raspberry Pi, and the real world. In this article, I will tell you everything on how to work on Raspberry Pi GPIO using Phthoon language.

As you know the Raspberry Pi organization recently launched their new development board called Raspberry Pi 4, they have added many more exciting features to their new innovation, but in this section, we are not going to discuss those innovations.
As there is already a blog on newly launched Raspberry Pi 4.
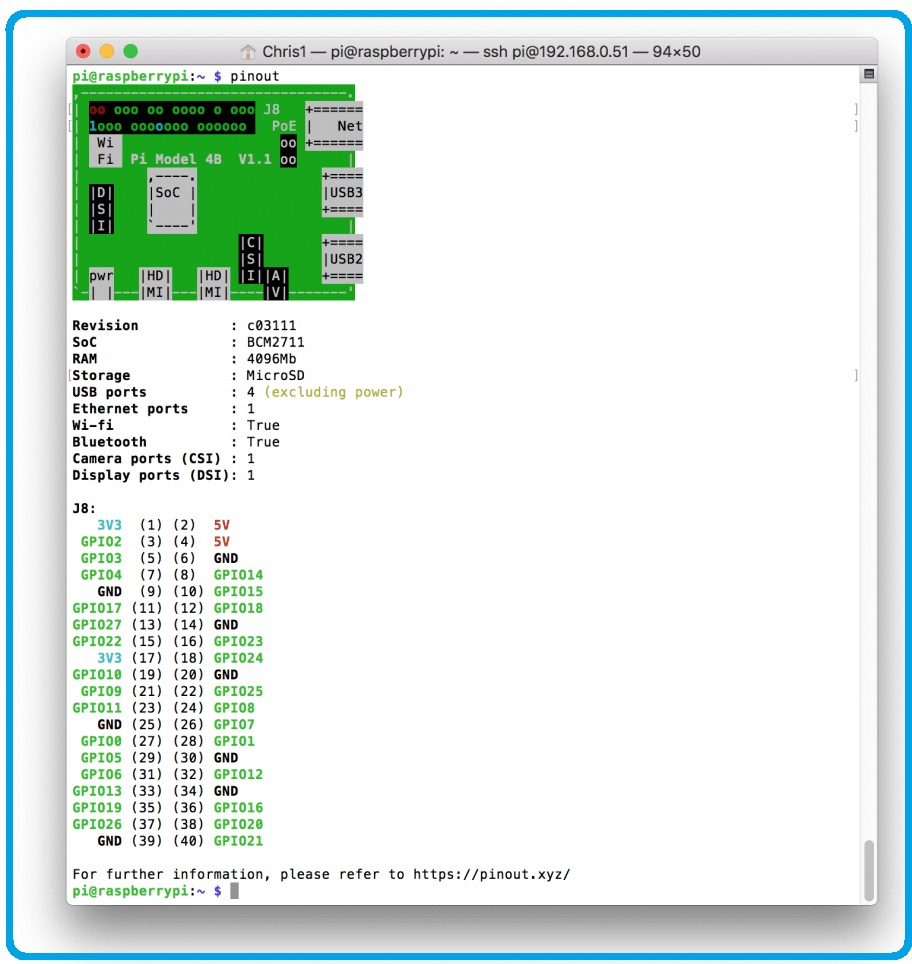
About Raspberry Pi 4 GPIO
In this section, we will focus solely on the Raspberry Pi 4 GPIO. So, before we begin, let me tell you the importance of GPIO pins.

The Raspberry Pi GPIO pin offers you many things that small-scale microcontrollers cannot. Features like multiple language support, a simple environment for IoT, and more. These features make the programmer's work more uncomplicated.
GPIO stands for the general-purpose input-output pin. I know that you know about this and also, I know that you know about its use, right!
Yes of course! We use this to connect the development board to the world. Connecting with the world here means connecting several sensors to the development board.
A sensor attached to the development board senses the data and sends it to Raspberry Pi and based on your written code, Raspberry Pi works on that received data.
It was about the sensor but what if you have a module that uses a communication protocol to communicate with the processor?
Don't worry, Raspberry Pi offers you a versatile option of communication protocol to meet your needs. We will discuss these protocols in our upcoming articles.
Hey wait, have I forgotten to tell you about the GPIO voltage level?
Yes of course! I apologize. How can I forget the most important topic of this discussion?
Like the Arduino DUE, the Raspberry Pi does not tolerate voltage levels higher than 3.3V on its GPIO pins. This means that you cannot run a sensor on a Raspberry Pi that requires a voltage higher than 3.3. Talking about the amperage rating, the Raspberry Pi 4 can deliver a maximum amperage of 16ma on each GPIO pin.
As well as simple input and output devices, the GPIO pins can be used with a variety of alternative functions, some are available on all pins, others on specific pins.
I2C Communication Protocol:
- I2CData = (GPIO2), Clock = (GPIO3)
- EEPROM Data = (GPIO0), EEPROM Clock = (GPIO1)
SPI Communication Protocol:
- SPI0:
- MOSI (GPIO10),
- MISO (GPIO9),
- SCLK (GPIO11),
- CE0 (GPIO8),
- CE1 (GPIO7)
- SPI1:
- MOSI (GPIO20),
- MISO (GPIO19),
- SCLK (GPIO21),
- CE0 (GPIO18),
- CE1 (GPIO17),
- CE2 (GPIO16)
UART Communication Protocol:
- TX = (GPIO14)
- RX = (GPIO15)
I hope the above information would help in your future projects. I know you might be thinking that this is a very short introduction on Raspberry Pi 4 GPIO but if I cover each and everything in this section then what do you extract from your upcoming articles. So, I am saving some interesting things for my future article.
In the next tutorial, we will work on relay modules and IR distance sensors. More importantly, we are using PYTHON to learn more about Raspberry Pi GPIO pins. so stay tuned !!


