Grid() Method – Grid Geometry Manager
In this tutorial, you will learn how to use Grid Manager in Tkinter.
Hello and welcome to this tutorial, in this tutorial, you will learn the next part of our Tkinter blog series, i.e. how to use Grid Manager in Tkinter. In our previous blog, we have discussed what Geometry Manager is and how to use Pack Layout Manager in Tkinter.
I hope you are clear with that part of our Tkinter series. If not, we request you to refer to our blog on Geometric Manager in Tkinter.
Why Grid Geometry Manager?
In our previous blog we talked about Pack Geometry manager, We can do almost everything using pack layout manager in tkinter Then why do we need grid manager?
Yes, we can do almost everything using the Pack Geometry Manager but it takes a lot of work to determine everything. Such as adding multiple frames and other complex tasks of adjusting widgets.
On the other hand, Grid Manager saves all your work and gives you all the options that make your work less complicated.
How To Use Grid Geometry Manager In Tkinter?
Before going through this let me show you the sample code of Grid Geometry Manager and of course, at this point, you do not need to worry about the methods that I have used in the following code.
In the further part of this blog, I will tell you about all these methods.
from tkinter import ttk
import tkinter as app

app_main_window = app.Tk()
label0   = ttk.Label(app_main_window, text="Label 1", background ='Orange')
label1   = ttk.Label(app_main_window, text="Label 1", background ='green')
label2   = ttk.Label(app_main_window, text="Label 2", background ='blue')
label3   = ttk.Label(app_main_window, text="Label 3", background ='magenta')

label0.grid(row=0, column=0)
label1.grid(row=0, column=1)
label2.grid(row=1, column=1)
label3.grid(row=1, column=2)

app_main_window.mainloop()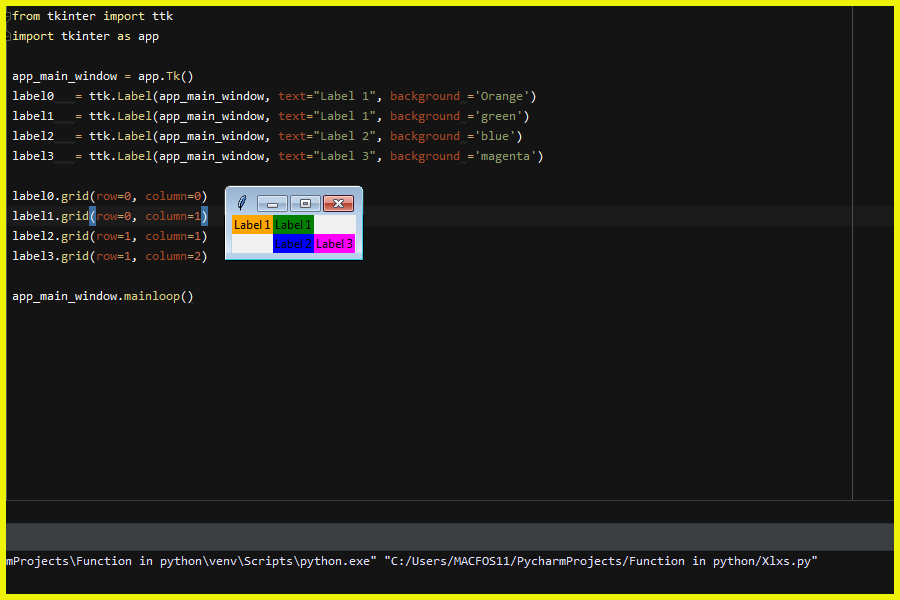
By looking at the code above, you might be thinking that Grid Geometry Manager Pack is a lot easier than Grid Geometry Manager.
Yes, you are right, Grid Geometry Manager is really easy to use. Grid Manager converts the layout into a 2-dimensional table and lets you easily access each of the cells of that table.
You just need to create a layout and give row and column values to the grid method of Grid Layout Manager. And the grid manager will automatically take care of the size and padding of the widget.
Also, there are other options available in Grid Layout Manager and we will talk about them one by one in the next part of this blog.
Rowspan and Columnspan Options in Grid Geometry Manager
In Grid Manager's sample code, we understood the use of row and column but what if we want to extend a particular widget to two or more rows or columns?
Sometimes when designing GUI, we need to show a widget on more than two rows or columns and we can do this using the rowspan and columnspan options of Grid Geometry Manager.
Resizing The Widget in Grid():
You have tried to run the above snippet of code in your IDE but have you tried to pull the GUI? When you drag the GUI, you may have noticed that the widget was not expanding,
Then how do you create a widget that will resize automatically when you drag the GUI?
Actually, such type of designing is called liquid UI.
Such liquid UI can be created using the Grid Layout Manager's rowconfigure and columnconfigure options.
Sticky Option in Grid()
Suppose we created a cell using the Grid Layout Manager and now we want the label to be placed in the west position of the cell but the Grid Geometry Manager is placing that widget in the center of that cell.
In that case, how would you position the widget in the west direction of the cell?
We can do this using the sticky option of grid layout manager.
Creating Liquid UI Using Grid()
By default, the layout manager places the widget in the center posture of the cell when the cell size exceeds the size of the widget placed in that cell.
We can override this rule by passing the sticky option to the grid layout manager.
Code For The Tkinter Geometry Manager
from tkinter import *
from tkinter import ttk

root = Tk()

content = ttk.Frame(root, padding=(3, 3, 12, 12))

Text1 = Text(content, borderwidth=5, relief="ridge", width=20, height=10)
submit_button_label = ttk.Label(content, text="Submit Comment: ")

Exit = ttk.Button(content, text="Exit")
Submit = ttk.Button(content, text="Submit")

content.grid(column=0, row=0, sticky=(N, S, E, W))

Text1.grid(column=2, row=0, columnspan=3, rowspan=2, sticky=(N, S, E, W))
submit_button_label.grid(column=0, row=0, columnspan=2, sticky=(N, W), padx=5)

Exit.grid(column=2, row=2)
Submit.grid(column=3, row=2)

root.columnconfigure(0, weight=1)
root.rowconfigure(0, weight=1)

content.columnconfigure(0, weight=1)
content.columnconfigure(1, weight=1)
content.columnconfigure(2, weight=1)
content.rowconfigure(0, weight=1)

root.mainloop()
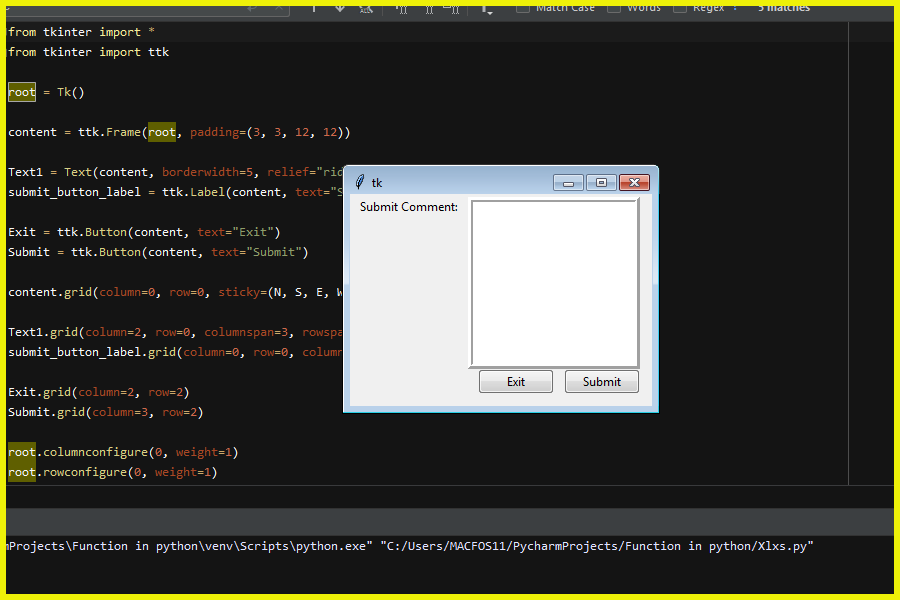
Output Of The Code:
Please drag the widget to the left or right to see the changes.
Padding Option In Grid Layout Manager:
When we tell rows and column values to the Grid Layout Manager, the Grid Layout Manager automatically adjusts the size of the widget but using the padding option we can give the widget some extra space.
This additional space of the widget is called the breathing area for the widget.
By using this option, we can adjust the appearance of the widget more clearly.
If you have experience with HTML markup language, then using this option will not bother you.
Tkinter Grid Spacing
We already know that we can simply pass the padding option for the widget and adjust the content of the widget, but another method is also available and that is making use of the Padx and Pady options of the grid layout manager.
Tkinter Grid Alignment
Similarly, we can also adjust the internal padding of the widget, but there we have to use the ipadx and ipady options of the grid layout manager.
The following code and the output of the code will clear your doubt.
from tkinter import *
from tkinter import ttk

root = Tk()
l = ttk.Label(root, text="First Label", background='green', anchor='center')
l.grid(row=0,column=1, sticky='e', padx=40, pady=40, ipadx=40, ipady=40)
m = ttk.Label(root, text="Star Label", background='red', anchor='center')
m.grid(row=1,column=1, sticky='w', padx=30, pady=30, ipadx=30, ipady=30)       # These Two Labels are in same cells

s= ttk.Label(root, text="Third Label", background='yellow', anchor='center')
s.grid(row=2,column=1, sticky='e', padx=20, pady=20, ipadx=20, ipady=20)

k= ttk.Label(root, text="Forth Label", background='orange', anchor='center')
k.grid(row=3,column=1, sticky='w', padx=10, pady=10, ipadx=10, ipady=10)

root.columnconfigure(1, weight=3)
root.mainloop()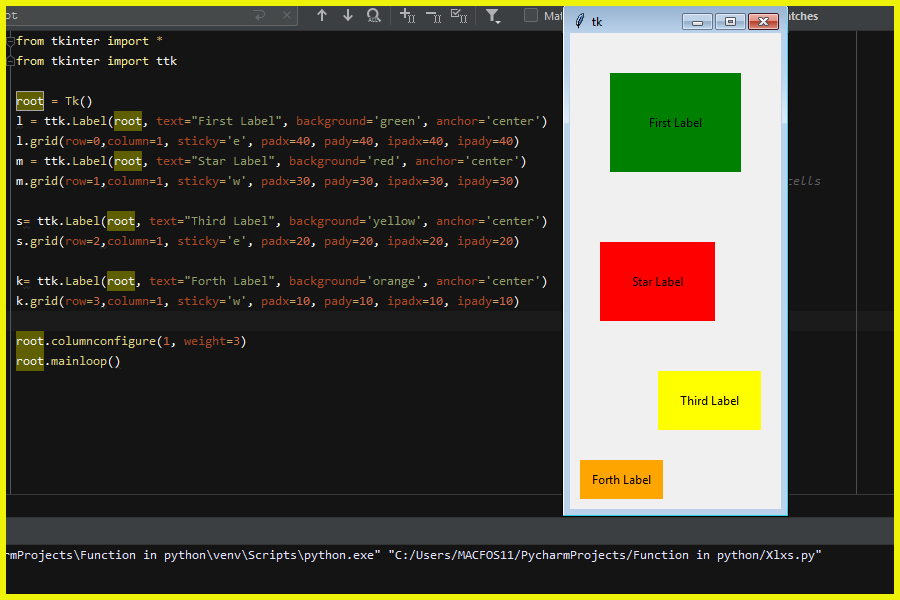
Conclusion - Tkinter|Grid() Method - Grid Geometry Manager
In this way we have learned how to use the grid layout manager in tkinter GUI. If there is any doubt please let me know in the comment section.
In our next blog, we will learn how to use Place Geometry Manager.


