How You Can Create Your Own Sound Reactive WS2812B Led Strip Using Raspberry Pi Pico
Led strips are a popular lighting solution for a variety of application like enhancing ambience of room, provide additional lighting in photography and do eye-catching lighting in festivals. The led

Led strips are a popular lighting solution for a variety of application like enhancing ambience of room, provide additional lighting in photography and do eye-catching lighting in festivals. The led strip we are using in our project is WS2812B. It is a programable led strip using which we can create our own patterns, color combinations, and led animations. All we need is a microcontroller to program it. In this project we are using Raspberry pi pico to program led strip.
By making the programmed led pattern react to beat of music we add extra interest to the project. To detect sound we are using a microphone module. The mic module can be placed near any sound source. The led animations will start on the beat of sound. This will make the led lights more interactive.
Hardware
To make this project you will require the below given components. Gather the components and make connections as per the circuit diagram.
Components
- WS2812B led strip
- Raspberry pi pico
- Micro USB cable
- Adapter 5V 3A
- LM393 sound detection sensor
- Jumper wires (F to F) – 4pcs
Circuit diagram
Library Installation Steps
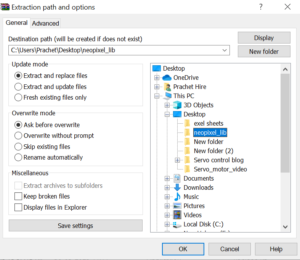
- Download zip folder and extract the zip contents to specific folder.
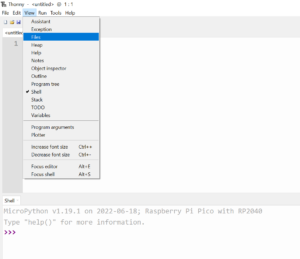
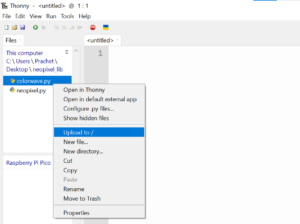
- Open Thonny IDE with Raspberry pi pico connected to COM port. Click on view and then files.
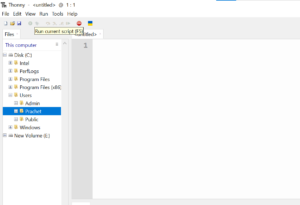
- Click on “This computer” and browse to path where you have extracted the zip folder contents.
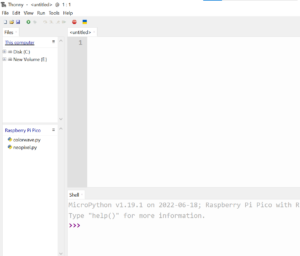
- There you will find two python files “neopixel.py” and “colorwave.py”. Upload both the files to raspberry pi pico.
The neopixel library is now installed.
How to use the library?
After importing the library we have to create a object from the “Neopixel” class and give it a name for eg – pix. The Neopixel class takes four arguments. First is the number of led’s in strip then the machine state number which is like a unique ID for our led strip and then the color scheme which is “GRB” – Green, Red, Blue.
pix = Neopixel(Number of led in strip(60), machine state number(0), Color scheme (“GRB”))
Once the object “pix” is created. Let’s see the different functions of the class.
- brightness(number) – This sets brightness of the led strip. When number is “0” it is minimum brightness and when number is 255 it’s maximum brightness
- show() – When this function is called it updates the changes made and the result is seen on the led strip.
- fill(RGB tuple) – This function fills all the led’s in the strip with the RGB color tuple passed in the argument. The tuple contains RGB values enclosed in two round brackets where 255 is maximum and 0 is minimum, for eg-(255,100,0) , in this the red is maximum (255) , green is medium (100) and blue is none (0). This tuple will create a yellow color.
- set_pixel_line(lower led number, higher led number, RGB color tuple ) – This function is used to light a set of leds in led strip for eg- only last ten leds from 49th led to 59th led. So the lower led number will be 49 and higher led number will be 59. The last argument is the RGB color tuple which sets the color.
- set_line_gradient(lower led number, higher led number, RGB color tuple, RGB color tuple) – This function is similar to the “set_pixel_line” function but it takes two color arguments and that is because it creates a gradient effect this means that there is a smooth transition between the two colors from lower led to higher led.
Once we know how to use the above functions in our code we can create our own custom led designs with custom colors.
Sound reactive fading led
Let’s program fading led effect and make it sound reactive.
Checking the sound sensor
To make the ws led strip react to sound we must read the ADC pin 26 on which our mic module is connected. The reading must happen continuously so the reading must happen within the while loop. The ADC value must be printed to the shell for us to see the real time changes in the ADC value when sound is made. So according to the observation the ADC value falls below 65535 when sound was made. This gives us the condition for our “if” statement in program.
Code
from machine import Pin, ADCfrom neopixel import Neopixelimport timemic = ADC(Pin(26))pix = Neopixel(60,0,0,"GRB")c=0
color_dict = {0:(255,100,0), 1:(255,50,0), 2:(0,255,0), 3:(0,0,255), 4:(255,0,0),
5:(0,255,100), 6:(255,255,255)}
while True:
mic_val = mic.read_u16()
print(mic_val)
if(mic_val < 65535):
c+=1
for a in range(255,0,-10):
pix.brightness(a)
pix.fill(color_dict[c%7])
pix.show()
time.sleep_ms(1)
Code explanation
When the sound is detected the count variable “c” is incremented by 1 and a “for loop“ is triggered which goes from maximum 255 to minimum 0 in steps of 10. The “for loop” variable sets the brightness of the led strip and therefore the brightness also varies from maximum to minimum giving us a fading effect.
The count variable is used to select the color from the dictionary (“color_dict”).
We use (c%7) mod seven because we don’t want the count to exceed above six as we have only seven colors in our dictionary. The mod function confines the count variable to a range of zero to six.
Finally we update the changes by calling the show() function and wait for 1ms. We can increase the speed either by lowering the delay or by increasing the step size.
Sound reactive running led (shooting star effect)
Let’s program running led effect and make it sound reactive.
To create a running led effect we must use the “set_pixel_line” function along with “for loop” as we have to animate that line in order to create a flowing effect.
Code
from machine import Pin, ADC
from neopixel import Neopixel
import time
import random
mic = ADC(Pin(26))
c=0
numpix = 60
pix = Neopixel(numpix, 0, 0, "GRB")
color_dict = {0:(255,100,0), 1:(255,50,0), 2:(0,255,0), 3:(0,0,255), 4:(255,0,0),
5:(0,255,100), 6:(255,255,255)}
black = (0,0,0)
s = 4
while True:
pix.brightness(255)
mic_val = mic.read_u16()
print(mic_val)
if(mic_val < 65535):
c+=1
pix.fill(color_dict[c%7])
time.sleep_ms(10)
for i in range(0,59-s,s):
pix.set_pixel_line(i,i+5,color_dict[c%7])
pix.show()
time.sleep_ms(1)
pix.fill(black)
pix.show()
Code explanation
Initially when the sound is detected. The ws led strip flashes with the color picked up by the count variable and then the “for loop” is triggered which goes from zero to the last led. The step size must be divisible by for loop range therefore we write “59 – s” where is the step size. We can change the step size and increase the speed.
Every time “i” increments in the “for loop” the “set_pixel_line” turns on five leds starting from the first led which is at position “i”. It keeps it on for 1ms and then turns it off by filling black color. The “i” variable increments and the next set of five leds turns on. The cycle repeats and the running led effect is achieved.
After the for loops iterates through all the numbers in range. The pix.show() function fill the leds with black color and that turns off all the led’s in strip. Ready to detect new sound.
Conclusion
This was the project. In this way we can program the WS2812B led strip with Raspberry pi pico and create our own sound reactive led light. If you have any doubt regarding any part of this blog then feel free to comment it. Our team will be there to assist you.
For more electronic projects. Check out our YouTube channel


