IR Thermometer Using Arduino
The tutorial will teach you the working principle of IR thermometer, learn how to design thermometer using Arduino and MLX90614ESF IR temperature module.

Nowadays we are seeing IR Thermometer guns everywhere, but do you know how they work? In this tutorial, not only you will learn the working principle of IR thermometer, but you will also learn how to design thermometer using Arduino and MLX90614ESF Non-Contact Human Body Infrared Temperature Measurement Module.
Content Of This Blog
- Working of MLX90614ESF IR Sensor
- Working Principle Of Contact less IR Thermometer GUN
- Components You Will Need To Design IR Thermometer Gun
- Features of MLX90614ESF Non-Contact Sensor
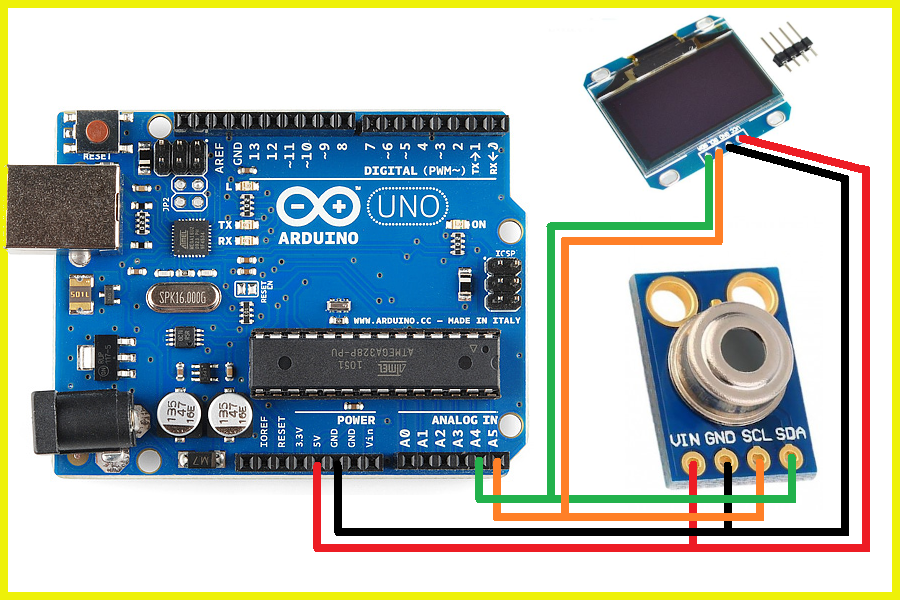
- Circuit Diagram For DIY Temperature Gun
- Arduino Code For IR Contactless Temperature Gun
Working of MLX90614ESF IR Sensor - DIY IR Thermometer GUN Using Arduino
So, how does an IR thermometer work? You may have previously used an NTC or PTC thermometer with arduino to measure the temperature of the object.
This type of the thermometer needs to be placed near the object whose temperature is to be measured, and then these sensors read the exact value of that object's temperature, depending on the change in resistance due to the change in temperature.
But don't you think that this is a very old thing and can also be the most sophisticated when the object is out of human reach. Yes, it is!
Many electronic scientists also thought same and they came up with a new idea of measuring temperature without making physical contact with the object. And they discovered IR thermometer for this work.

Working Principle Of Contact less IR Thermometer GUN
We know, every object that has an absolute temperature greater than zero has molecules moving around it.
These molecules radiate infrared radiation. That radiation is not visible to the human eye because it falls below the visible spectrum of light. The higher the temperature, the higher the radiation of light.
This radiated light emitted by the object is then captured by a detector called a thermopile.
A thermopile in the thermometer is a transducer that absorbs this infrared light emitted by an object and converts it into heat. This heat is then converted into electricity.
This electricity is then passed to the Arduino board which then determines the temperature of the object at which the thermometer is indicated based on the readings received from the MLX90614ESF Sensor.
Designing IR Thermometer GUN Using Arduino
By this point, you have learned the basics of IR thermometers. Next, we will learn how to interface the IR thermometer sensor with the Arduino board.
Components You Will Need To Design IR Thermometer Gun
Hardware Compoents List
- Arduino Uno/ Arduino Nano
- Connecting Cables
- MLX90614ESF Non-Contact Human Body Infrared Temperature Measurement Module
- OLED LCD
Software Compoents List
Assembling Parts For Designing A DIY IR Thermometer Using Arduino
I hope you have collected all these things, now the time has come to assemble all these things.
As we are designing a slightly complex circuit, I suggest that you try to assemble it on the breadboard first, once the circuit works properly, you can go ahead and do it on a solid PCB.
So, going forward, here in this project we are using an OLED display, on which we will display the exact temperature of the object. After that, we are using an MLX90614ESF thermometer sensor to absorb the heat emitted by the object.
Talking About MLX90614ESF Thermometer Sensor
The MLX90614ESF Non-Contact Human Body Infrared sensor that we are using to design the thermometer produces two modes of output PWM and TWI I2C.
If we use the PWM method we will get an accuracy of 0.14 ° C, while in TWI mode, it gives an accuracy of 0.04 ° C.
-
Works from 3.3V to 5V input, Module has power regulator IC built-in.
-
Standard I2C interface with built 2x pull up resistors
-
When measuring the temperature, please maintain a measuring distance of 1 cm
-
Small size, low cost
-
Easy to integrate
-
Factory calibrated in a wide temperature range: -40 to 125 °C for sensor temperature and -70 to 380 °C for object temperature.
-
High accuracy of 0.5°C over the wide temperature range (0..+50 C for both Ta and To)
-
Medical accuracy of 0.1°C in a limited temperature range available on request
-
The measurement resolution of 0.01°C
-
SMBus compatible digital interface for fast temperature readings and building sensor networks
-
Customizable PWM output for continuous reading
-
Simple adaptation for 8 to 16V applications
How To interface MLX90614ESF Infrared Temperature Sernsor with Arduino?
By this point, we learned what the MLX90614ESF sensor and the features of this sensor.
In this part of the blog, we will learn how to interface the MLX90614ESF sensor with Arduino to design a thermometer.
As we know that MLX90614ESF generates two types of output, we are using I2C communication to get more accurate results.
Circuit Diagram For DIY Temperature Gun

Arduino Code For IR Contactless Temperature Gun
#include <SPI.h>
#include <Wire.h>
#include <Adafruit_GFX.h>
#include <Adafruit_SSD1306.h>
#include <stdint.h>
#include <Adafruit_MLX90614.h>

#define OLED_RESET 4

Adafruit_SSD1306 display(OLED_RESET);
Adafruit_MLX90614 mlx = Adafruit_MLX90614();

#if (SSD1306_LCDHEIGHT != 32)
#error("Height incorrect, please fix Adafruit_SSD1306.h!");
#endif

void setup()
{
  Serial.begin(57600);
  Serial.println("Adafruit MLX90614 test");
  mlx.begin();
  display.begin(SSD1306_SWITCHCAPVCC, 0x3C);  //To find the I2C //Address Of your OLED please Check this Blog //https:create.arduino.cc/projecthub/abdularbi17/how-to-scan-i2c-address-in-arduino-eaadda
}


void loop()
{
    // Clear the buffer.
  display.clearDisplay();

  // text display tests
  display.setTextSize(1);
  display.setTextColor(WHITE);
  display.setCursor(0,0);
  display.print("Ambient: ");
  display.print(mlx.readAmbientTempC());
  display.print(" c");
  display.setCursor(0,10);
  display.print("Object: ");
  display.print(mlx.readObjectTempC());
  display.print(" c");
  display.display();
  delay(2000);

}
Note - To find The I2C Address of your OLED Display Please Check this Link
Conclusion
In this way, we learned how to design IR thermometer using Arduino if there is any doubt please let us know in this comment section.


