How to Setup Naze 32 Flight Controller
This guide takes you through the steps involved in setting up a Naze 32 Flight Controller

Hello geeks, in this blog, we will see, How to setup Naze 32 flight controller. Also, we will learn about the comparision of different versions of Naze 32 flight controller.
What is Naze 32 Flight Controller?
The Naze 32 is a small (36x36mm) flight controller based on 32-bit STM32 processor running at 72 MHz. Comparing to other popular FC such as the KK2, APM, pixhawk which are all based on 8-bit platform running at 16 MHz.
This board comes in two types, Acro Naze32 and Full Naze 32. The Full Naze 32 has additional barometer and compass. This FC is getting more and more popular with mini size multi copter, due to its excellent performance and small size.
Naze 32 versions in Revision 6
Currently, there are four core versions are available in Naze 32 flight controller. These are Acro, Naze 32 6DOF, Naze 32 10DOF, and Naze32 Full REV6.
All the versions use the same basic hardware such as the STM32F103CBT6 CPI running at 72 MHz with 16Mb of flash memory. The sensors is where each of the versions differ as shown in the table below.
Parameters |
Naze 32 6DOF |
Naze 32 Acro |
Naze 32 10DOF |
Naze 32 Full |
|
Barometer |
None |
BMP280 |
BMP280 |
MS5611 |
|
IMU sensor |
MPU6500 |
MPU6500 |
MPU6500 |
MPU6500 |
|
Magnetometer |
None |
None |
HMC5883 |
HMC5983 |
This flight controller has built in SPI flash. All the revision 6 boards include a built in black box flight data recorder which is great. The 6 DOF, Acro and 10 DOF Naze boards have 16Mbit on board SPI flash.
However, the Full version includes 128Mbit on board SPI flash so this just means you can store more flight logs on your full board.
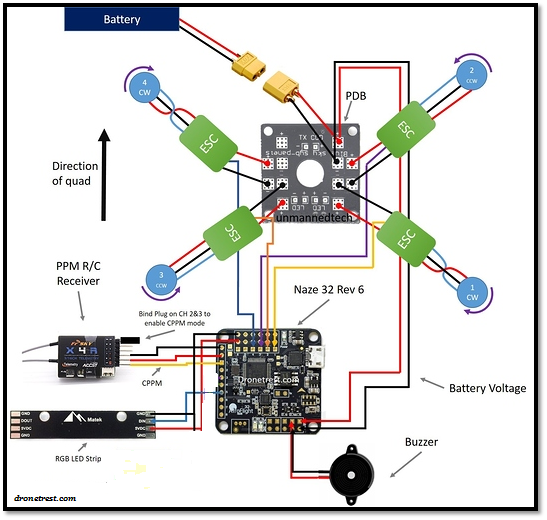
Naze 32 connection diagram
Kindly check the below connection diagram for simple quadcopter using optional RGB LED bar.
Using RGB LED bar in your Naze 32 is one of the coolest features for FPV flying. You can add smart features to your LED, so when you are turning left, the Left LED’s can flash. When you slow down the lights can glow bright red, just like a car brake lights.
Depending on your RGB LED strip power requirements you might need to connect it directly your battery, or BEC.
Naze 32 LED’s and their meanings
Each Naze 32 has three LED’s on the board, one located close to the USB port to indicate if it’s powered or not. The other two are located next to the spectrum connector and are used to provide some details as to what is happening on your flight controller according to various flashing sequence:
- Red + Green + Blue on solid - device is in boot loader mode
- Green flashing - indicates the board is not armed (if you can’t get your board to arm see below)
- Green on solid - the board is armed
- Green + Red on solid - board is armed and is in horizon / self-level mode
- Red + Green flashing one after another - board is calibrating accelerometers / compass
Naze 32 Firmware
The Naze 32 boards can run either base flight or clean flight firmware. Both are very similar but clean flight Firmware is more updated. Kindly go through the below link and install this software.
Link: https://chrome.google.com/webstore/search/cleanflight?hl=en
After installation of the software,
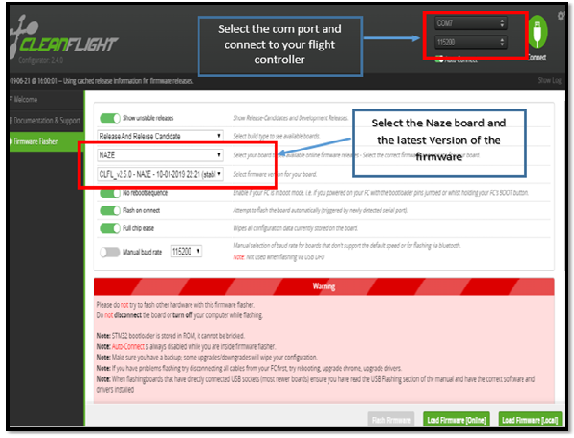
- kindly connect your flight controller to the PC and select the com port.
- Then select the latest firmware and click on the Load Firmware (Online) button at the bottom of the screen and Clean flight will download the firmware onto your PC.
- Once done, you will see that the ‘Flash Firmware’ button. After that, we first need to enable the bootloader mode.
- Bootloader mode allows to flash firmware onto the flight controller board. The process of enabling bootloader mode is very simple. You need to do is short the two bootloader pins (as shown below) as you connect the flight controller to your PC.
- Now that the board is connected to the PC in bootloader mode, you simply have to click the Flash Firmware button.
If this works straight away, then great! This isn’t usually the case however. You usually need to change a few settings. This is the process I follow:
- Go back up the page and turn on ‘Flash on Connect’ (first select ‘No reboot sequence’) and ‘Full Chip Erase’ for good measure.
- Unplug the board and connect it again (still in bootloader mode). Clean flight will then attempt to flash the firmware automatically upon connection.
- Didn’t work again? Hit ‘Flash Firmware’ again just to make sure.
- Last but not least, if you’ve been through all of this, unplug the board again and select ‘Manual Baud Rate’ (whilst keeping the other options selected). You might also want to try a slower baud rate just to make triple sure.
- Plug the board in again and hey presto! Hopefully, the firmware is being flashed.
- If you are still having problems, make a quick video of what you are doing and post it on our forums and one of us will help you out!
Frequently faced Issue- Naze 32 is not arming.
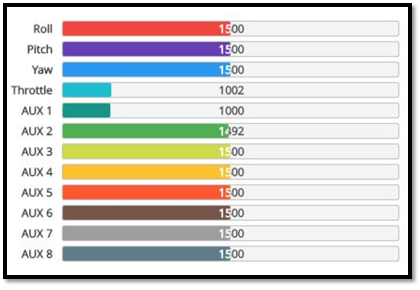
- Do the radio setup properly.
Kindly do the radio settings correctly. This means to make sure that the channels are correctly assigned and not reversed. Also keep the range is between 1000-2000.
2. Do the sensor calibration properly like accelerometer, compass.
3. Kindly check the throttle failsafe-
A common error is the PWM failsafe value that is set on clean flight. Software has a failsafe to turn off the motors and disarm if it looses connection to your R/C controller.
However sometimes this might be higher than your actual radio throttle idle value, so the failsafe would activate so you will either need to change the throttle idle value on your radio, or change the value within clean flight. But please make sure that you do set a failsafe and have configured this on your R/C receiver as you don’t want your drone to fly away accidentally.
We at Robu.in hope that you found it interesting and that you will come back for more of our educational blogs.
MUST READ BLOGS ON FLIGHT CONTROLLER


Great post I really enjoyed reading your step-by-step guide on how to configure the Naze 32 flight controller. The instructions were clear and concise, making it easy for beginners like me to understand. I appreciate the inclusion of screenshots, as they helped me visualize the process. Your enthusiasm for the topic shines through in your writing, making it an engaging read. Keep up the excellent work, and I look forward to reading more of your informative articles in the future!
Please checkout my website watdafeck.uk