Host your own Discord Bot on Raspberry Pi 5
Today we’ll be showing you how to make your own discord bot and host it on Raspberry Pi 5 seamlessly. Before we begin, we need few perquisites like basic knowledge

Today we'll be showing you how to make your own discord bot and host it on Raspberry Pi 5 seamlessly. Before we begin, we need few perquisites like basic knowledge in python and functional programming.
So without any further ado, let's get started.
Table of Contents
What is Discord ?
Discord is an instant messaging and VoIP social platform which allows communication through voice calls, video calls, text messaging, and media and files. Communication can be private or take place in virtual communities called "servers". Basically a group chat but better.
What is Discord Bot ?
A Discord bot is any bot added to a Discord server to automate tasks that are ordinarily performed by humans, such as sending private chats and texts, orienting new members and users, moderating interactions between members, in chats, and more like playing music, games, etc.
Raspberry Pi 5
Raspberry Pi is a series of small single-board computers developed in the United Kingdom by the Raspberry Pi Foundation in association with Broadcom. And Raspberry Pi 5 is the next successor to Pi 4 as its made on 16nm architecture compared to its predecessor which is 28 nm. Making it power efficient per cycle.
Some key features are -
- 2.4GHz quad-core, 64-bit Arm Cortex-A76 CPU, with 512KB L2 caches and a 2MB shared L3 cache
- VideoCore VII GPU
- LPDDR4X-4267 8GB SDRAM
- 2.4 GHz and 5.0 GHz 802.11ac Wi-Fi
- Bluetooth 5.0 / Bluetooth Low Energy (BLE)
- Micro SD card slot, with support for high-speed SDR104 mode
- 2 × USB 3.0 ports, supporting simultaneous 5Gbps operation
- 2 × USB 2.0 ports
- Gigabit Ethernet, with PoE+ support (requires PoE+ HAT)
- 2 × 4 lane MIPI camera/display transceivers
- PCIe 2.0 x1 interface for fast peripherals
- 5V/5A DC power (PD enabled)
- Raspberry Pi standard 40-pin header
- Real-Time Clock (RTC), powered by an external battery
- On-board power button
Python
Python is a high-level, general-purpose programming language. Its design philosophy emphasizes code readability with the use of significant indentation. Python is dynamically typed and garbage-collected. It supports multiple programming paradigms, including structured, object-oriented and functional programming.
It has pretty huge and active community backing it up, making new libraries and add-ons for it everyday.
Hardware Requirements
- Raspberry Pi 5
- Pi 5's cooler
- Pi 5's Case
- 32GB SD Card or 64GB
- A stable internet connection
Software Requirements
- Python
- Visual Studio Code
- discord.py
- Raspberry Pi Imager Tool
Setting up Raspberry Pi 5
Get a Micro SD Card of size 16GB at least or more is preferred of Class10 grade. Download Raspberry Pi Imager tool from Raspberry Pi official website and connect your card to your pc.
Open up your Imager tool and connect the SD card to your PC, it should show up under storage menu and select it.
Moving on to selecting device, select Raspberry Pi 5 and under OS menu, select the Raspberry Pi 5 64 bit OS with desktop.
Click next and set your network credentials and configurations such as root/admin password before starting the process of flashing the SD card.
After clicking start, it should take around 20-30min depending on your internet speed as it'll download Raspberry Pi OS and install it on the SD card.
After the Imager says its complete, remove the SD card and slot it into the raspberry Pi 5 and power it up. It'll take few minutes as it its first boot, so it'll set up few things. When you finally come to the desktop, open up the terminal and run the following commands one by one -
sudo apt-get update
sudo apt-get upgrade -y
and to install python libraries/ packages, the syntax to install them system wide is -
sudo apt install python3-[package_name_here_without _the_brackets]
It might take some it as it'll download the latest and update the already installed packages.
This is optional - Install VS Code from the Raspberry Pi recommended software section. After its done, open it up and move to the extensions menu on the left side. Install python extension, and your IDE is ready to execute python programs.
Discord Developer Portal
Firstly you need to have a discord account, in order to have access to the developer portal.
After logging into developer portal, create new application. Give your bot a name and create.
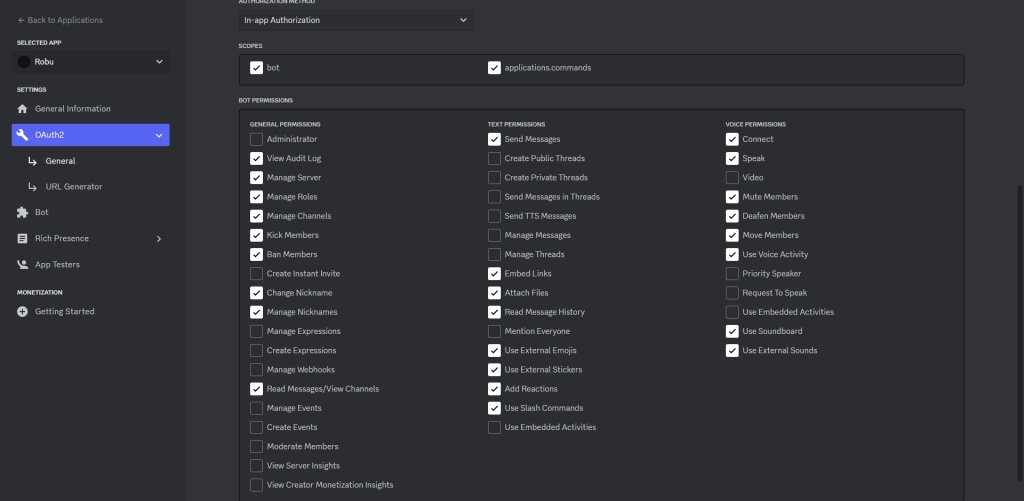
After creating you'll go to OAUTH2 menu and setting up authorization link as "In-app authorization"
and below that bot permissions as such.

and hit the save changes.
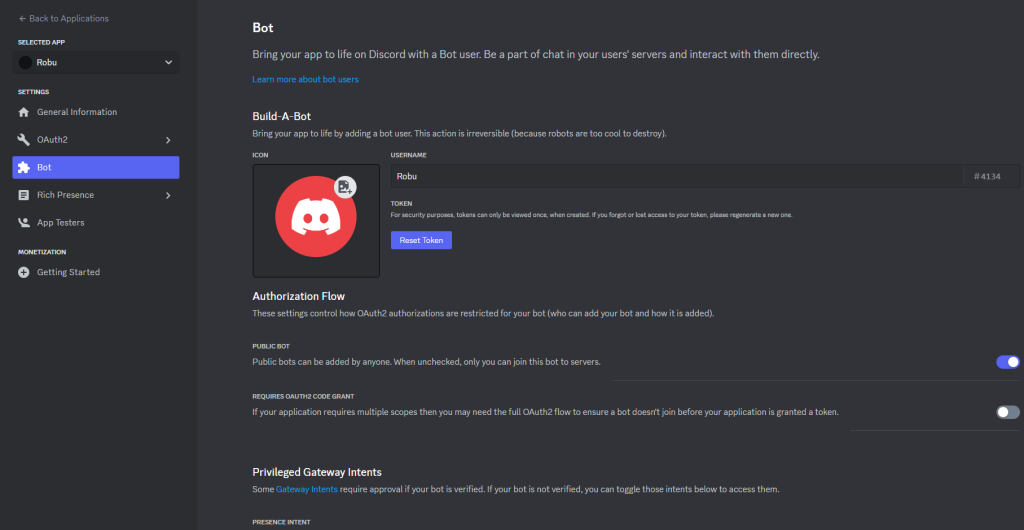
Moving to the Bot menu below OAuth2, you'll need to copy the token after you've reset it. Cope the token and save it somewhere secure for now. Don't share this token anywhere else, as anyone will be able to use this token to use your bot and do unwanted or malicious stuffs.
Note - If you lose the token, you'll need to reset the token again

Just below this you'll see 3 Privileged intents and slider button for each of them. Turn all the intents on as well need them later on.
Visual Studio Code
Moving onto Visual Studio Code. You'll need to have the python extensions installed. If not then go to the extensions menu on the left, and download the extension for python. Wait for few minutes as it installs the extensions.
Create a folder for the bot and all of its stuff to store them in one place.
For us, we'll be making Robu.py, as our bot's name is Robu. Its name doesn't matter. Name it what ever you want it.
In that file you'll need to import the libraries, setup variables and write functions which will handle the interactions with the chat and respond to commands.

Make an "token.env"" file where we'll store all our credentials and passwords. like in this format.
After the "=", just paste the token normally without any space after =.

like such is the image.
We've written a command named "hello", where it'll ask for your name or a string as a input. And it'll reply back as such "Hello [the string you've entered]".
We can invoke the command by typing /hello or +hello where + is the prefix.
Note- prefix method is slowly being rolled out. Hence we gonna be using / to invoke commands.
But before we give bot any command, we need to invite it to our server first.
Head over to the developer portal, and under OAuth2 -> URL generator. Select bot, and select the permissions you'd want to give the bot. And copy the link below.
By pasting it in your browser, you'll be prompted to authorize the bot to join server of your choice.
After successfully inviting your bot to your server, it should look like this.

Now, going back to the IDE, we run the file. And it should look like this if everything till now is okay.

And you'll also see your bot online in your server.

typing the command name with / as prefix will let you access your command.

if the command works without throwing any error on IDE, then this should be the reply from the bot.

Coding
This is a simple code to test out different functions, and commands.
import discord
from discord import app_commands
from discord.ext import commands
from dotenv import dotenv_values

import random
import warnings


warnings.filterwarnings("ignore", category=RuntimeWarning)


intents = discord.Intents.all()
intents.voice_states = True

client = commands.Bot(command_prefix='+', activity=discord.Game(name="/help To know more"), intents=intents)


@client.event
async def on_ready():
    print(f'{client.user} has connected to Discord Server\n')
    for guild in client.guilds:
        print("Server Name:",guild.name,"  Server ID:",guild.id,'\n')
    #print(song_queue)

    try:
        synced = await client.tree.sync()
        print(f"Synced {len(synced)} Commands")

    except Exception as e:
        print(e)

@client.event
async def on_guild_join(guild):
    print("Joined :", guild.name)

@client.event
async def on_guild_remove(guild):
    print("Left :", guild.name)


# TEST #########################################################################################################################################################################

@client.tree.command(name="hello", description="Simple hello command")
@app_commands.describe(your_name = "Enter your Name")
async def hello(interaction: discord.Interaction, your_name:str):
    return await interaction.response.send_message(f"hello {your_name}", ephemeral= True)


# UTILITY COMMANDS #############################################################################################################################################################

@client.tree.command(name="ping", description="Check Latency")
async def ping(interaction: discord.Interaction):
    return await interaction.response.send_message(f"Ping: "+str(1000 * round(client.latency,3))+"ms", ephemeral= True)


@client.tree.command(name="getuser", description="Get's Users ID")
@app_commands.describe(user= "Select User")
async def hello(interaction: discord.Interaction, user:discord.User):
    if interaction.user.guild_permissions.administrator:
        return await interaction.response.send_message(f"Discord ID: {user.id}", ephemeral= False)
    else:
        return await interaction.response.send_message(f"You dont have permission for this command", ephemeral= True)


# GAME COMMANDS ################################################################################################################################################################

@client.tree.command(name="toss", description="Toss a coin")
async def toss(interaction: discord.Interaction):
    coin = random.randint(0, 1)
    if coin % 2 == 0:
        return await interaction.response.send_message("Heads")
    else:
        return await interaction.response.send_message("Tails")


client.run(dotenv_values("token.env")["BOT_TOKEN"])
You can study this code, and their original documentation here. If you have doubts about it, you can ask down below in the comments section.
Conclusion
Now you've got yourself a working bot, which replies to a command from the server. Now with the knowledge of python and help from discord.py documentation, you can build a custom discord bot pretty easily. Just make sure you can accidentally public the bot's or any other access token, as it could be pretty dangerous.
You can also setup the cron to execute the bots main script on powering up the Pi 5 automatically.
And happy tinkering 🛠.


Good blog