How To Make Automatic Hand Sanitizer Dispenser Using Arduino – DIY
The tutorial will help you to design your own automatic hand sanitizer dispenser.

Today, we are going to know how to make automatic hand sanitizer dispenser using Arduino board.
As we know that COVID-19 disease is spreading wildly and our government and doctors are telling us that we can avoid this disease by washing hands regularly.
But what if someone who is not infected with Covid-19 touches the hand sanitizer previously used by the COVID-19 infected person? This action will also infect a normal person.
So how will you protect your apartment, your hospitals? The answer to these questions is the use of automatic hand sanitizer dispenser.
In this tutorial, I will help you to design automatic hand sanitizer dispenser and to design it you will need the following components.
Here's the video for this DIY tutorial.
Components You Will Need To Design An Automatic Hand Sanitizer
Hardware Part
- Ultrasonic Sensor/ IR sensor
- Arduino Nano / Arduino Uno
- Relay Module 1 Ch/ 2 Ch
- Water Pump
- Soapy Water Container
- water valve
- Power source
Software Part
How To Design An Automatic Hand Sanitizer Dispenser?
I hope you have bought everything to move forward. Before we begin, let's get an idea of the working principle of a normal hand sanitizer. The following image shows a picture of a normal hand sanitizer.
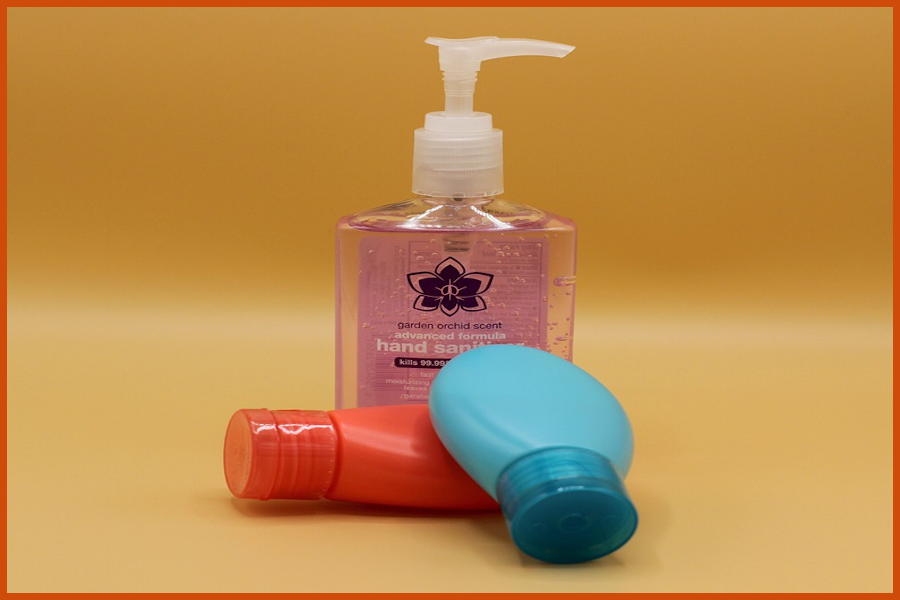
In the above picture, you can see a normal hand sanitizer and to operate this hand-sanitizer, we have to apply pressure on it and when we apply pressure on it, it creates pressure on the liquid in the bottle and when the pressure is released, hand sanitizing liquid will be pumped out.
So this was the basic introduction to the work of general hand sanitizer, now we will apply this logic in the design of automatic hand sanitizer dispenser.
To design an automatic hand sanitizer dispenser, first, we will need a container to store soapy water. After that, we will need something that will pump soap water and this thing is a DC water pump.
The DC water pump will pump out soapy water for us. But what is it that will trigger the water pump? The answer to this question is as follows.
Distance Sensor For Automatic Hand Sanitizer Dispenser
There are different types of sensors available in the market for distance sensing but for this tutorial, we will use one of the following two sensors.
Ultrasonic Sensor for Automatic Hand Sanitizer Dispenser
The ultrasonic sensor uses ultrasonic sound waves to detect the object. The transmitter of the sensor transmits ultrasonic waves and the receiver of the module receives those ultrasonic waves.
We have created a blog on the working principle of ultrasonic sensors, if you want to know more about these sensors then we request you to check this blog.
Interfacing Ultrasonic with Arduino
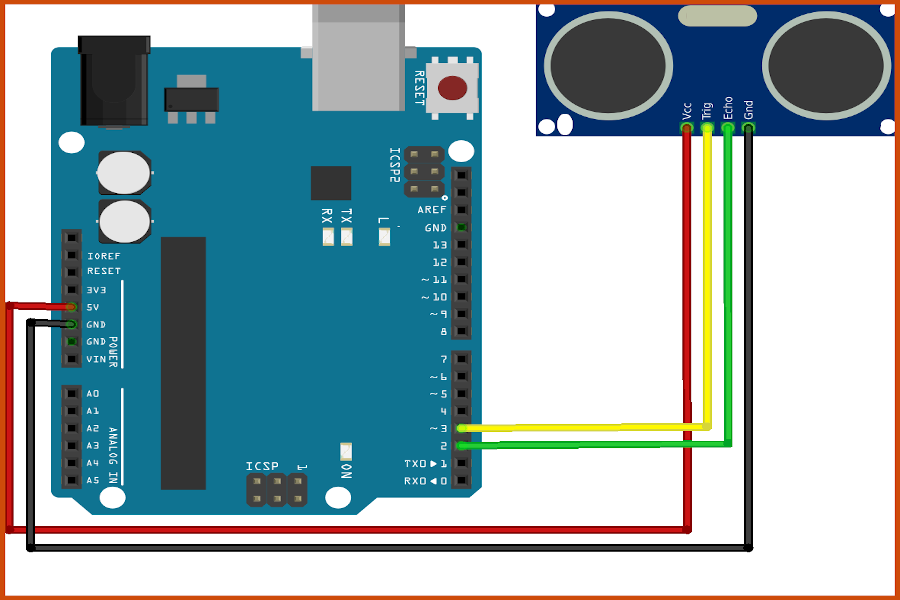
The following figure shows the interface of the ultrasonic sensor with the Arduino. In this, we have connected the trigger pin of the ultrasonic sensor to the D3 of the Arduino board and the D2 pin of the Arduino to the echo pin of the ultrasonic sensor.
Arduino Code For Ultrasonic Sensor
    const int trigPin = 3;
    const int echoPin = 2;
    // defines pins
    long duration;
    int distance;
    void setup() {
    pinMode(trigPin, OUTPUT); // Sets the trigPin as an Output
    pinMode(echoPin, INPUT); // Sets the echoPin as an Input
    Serial.begin(9600); // For serial communication
    }
    void loop() {
    digitalWrite(trigPin, LOW);
    delayMicroseconds(2);
    digitalWrite(trigPin, HIGH);
    delayMicroseconds(10);
    digitalWrite(trigPin, LOW);
    duration = pulseIn(echoPin, HIGH);
    //Distance calculation
    distance= duration*0.034/2;
    // Printinng the distance on the Serial Monitor
    Serial.print("Distance: ");
    Serial.println(distance);
    }
IR Sensor For Automatic Hand Sanitizer Dispenser
This is the second option(As a distance sensor) you can use in the design of an automatic hand sanitizer machine. This sensor uses a light source to detect the obstacle.

The above figure shows the connection diagram. In the above image, we have used IR sensors for object detection. If you don’t have an IR sensor then you can use the Ultrasonic sensor. In the above image, we have connected the IR sensor on pin number 2.
Arduino Code For IR Sensor
#define IRsensor 2
void setup()
{
  pinMode(IRsensor, INPUT);
  Serial.begin(9600);
}
int readPin = 0;
void loop()
{
 readPin = digitalRead(IRsensor);
 Serial.print("IR Sernsor Output = ");
 Serial.println(readPin);
 delay(200);
}
Up to this point, we have discussed the types of sensors used in the design of hand sanitizers, but what is it that will make the connection between these sensors and DC water pumps?
That thing is the Arduino board. The Arduino board will read the signals from these sensors and trigger the relay board when a predicted condition is found (For Example if the distance is below 5CM )and then the relay will turn on the DC motor after receiving the signal from the Arduino.
Now, you might be wondering what is the reason for using a relay module between the DC water pump and Arduino? The reason for using the Arduino is that the Arduino cannot generate more than 5V on its GPIO pins which is why we have to use a relay module to power the 12V DC water pump.
Interfacing Relay with Arduino
The relay is an electrotechnical switch that is used to trigger high volt applications using low volt signals. To turn on the DC water pump, we are using this 5V relay module. The interfacing diagram of the relay module with the Arduino is as follows.
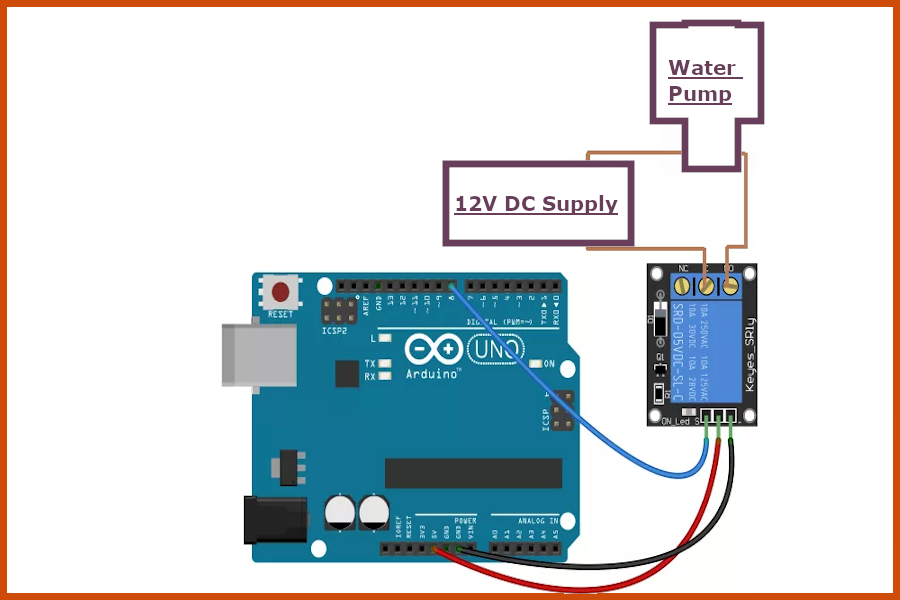
In this, we have connected the relay module to the D7 pin of the Arduino board.
Arduino Code For Relay Module
#define DCwater_pump 8
void setup()
{
  pinMode(DCwater_pump, OUTPUT);
  Serial.begin(9600);
}

void loop()
{
 digitalWrite(DCwater_pump,HIGH);
 Serial.println("DC Pump is ON Now!!");
 delay(500);
 digitalWrite(DCwater_pump,LOW);
 Serial.println("DC Pump is OFF Now!!");
 delay(500);
}
Arduino Code for Automatic Hand sanitizer
Up to this point, we discussed what would be needed to design an automated hand sanitizer. After this point, we are integrating all of the above things into one place.
Code for Automatic Hand sanitizer (IR sensor)
#define IRsensor 2
#define DCwater_pump 8
void setup()
{
  pinMode(IRsensor, INPUT);
  pinMode(DCwater_pump, OUTPUT);
  Serial.begin(9600);
}
int readPin = 0;
void loop()
{
 readPin = digitalRead(IRsensor);
 if (readPin == HIGH)
{
 digitalWrite(DCwater_pump,HIGH);
 Serial.println("DC Pump is ON Now!!");
 delay(500);
}
else
{
 digitalWrite(DCwater_pump,LOW);
 Serial.println("DC Pump is OFF Now!!");
 delay(500);

}
}
Code for Automatic Hand Sanitizer (Ultrasonic Sensor)
    const int trigPin = 3;
    const int echoPin = 2;
    #define DCwater_pump 8
    // defines pins
    long duration;
    int distance;
    void setup()
{
    pinMode(trigPin, OUTPUT); // Sets the trigPin as an Output
    pinMode(echoPin, INPUT); // Sets the echoPin as an Input
    pinMode(DCwater_pump, OUTPUT);
    Serial.begin(9600); // For serial communication
}
    void loop()
{
    digitalWrite(trigPin, LOW);
    delayMicroseconds(2);
    digitalWrite(trigPin, HIGH);
    delayMicroseconds(10);
    digitalWrite(trigPin, LOW);
    duration = pulseIn(echoPin, HIGH);
    //Distance calculation
    distance= duration*0.034/2;
    // Printinng the distance on the Serial Monitor
    Serial.print("Distance: ");
    Serial.println(distance);

 if (distance < 30)
{
 digitalWrite(DCwater_pump,HIGH);
 Serial.println("DC Pump is ON Now!!");
 delay(500);
}
else
{
 digitalWrite(DCwater_pump,LOW);
 Serial.println("DC Pump is OFF Now!!");
 delay(500);

}
}
Conclusion
In this way, you have learned How To Make An Automatic Hand Sanitizer Dispenser Using An Arduino Board.
If there is any doubt, feel free to ask me in the comments section. In our next blog, we will learn how to make a DIY IR Thermometer Gun Using An Arduino board.
More To Explore


Hello sir. Here, we are using arduino ide software and this software is available in smart phone.
Thanks for the Automatic Hand Sanitizer Dispenser Using Arduino i read from different blogs but i get all realistic concept cleared here including circuit diagram but some parts i ordered online well working.Kindly make one on temperature detection thermometer very much required sir.
You delivered such an impressive piece to read, giving every subject enlightenment for us to gain information. Thanks for sharing such information with us due to which my several concepts have been cleared about Hand Santizer stand.
Hello Sir. This is really very nice project. I completely inspired and ordered parts from Robu.in. Built on module. its running perfect for me. One question. If i do not remove hand from IR sensor, pump is running continuously. I have no idea what kind of function i can use to restrict pump running continuously if someone do not remove hand from IR sensor. Could you please guide me on the program?
Sir, Iordered
srd 05vdc sl c relay
But got this jqc-3ff-s-z relay will it work with it is not printed DC on it…
Hello Sir,
Thank you for your comment. If that is a 5v operated relay then you can use it.
Hello Vishal why Arduino board
You can make it without using any microcontroller it makes mass production cheaper
Hello Sir,
Thank you for your comment. Yes it is possible to design this project without using the arduino(For example you can use 555 timer modules), but to simplify it here we have used the arduino board.
How to connect relay and sensor to same 5v port
Hello Sir,
Thank you for your comment, You can connect both things on the same 5v pin.
Hi Mr.Vishal, Thanks for the most needed project, I really liked it, but I’ve a request, it will be better if you can program it and develop for any MCU, it will be very cost-effective and all project can be developed on a single PCB with Relay Section and MCU….
Hello Sir,
Thank You for your appreciation. That is a great idea,our respective team will definitely think about it.
Sir, I tried using your program but it is showing “DCwater_pump was not declared in this scope” error
please help.
Hello Dnyanesh Narhe, Thank you for the feedback. That was a code error, we apologize for the inconvenience. we have now cleared that error and you can use that code now. (Use the updated code)
how about if someone keep hand there for long? the dozes of sanitizer would keep coming after 0.5sec gaps, which actually not required. Pls. suggest code that after one doze of sanitizer, one has to remove the hand away, or next person should come, to activate the next doze drop.
Also, the system should stop after 3 sec sensing the hand in order to prevent wastage
Sir not run dc moter
Thank you for your comment. You should check the connection and make sure that you are connecting the relay pin to the correct pin number.
Connect positive terminal of dc motor to +5V to +12V as per motor working voltage requirement. Use relay to act as switch to give GND to dc motor. I mean your ground should be anywhere connected to Common or Normally Open terminal of relay. Now connect remaining connection (either Normally Open or Common) to dc motor negative terminal. So when relay gets On , your motor will get dc voltage and it would start working.
Can I do the same using a Arduino nano?
Yes, mate! You can use Arduino nano instead of Arduino Uno.