Geometry Management In Tkinter APP – Place, Pack, Grid Managers
In this tutorial, we will learn how Grid Manager works in Tkinter and how we can use Pack, Place, and Grid Geometry / Layout Managers in Tinker
Hello Geek, welcome!! In this tutorial, we will learn how Grid Manager works in Tkinter and how we can use Pack, Place, and Grid Geometry / Layout Managers in Tinker?
In our previous blog, we learned how we can create widgets in our Tkinter app but how can we adjust them in your app? How can we design a layout in our Tinker app? These questions may be on your mind and the answer to those questions is by using the GUI managers.
Tinker has three types of geometry/layout managers which are as follows:
-
Place Geometry Manager In Tkinter
-
Pack Geometry Manager in Tkinter
-
Grid Geometry manager in Tkinter

Why Do We Use These Layout Managers In Tkinter?
The main reason for using Geometry Manager is that by using these Geometry Managers we can manage widgets in Tinker, we can organize them according to our requirement and in addition, we can control the display functions of the widget.
If we can adjust these things by calling the widget function then why do we need a layout manager? Look at the code that we used in our previous blog; The above questions may be causing confusion in your mind.
The main reason we use layout manners in the Tkinter the app is that widgets can only define the size and padding of widgets, but they cannot define their position where they will be displayed in our app.
This is the work of layout managers. Widgets can only give shape and padding information to layout managers. But the layout manager does the work of organizing them into our app.
So far, we have learned the importance of Geometry Manager in Tkinter. In the further part of this blog, we will discuss the importance of geometry managers available in Tkinter.
Pack Geometry Manager In Tkinter
So what does Pack Geometry do in Tkinter? If you have checked our previous blog, in that blog we have used Pack Manager. Pack Geometry Manager in Tkinter is the simplest and easiest to use Geometry Manager in Tkinter.
The pack commands are easy to use, but it has limited features compared to the layout manager grid and Place. This is definitely the best option for simple applications.
Pack geometry packs all widgets on top of each other.
This means that if you are first packing a button in your GUI app and then packing the entry widget, the button widget will be packed first and then the entry widget will be packed.
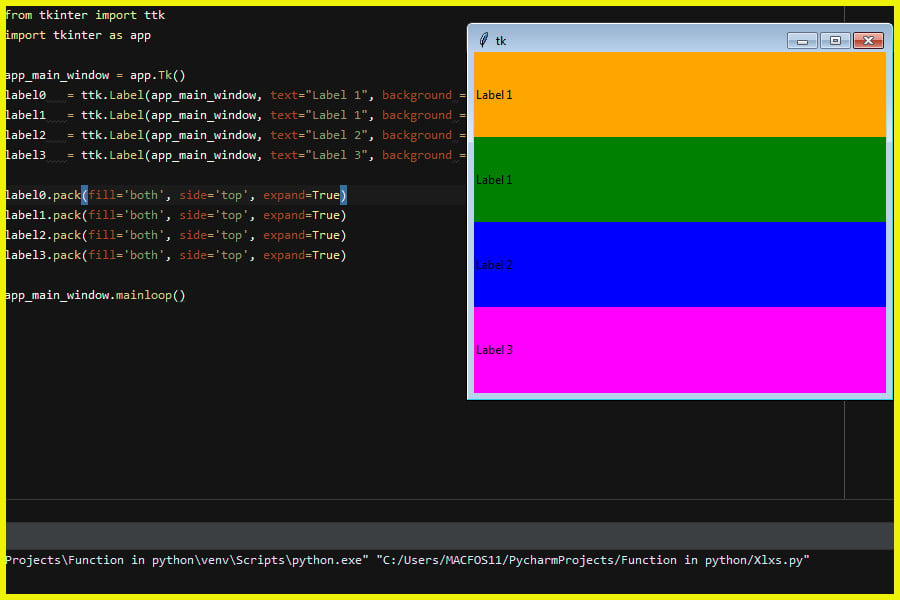
The following code and the output of the code will make you more accurately clear.
Looking at the output of the code, I hope you got what I mean. In the code above, you can see that we have passed Fill, Side, and Expand Options. What are they and why are we using them?
Actually, these are the options that are available for pack Geometry Manager. In the following section, you will learn about them in detail.
from tkinter import ttk
import tkinter as app

app_main_window = app.Tk()
label0   = ttk.Label(app_main_window, text="Label 1", background ='Orange')
label1   = ttk.Label(app_main_window, text="Label 1", background ='green')
label2   = ttk.Label(app_main_window, text="Label 2", background ='blue')
label3   = ttk.Label(app_main_window, text="Label 3", background ='magenta')

label0.pack(fill='both', side='top', expand=True)
label1.pack(fill='both', side='top', expand=True)
label2.pack(fill='both', side='top', expand=True)
label3.pack(fill='both', side='top', expand=True)

app_main_window.mainloop()
Options Available For Pack Geometry Manager In Tkinter
1) Fill Option In Pack –
The fill option of the pack geometry manager tells the Geometry Manager that the widget wants to fill the specified position. There are three parameters that we can pass to fill the options and they are as follows:
widget.pack(fill = ‘x’)
widget.pack(fill=’y’)
widget.pack(fill = ‘both’)
Think of the X and Y axis, if you pass the Fill = 'X' parameter to the Pack Manager, the Pack Layout Manager will allow the widget to take the 'X' axis.
Similarly, if we pass 'Y', the Pack Geometry Manager will allow the widget to take the 'Y' axis of the display.
And the last parameter Fill = 'Both', if we pass this parameter to the Pack Geometry Manager, the Geometry Manager will allow the widget to have both 'x' and 'y' axis.
In the process of allowing widgets to take their positions, geometry also cares about the positions of other widgets. It does not allow one widget to overlap with another widget.
The following code and the output of the code will clear your doubt.
2) Expand Option Of The Pack In Geometry Manager
This option takes a Boolean operator such as "True" or "False". When "True" is passed for this option, it will tell the Geometry Manager that the widget wants to expand to fill any space that has not been used in the main widget.
By default, it is set to false. If we want the widget to fill a particular space that is not used in the main widget then we can fill that unused space by setting "expand = ‘true’" in the widget's pack layout manager.
After reading the above statement, you might be wondering why we need the Expand option in pack geometry manager, if we have a fill option then the answer is as follows.
What's The Difference Between The Expand and Fill Options Of The Pack Geometry Manager?
The fill option tells the manager that the widget wants it to fill the entire space assigned to it. The value controls how to fill the space; Both mean that the widget should expand both horizontally and vertically, X means that it should only extend horizontally, and Y means that it should only expand vertically.
The expand option tells the manager to assign additional space to the widget box. If the main widget is made larger than necessary to hold all packed widgets, any exceeding space will be distributed among all widgets that have the expand option set to a True.
3) Placing Widgets Side By Side Using Side Option Of Pack Geometry Manager
As you know the pack layout manager of Geometry Manager in TKinter stacks all the widgets one after the other.
In that case, how will you fit all the widgets together? The answer to this question is by using the side option of the pack geometry manager.
However, this is not the only option available to do this, but at this time, we will only discuss this method.
The side option of Pack Geometry Manager takes three parameters and they are right, left, and top.
As the name implies, when we pass these parameters in the side option of the Pack Geometry Manager, the Geometry manager will assign the described position to the widget.
How We Can Place Widgets Side By Side?
The the solution to the above is a bit tricky for beginners but once you start using it you will learn to use them.
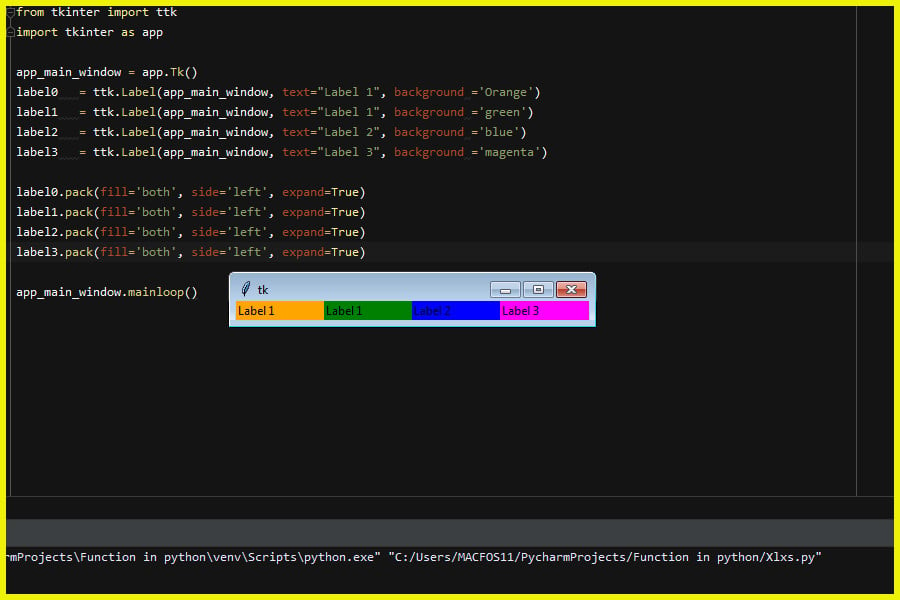
To keep the widgets side by side, we set the side options of all those widgets to the same parameter.
That parameter can be left or right but not top.
from tkinter import ttk
import tkinter as app

app_main_window = app.Tk()
label0   = ttk.Label(app_main_window, text="Label 1", background ='Orange')
label1   = ttk.Label(app_main_window, text="Label 1", background ='green')
label2   = ttk.Label(app_main_window, text="Label 2", background ='blue')
label3   = ttk.Label(app_main_window, text="Label 3", background ='magenta')

label0.pack(fill='both', side='left', expand=True)
label1.pack(fill='both', side='left', expand=True)
label2.pack(fill='both', side='left', expand=True)
label3.pack(fill='both', side='left', expand=True)

app_main_window.mainloop()
Conclusion - Geometry Management In Tkinter APP - Place, Pack, Grid Managers
In this blog, we have talked about Tkinter Pack Geometry Manager in our next blog, we will learn to use Grid Geometry Manager in Tkinter.


