GUI Designing On Raspberry Pi Using Tkinter And Python
Design your own GUI on Raspberry Pi using Tkinter and Python in this step by step guide.

Hello Geeks, welcome!! In this tutorial, we are learning the design of GUI on Raspberry Pi. As you are here, I believe you are on the journey of designing an app to do automation. In this blog we will use the Tinker library to design the GUI on Raspberry Pi.
After the completion of this blog series you will be able to design a GUI app for Raspberry and will be able to control GPIO pins and can design your own GUI app.
Before starting the journey of GUI designing on Raspberry Pi, you should understand all the basic things, and as this tutorial is the first tutorial in the series, we are just learning some basic things like how to create frames, labels, entry fields.

What Is Tkinter And How To Use It On Raspberry Pi To Design A GUI App On Raspberry Pi?
This is a great question and let me tell you about it here. Tkinter is a python library as you know python is the battery's included programming language, which means that you already have everything in it for you, and Tkinter is also a library that comes preinstalled.
TKinter is the library used in the design of GUI apps. It includes various classes and methods used to create widgets in the GUI app.
So far we have discussed what Tinker is if I missed something or if you want to know more about it you can put questions in the comments section. I will answer all your doubts.
How to write a simple greeting GUI app using Tkinter GUI App Python Module?
The below mentioned code is of the greeting app. You can copy the following code and run it on any python IDE that you prefer.
As you are getting started, I know that the following Python GUI code has lots of new things for you, but don't worry. I will clear all your doubts ahead of this blog.
from tkinter import ttk
import tkinter as app

app_main_window = app.Tk()


def greet():
print(f"Hello {submit_label_Entry_text.get()}!!")


submit_button_text = app.StringVar()
submit_label_Entry_text = app.StringVar()
submit_button_text.set("Submit")
s = ttk.Style()
s.configure('.', background='gray')
main_frame = ttk.Frame(app_main_window,
style='main_frame.TFrame',
height=100,
width=50,
cursor='question_arrow',
relief='sunken')
main_frame.pack(fill='x')
hi_label = ttk.Label(main_frame,
text='Enter Your Name: '
)
submit_button = ttk.Button(
main_frame,
text='Submit Button',
style='submit_button.TButton',
textvariable=submit_button_text,
width=25,
command=greet
)

user_entry = ttk.Entry(main_frame, textvariable=submit_label_Entry_text)

hi_label.grid(row=0, column=0)
user_entry.grid(row=0, column=1)
submit_button.grid(row=2, columnspan=3, pady=5)

app_main_window.mainloop()
I hope you saw the GUI asking usernames after testing the above greeting app code, but do you know how all those things worked? The reason for this is the Tkinter library, it understood our need and gave us access to use the asked functions. So now, what is tkinter and how to use it in our program?
Tinker is a library of Python programming language and if we want to use it then we have to import it first. Using the following line of code, you will be able to import the Tkinter library.
Import tkinter as app After this we are going to import ttk class from tkinter module, we will be able to design various widgets with the help of this class. We can import the ttk class from tkinter using the following line of code.
from tkinter import ttkWhat Is The Difference Between tk And ttk?
If we can design GUI widgets using tkinter ourselves then why are we using ttk class? This can be your question, and the answer to this question is as follows.
ttk class of tkinter gives us styling options, we will be able to customize the look of widgets using the ttk module.
So if we want our GUI to be more attractive then we use ttk class.
Frame Creation Using ttk.Frame in Tkinter GUI App

Ttk.Frame(parent,options**) Ttk.Frame is a widget where we can put buttons, entry fields. It is like a container where we can put other widgets like button, child frames, labels and more.
Various Options Available For ttk.Frame In Tkinter GUI App
Tinker has a lot of options available that we can use to customize the frame. Below are the options available for ttk.frame
from tkinter import ttk
import tkinter as app

app_main_window = app.Tk()
s = ttk.Style()
s.configure('.', background='orange')
main_frame = ttk.Frame(app_main_window,
                      style='main_frame.TFrame',
                       height=100,
                      width=50,
                      cursor= 'question_arrow',
                      relief='sunken')
main_frame.pack(side='left')


app_main_window.mainloop() 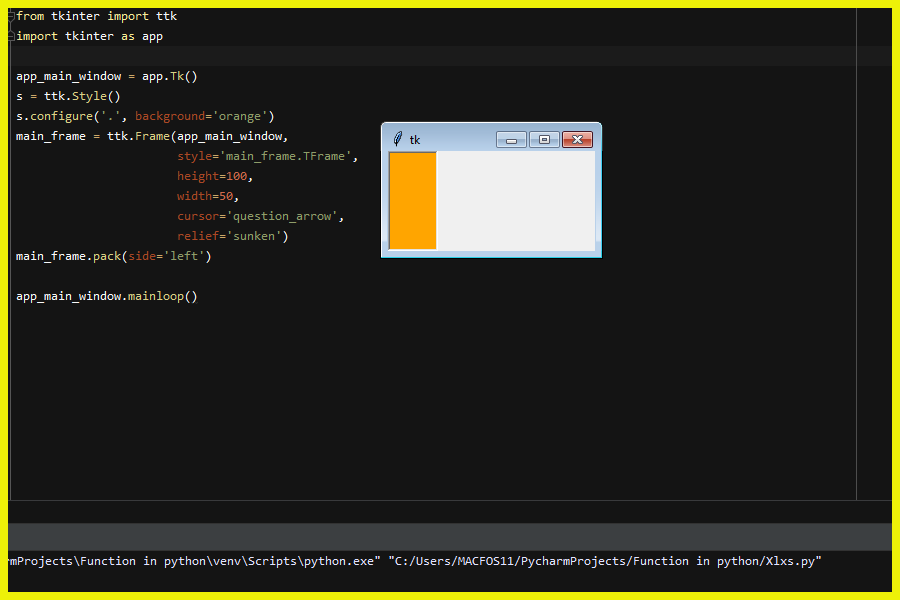
Styling In ttk.Frame
s = ttk.Style()
s.configure('.', background='orange')
In the line above the code we are setting the background of the frame to orange.
Adjusting The Height And Width Of The Frame Using The Height And Width Options Of ttk.Frame
Many times, when designing GUI apps we need to specify the height and width of the frame, using these options we will be able to adjust the height and width of our frame.
Cursor Option Of ttk.Frame
The cursor option of the ttk.Frame class is used to change the graphics of the cursor when we hover the mouse over our frame.
The cursor option of the ttk.Frame class is used to change the graphics of the cursor when we hover the mouse over our frame.
Relief Option Of ttk.Frame
This option of ttk.Frame is used to change the border style of our frame. Given below are the parameters that you can pass this option and adjust the look frame.

It was all about the frame, now we will learn how to add a button to the GUI app
How To Add Button Widget in Tkinter GUI App
Buttons in any widget allow the user to submit a form or do more realistic things.
from tkinter import ttk
import tkinter as app

app_main_window = app.Tk()
Submit_button_text = app.StringVar()
Submit_button_text.set("Submit")
s = ttk.Style()
s.configure('.', background='orange')
submit_button = ttk.Button(
    app_main_window,
    text='Submit Button',
    style= 'submit_button.TButton',
    textvariable = Submit_button_text,
    width=20,
    command= lambda : Submit_button_text.set('ok')
)
submit_button.pack()

app_main_window.mainloop() 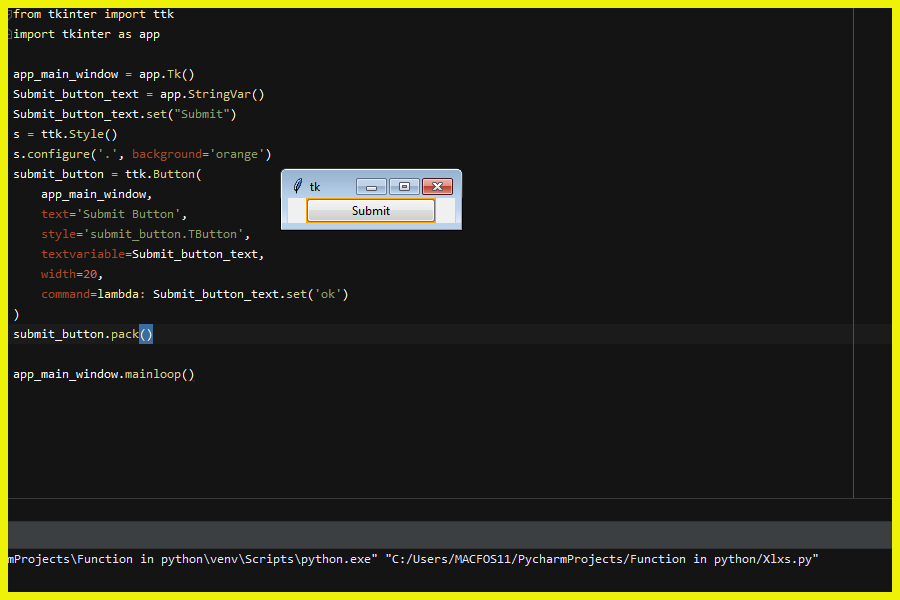
List of options in ttk.Button
Like ttk.Frame option, ttk.Buttion also has some options available. Some of them are similar to the options available for ttk.Frame.
Here I have only mentioned options that are new.
Text option in ttk.Button
We can name the button using this option. Please note, we cannot rename buttons if you use this option.
If we want to rename the button at runtime of the code then we can rename the button using the Textvariable option.
Textvariable option in ttk.Button
As I told you earlier, we can use this option to rename buttons. But for this, we have to initialize the variable first and for that, we can use the following line of code.
Submit_button_text = app.StringVar()

Submit_button_text.set(‘Submit’)
But note that if you are using textVariable option, this usage will ignore all the defined parameters of the text options. What I mean to say is that if we are defining a text option and a textVariable option in your app for the same widget, Tinker will only show the text that is assigned by TextVariable.
TTK.Label In Tkinter GUI App
As the name itself suggests, it is used for creating label widget in tkinter GUI app.
from tkinter import ttk
import tkinter as app

app_main_window = app.Tk()
label_text = app.StringVar()
label_text.set("This is text variable Text")
s = ttk.Style()
s.configure('.', background='orange')
submit_button = ttk.Label(
app_main_window,
style= 'submit_button.TLabel',
textvariable = label_text,
width=25
)
submit_button.pack()

app_main_window.mainloop() 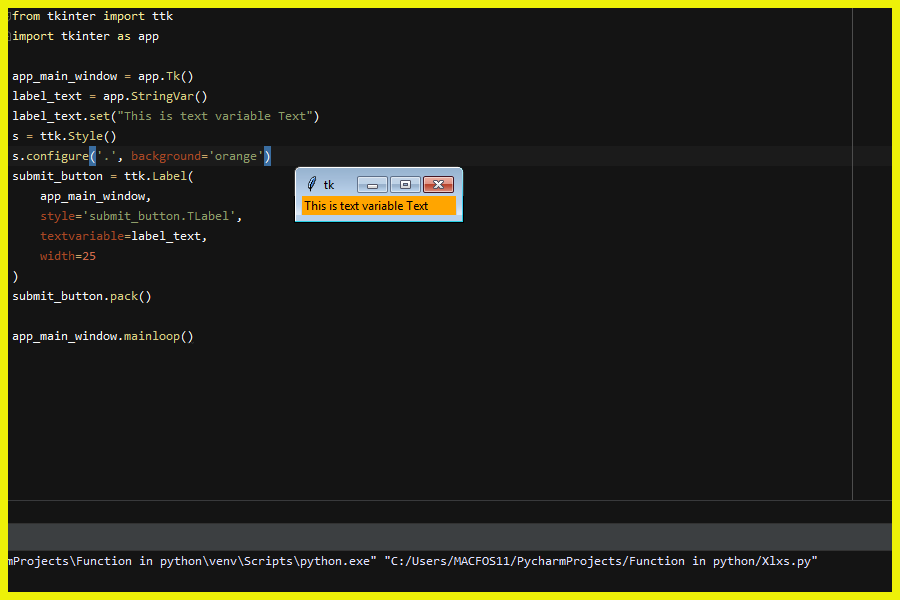
Available options for ttk.Label
The options available for the label are common and we have already discussed them in the first phase of this blog.
The list of options available for ttk.Lable is as follows:
1. Text - we can do this option for naming labels
2. TextVariable If we want to rename Lable in our program's runtime, we can use this option.
3. Style - If we want to add a style, we can use this option.
Conclusion Of GUI Designing On Raspberry Pi Using Tkinter And Python
So, this was about the basic widgets we often use in the design of the Tinker GUI app. I hope you have enjoyed the tutorial and hope it helps in your project somewhere. In our next blog, we will learn how Geometry Manager works.


