Arduino Nano Board: Pinout & Programming
Being one of the most popular board in the world of electronics, Arduino has been developed in many different variants according to the needs and demands. Here, I said demand

Being one of the most popular board in the world of electronics, Arduino has been developed in many different variants according to the needs and demands. Here, I said demand in the context of size and reliability.
With the day by day evolution of complex circuits and electronic appliances, the motherboards and development boards becoming more compact in size. Arduino Nano is one of the example of this change. As the name itself suggest it is smallest board in Arduino family till now.
Arduino Nano is a small, complete, and breadboard-friendly development board based on the ATmega328 (Arduino Nano 3.0) or ATmega168 (Arduino Nano 2.x). It has more or less the same functionality of the Arduino UNO, but in a different package. It lacks only a DC power jack, and works with a Mini-B USB cable instead of a standard one. The connectivity is the same as the Arduino UNO board.
NANO has the same functionality and the same features except the number of pins and size than other varient in its family. Due to compact size, the only limitation of this board is it doesn't have any input power jack. So, you can't supply power from any external power source like a battery. Apart from this, more or less this board is quite similar to any Arduino board.
This development board provides small plate with the same powerful microcontroller as on the Arduino Uno. So it is compatible with all Arduino ecosystem and ideal for fast prototyping and easy integration, It can be used with other sensors to create different montages.
Nano is Ideal for small projects and has the advantage that it can be programmed via USB or even you can programe it using your Android phone. Although the is no offiicial IDE for Android yet but makers community find the way to it. Here is the Source to more information on it
Now let’s look at the Arduino NANO Specifications and Features.
Here are the technical specifications and few of its basic features which you must know if you are thinking to work on this great microcontroller board:
- It has 22 input/output pins in total.
- 14 of these pins are digital pins.
- Arduino Nano has 8 analogue pins.
- It has 6 PWM pins among the digital pins.
- It comes with 16MHz clock speed via a crystal oscillator
- It's operating voltage varies from 5V to 12V.
- It also supports different ways of communication, which are:
- Serial Protocol.
- I2C Protocol.
- SPI Protocol.
- It also has a mini USB Pin which is used to upload code.
- Memory in Arduino Nano
- It has below memories embedded in it which are used for different purposes and are as follows:
- Flash memory of Arduino Nanois 32Kb.
- It has preinstalled bootloader on it, which takes a flash memory of 2kb.
- SRAM memory of this Microcontroller board is 8kb.
- It has an EEPROM memory of 1kb.
- It has a Reset button on it.
for more details like Mechanical drawing and Schematic click the link below :
Arduino Nano Datasheet
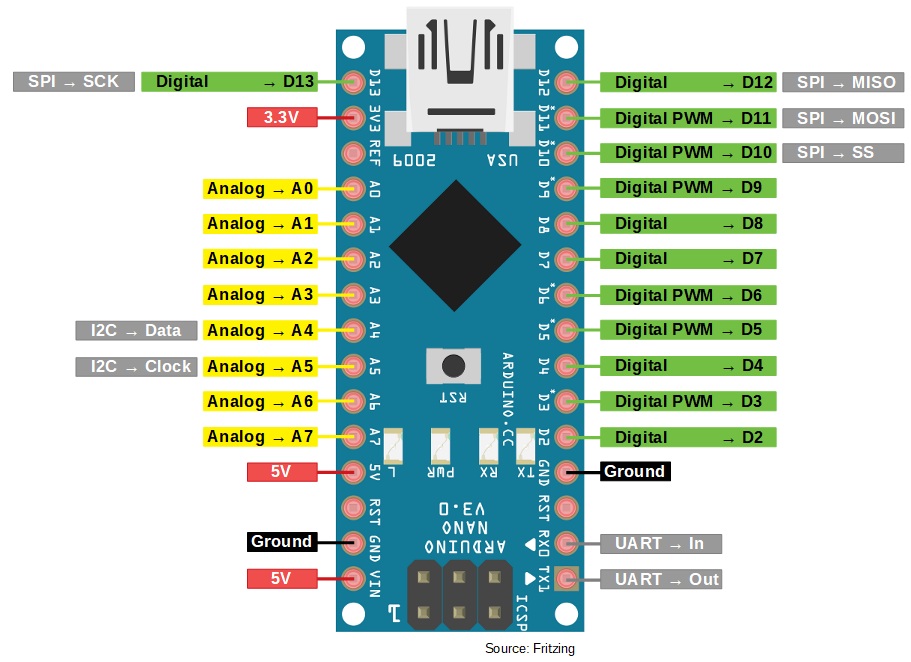
Arduino Nano Pinout
Arduino Nano pin configuration is shown and each pin functionality is discussed below.
- Power Pin (Vin, 3.3V, 5V, GND):These pins are power pins
- Vin is the input voltage of the board, and it is used when an external power sourceis used from 7V to 12V.
- 5V is the regulated power supplyvoltage of the nano board and it is used to give the supply to the board as well as components.
- 3V is the minimum voltage which is generated from thevoltage regulator on the board.
- GND is the ground pin of the board
- RST Pin( Reset):This pin is used to reset the microcontrollerAnalog Pins (A0-A7):These pins are used to calculate the analog voltage of the board within the range of 0V to 5V
- I/O Pins (Digital Pins from D0 – D13):These pins are used as an i/p otherwise o/p pins. 0V & 5V
- Serial Pins (Tx, Rx):These pins are used to transmit & receive TTL serial data.
- External Interrupts (2, 3):These pins are used to activate an interrupt.
- PWM (3, 5, 6, 9, 11):These pins are used to provide 8-bit of PWM output.
- SPI (10, 11, 12, & 13):These pins are used for supporting SPI communication.
- Inbuilt LED (13):This pin is used to activate the LED.
- IIC (A4, A5):These pins are used for supporting TWI communication.
- AREF:This pin is used to give reference voltage to the input voltage
Arduino Nano Programming
Arduino nano programming is not different than any other version of Arduio Board. It can be done using the common Arduino software made for all type of operation systems by Arduino Official. This software is commonly known as Arduino IDE.
The board can be directly programe from the Arduino IDE, connecting your NANO board to the PC using the USB mini (Nano side) to USB B-type (PC side) cable. You just need to download Free Arduino IDE software available for all operating systems or you can code it online too on their online Arduino Web IDE without any downloads and installations.
Here is link to dowload the Latest Arduino IDE Software
Note: Choose the download option according to your operating system.
I hope now you got the brief idea about whats is Arduino programing. So next I will guide you how to download and configure Arduino IDE step by step and run your first code.
Arduino installation is not big science actually, it is just like any other software installation where we need to follow the instructions pops up itself by Software and hitting next button till finish one is arrived.:D
But still if you are bigginer, here is the best link to guide the installation steps.
Steps to use the Arduino IDE
Once Arduino IDE is installed on the computer, connect the board with computer using USB cable. Now open the Arduino IDE and choose the correct board by selecting
Tools>Boards>Arduino/Nano
and then choose the correct Port by selecting
Tools>Port.
Arduino Nano is programmed using Arduino programming language based on Wiring. To get it started with Arduino Nano board and blink the built-in LED, load the example code by selecting
Files>Examples>Basics>Blink.
Once the example code (also shown below) is loaded into your IDE,
click on the ‘upload’ button given on the top bar.
Once the upload is finished, you should see the Arduino’s built-in LED blinking. Below is the preloaded example code for LED blinking
// the setup function runs once when you press reset or power the board
void setup() { // initialize digital pin LED_BUILTIN as an output.
pinMode(LED_BUILTIN, OUTPUT);
}
void loop() // the loop function runs over and over again forever
{
digitalWrite(LED_BUILTIN, HIGH); // turn the LED on (HIGH is the voltage level)
delay(1000); // wait for a millisecond
digitalWrite(LED_BUILTIN, LOW); // turn the LED off by making the voltage LOW
delay(1000); // wait for a millisecond
}
After running the code, the onboard LED should start blinking according to the frequency of delay you set in code like this.:D
If you are just beginner and haven’t used Arduino and its IDE yet. Do not worry it is very simple to understand. Yes can say it because I learned to code Arduino in just 2 hours for first time with the help of steps provided in Getting Started with the Arduino Nano article by Arduino officials itself and many helpful videos from YouTube.
Even you can edit and run buit-in sample codes in Arduino IDE. Follow the link below to know more about buit in code and steps to get it in your IDE from Arduino Official Tutorials. Click to Open it in new Tab
Applications of Nano Arduino Board
These boards are used to build Arduino Nano projects by reading inputs of a sensor, a button, or a finger and gives an output by turning motor or LED ON, or and some of the applications are listed below.
- Samples of electronic systems & products
- Automation and Control Systems
- Several DIY Robotics projects
- Prototyping of Electronics Products and Systems
- Easy to use for beginner level DIYers and makers.
- Projects requiring Multiple I/O interfaces and communications.
Useful Links
Explore some cool projects with Arduino Nano.
Buy Original Arduino NANO Board
Other Arduino Boards and Accessories
Conclusion
It is one of the most compact and smallest Arduino board. So, you can use this tiny board in your prototype more often than Uno or mega. It is, however, better to avoid it if you have a bulk of code or more input/output operations.
I hope you got the facts for which you were landed here.
Thanks you.


