Raspberry Pi Ultrasonic Sensor Interface Tutorial
In this article, we discuss the interfacing of ultrasonic sensors with Raspberry Pi.

Hi geek, As I ensured in my previous article, I am back with an article on ultrasonic interfacing with Raspberry Pi GPIO. In our earlier article, we talked about the Raspberry Pi GPIO pinouts. If you haven't gone through it, I request you take a look, here is the link. In this article, we will discuss the interfacing of ultrasonic sensors with Raspberry Pi and a little description of the "Python code for ultrasonic sensor".
Using Ultrasonic Sensors With Raspberry Pi GPIO
As you know ultrasonic sensors are used for distance measurement purposes. Typically, we use ultrasonic sensors in obstacle prevention robots and DIY radar projects. Similar sensors like IR sensor, LIDAR, sonar sensor are also available in the market which can be used for similar purposes but in this article, we are not talking about them. I will write about them in my upcoming articles.
How Does the Ultrasonic Sensor Works?
As you are from the DIY community, I'm pretty sure you know how an ultrasonic sensor works. If you know about it then you can skip this part of this blog and go to the coding section. But if you are new to this then you can continue this section.
So, ultrasonic sensor work is somewhat similar to radar sensor work. In radar, the transmitter generates radio waves (sound waves), an electromagnetic wave that travels in the air and returns when it hits an object in their path. The distance is then calculated using a simple high-school formula which is given below.
Distance = Time x Speed
Time – Time that is taken by the sound wave to reach the receiver
Speed – Speed of the sound wave.
Interesting Note –
-
Speed of sound changes due to the change in temperature and change in humidity.
-
The speed of sound, however, is 4.3 times as fast in water as in air
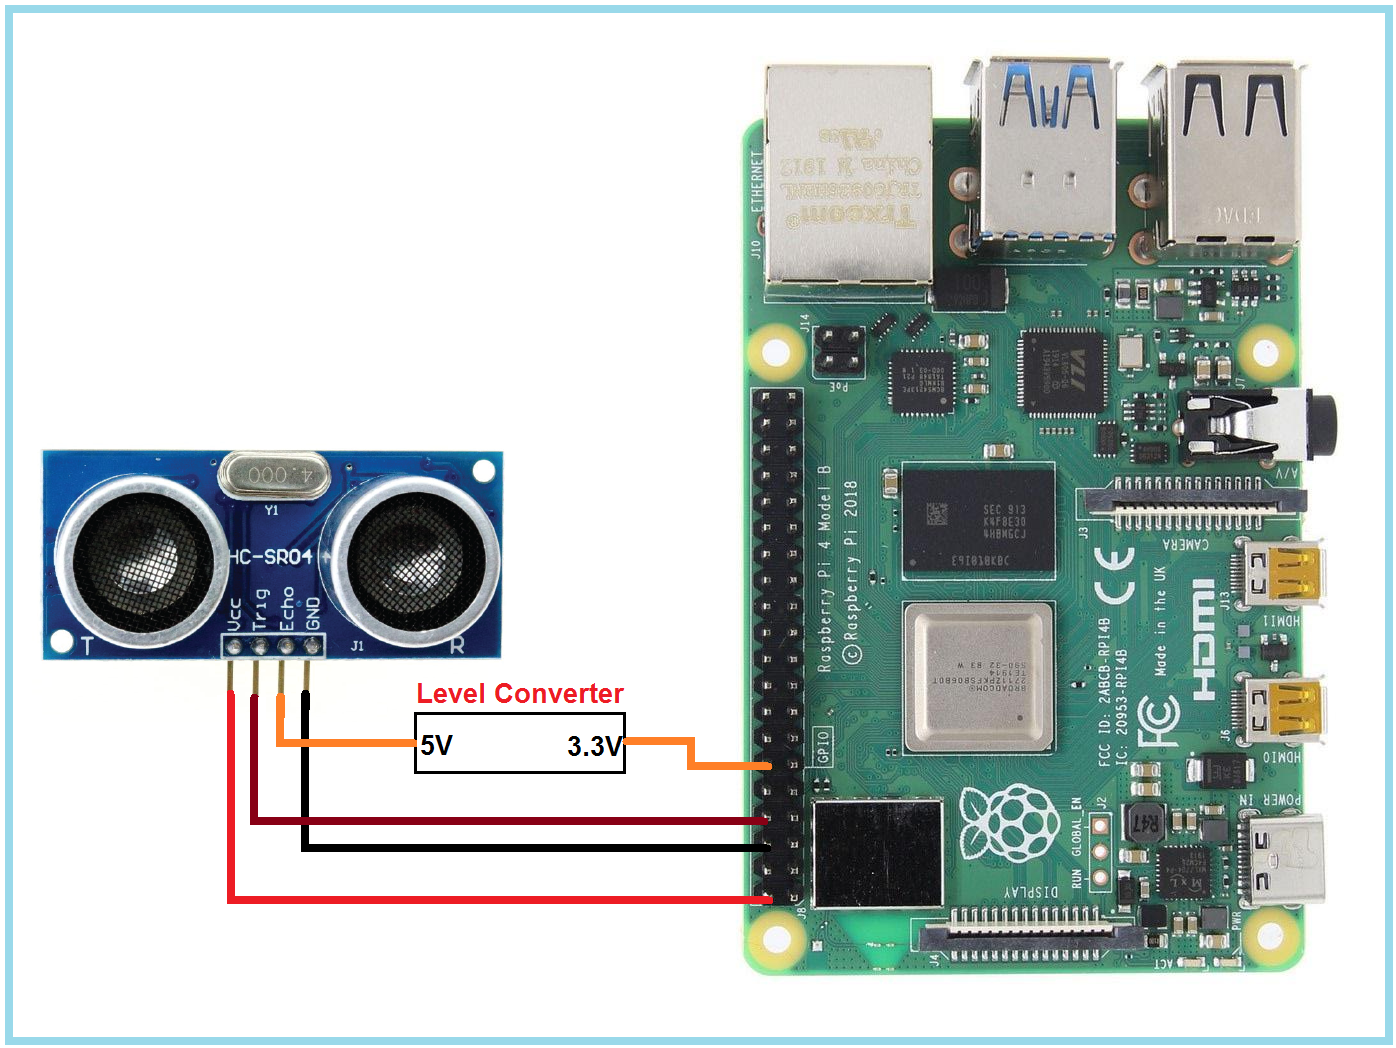
Interfacing Of The Ultrasonic Sensor With The Raspberry PI 4 GPIO-
As discussed earlier, ultrasonic sensors have a transmitter (Trigger) that can be used to transmit infrared sound waves and have a receiver that receives reflected sound waves(ECHO pin).
And it has power pins which are VCC and GND. The following picture shows the pinout of the ultrasonic sensor and its interface with the Raspberry Pi.
Components that you will require:
Python Code For The Ultrasonic Sensor
Here begins the most awaited section of this article and that is the Python code for ultrasonic sensors. Here I have tried to broaden every line we use in this code, but if I have messed up something here, please let me know in the comments section.
So, the first line of this code starts from importing modules that can be used to work with the raspberry pi GPIO pins.
import RPi.GPIO as GPIO
import time
RPi.GPIO - This module helps us to talk with the GPIO pins of Raspberry Pi.
Time - We are using the Time Module to add a delay between transmitting infrared sound waves and receiving it.
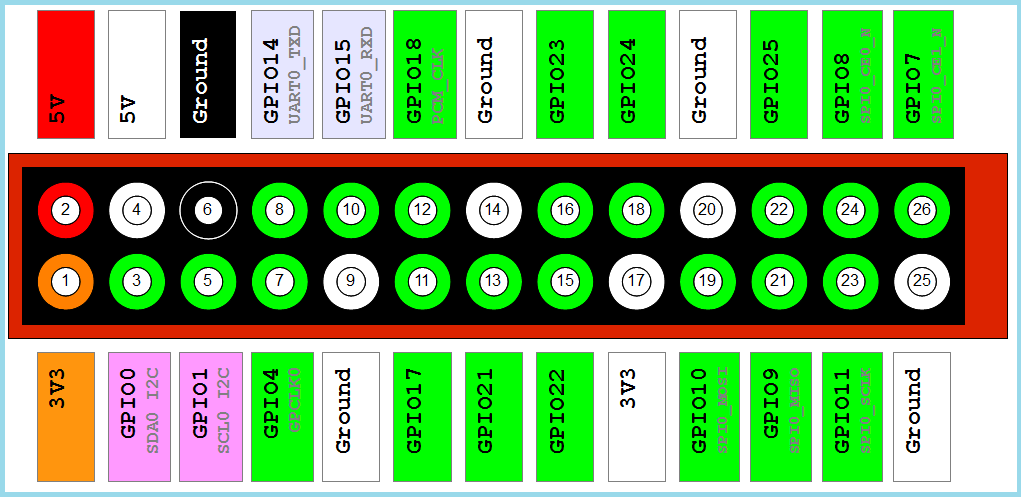
GPIO.setmode(GPIO.BCM)The GPIO SetMode is used to define the numbering scheme used to work on the Raspberry Pi GPIO and there are two ways to define the numbering scheme which are GPIO.board and GPIO.BCM.
Before I tell more about GPIO.Board and GPIO.BCM, I request you to take a look at the following image.
GPIo.Board - If you want to refer to the pin with the number indicated in the circle, you can use the GPIO.setmode (GPIO.board) method
GPIO.setmode(GPIO.BCM) - BCM is an acronym for Broadcom chip-specific number. If you want to refer to a pin number representing a rectangle you can use GPIO.SetMode (GPIO.BCM).
Personally, I like to use GPIO.setmode(GPIO.BCM) method because it comes in handy when working on communication protocols such as Serial, SPI, I2C, etc.
GPIO_ECHO = 13

GPIO_TRIG = 11
These lines of code are used for initialization of PINs, to which we will connect the ultrasonic sensor.
GPIO.setup(GPIO_ECHO, GPIO.IN)

GPIO.setup(GPIO_TRIG, GPIO.OUT)
If you have worked on the Arduino board before then you may be familiar with the pinMode function, this line of code does the same thing. Using this line of code, we can configure the Raspberry Pi's pins as input pins or OUTPUT pins.
Distance Calculation Python Code
GPIO.output(GPIO_TRIG, GPIO.LOW)

Time.sleep(2)
As mentioned in the datasheet of this ultrasonic sensor we are using the above line of code to make the GPIO pin low for 2 milliseconds.
Time.sleep(2) - This line of code introduces the delay in the process.
GPIO.output(GPIO_TRIG, GPIO.HIGH)

time.sleep(0.00001)

GPIO.output(GPIO_TRIG, GPIO.LOW)
As per the datasheet of the sensor we are introducing the delay in between making GPIO_TRIG pin high and low.
while GPIO.input(GPIO_ECHO)==0:

                start_time = time.time()

while GPIO.input(GPIO_ECHO)==1:

               Bounce_back_time = time.time()

pulse_duration = Bounce_back_time - start_time

distance = round(pulse_duration * 17150, 2)

print (f"Distance: {distance} cm")
Note – If you are not using Python 3.0 or higher version then the above print function will not work. in that case, you can modify the print line with the following line.
print ("Distance:",distance,"cm")In the above line of code, we are calculating the time taken by the pulse to return to the receiver after hitting an object, and for this purpose, we have initialized the pulse duration variable. This variable stores the duration that is taken by the sound wave to return.
If you add all the above lines of code you will get the following code.
import RPi.GPIO as GPIO

import time

GPIO.setmode(GPIO.BCM)

GPIO_TRIG = 11

GPIO_ECHO = 18

GPIO.setup(GPIO_TRIG, GPIO.OUT)

GPIO.setup(GPIO_ECHO, GPIO.IN)

GPIO.output(GPIO_TRIG, GPIO.LOW)

Time.sleep(2)

GPIO.output(GPIO_TRIG, GPIO.HIGH)

Time.sleep(0.00001)

GPIO.output(GPIO_TRIG, GPIO.LOW)

while GPIO.input(GPIO_ECHO)==0:

start_time = time.time()

while GPIO.input(GPIO_ECHO)==1:

Bounce_back_time = time.time()

pulse_duration = Bounce_back_time - start_time

distance = round(pulse_duration * 17150, 2)

print (f"Distance: {distance} cm")

GPIO.cleanup()
Conclusion -
In this article, we learned the interfacing of ultrasonic sensors with Raspberry Pi GPIO 4 pins. If you liked this article or have any doubt then let me know in the comment section. In our next article, we will discuss on the relay module and its interfacing with the raspberry GPIO 4. Stay Tuned!!


very informative for my projects… thanku sir