How to Use Raspberry Pi Imager
The tool we have been waiting for. Everyone’s been using Win32Disk Imager and Balena etcher. I prefer Win32Disk Imager, but now I might have to reconsider. They’ve made a simpler

The tool we have been waiting for. Everyone's been using Win32Disk Imager and Balena etcher. I prefer Win32Disk Imager, but now I might have to reconsider. They’ve made a simpler way to write Image to your microSD card with Raspbian and other operating systems. Now let's see the Raspberry Pi imager tool.

Ease is necessary
I always wanted that people should be able to get started easily with their Raspberry Pi. They have really made it easier now for us to flash an SD card. Earlier sometimes Balena Etcher used to show some issues while flashing and didn't flash properly sometimes. ( as heard by customers). I have been using Win32 Disk Imager for years now. I haven't got any issues with it. Well now let's give this one a try.
Things get wild sometimes
When it comes to microSD cards, flashing them with your favorite operating system can be difficult.
The main issue comes from people using different operating systems like: Windows, macOS, and Linux all use different methods of accessing the SD card, which doesn’t help. And, for some new Raspberry Pi users, understanding where to find the latest up-to-date image and how to get it onto the microSD card can be a bit complicated, unless you’ve had little experience with image-flashing tools such as Etcher or win32diskimager.
For that reason, They’ve always suggested that you should buy a pre-loaded NOOBS SD card from your Raspberry Pi Approved Reseller.
But what if you want to reinstall an image on an existing card?
Raspberry Pi Imager
From Now on, Raspberry Pi users will be able to download and use the new Raspberry Pi Imager, available for Windows, macOS, and Ubuntu.
The utility is easy to use and super speedy, thanks to some shortcuts they’ve introduced into the algorithm.
Firstly, Raspberry Pi Imager downloads a.JSON file from their website with a list of all current download options, ensuring you are always installing the most up-to-date version.
How to use this new Raspberry Pi Imager tool?

- First, you need to download it(which you can from this link). Once installed, You can click on the choose OS button to proceed.

- Now you will see the list of operating systems, Format options and EEPROM recovery option for Raspberry Pi 4 Boot issue. I want to make a blog about the boot Issue of Raspberry Pi 4 separately, as I have observed many people are facing the issue, we will talk about it in some other blog.
- Just select the operating system you will like to go with, be it Raspbian or LibreELEC.

- One Extra option you get is to flash a custom image like ubuntu core, ubuntu mate, windows core, etc...

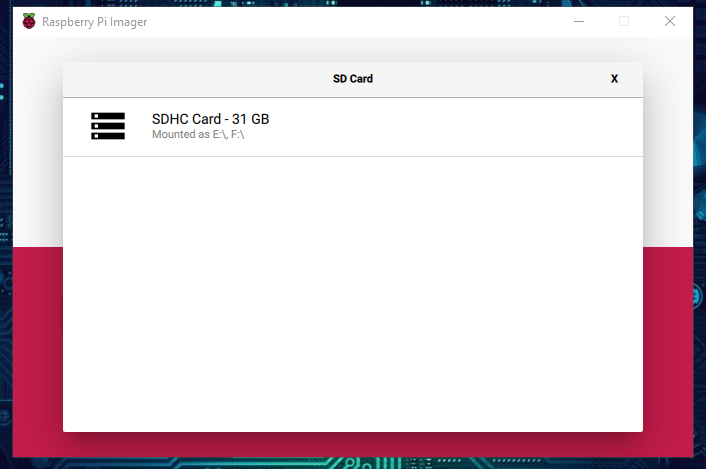
- Now click on the choose SD card button.

- Select your SD card. Here mine is a 32GB Class 10. The better the class you go for, the better the performance of the Pi.

- Click on the write button after this.

- Now the imager will start writing into the sd card.

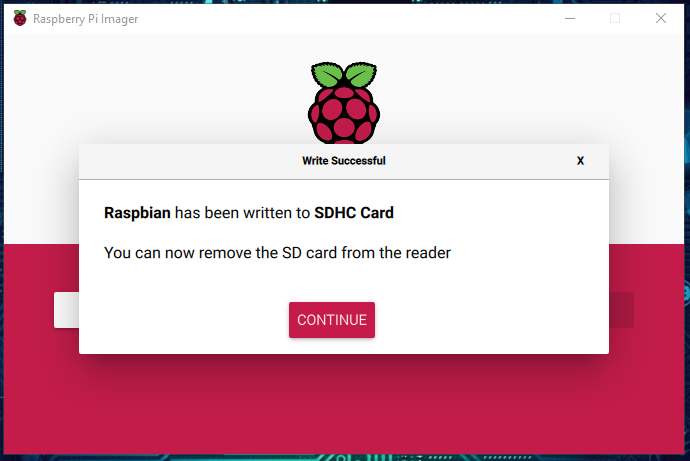
- Once written it will verify to make sure the OS is properly put.

- Now you will see the final dialog of finished and it will auto-eject the micro SD card once clicked continue.
- In case you have any confusion, you can check this video made by the official Raspberry Pi Foundation team. For some reason, the video was not embeddable . So you can check it here from this link.
Imager internals
Once you’ve selected an operating system from the available options, the utility reads the relevant file directly from their website and writes it straight to the SD card.
This speeds up the process quite considerably compared to the standard process of downloading it from the website, writing it to a file on your hard drive, and then, as a separate step, reading it back from the hard drive and writing it to the SD card.
During this process, Raspberry Pi Imager also temporarily saves the downloaded operating system image into your local drive so you can flash multiple cards without having to download the file again.
Is Raspberry Pi Imager open-source?
Yeah! it is. You can modify the source code, study, and distribute the software to anyone and for any purpose. That's Awesome I think.
I am really hoping that people in the community should add more OS options into this and writing multiple SD cards at once, should be an option. If I get time I am also interested to work into this software and make a better build on it. ( Not that it's not better, things can always be improved)
Download the Raspberry Pi Imager from their downloads page today.
Raspberry Pi Imager is a fully open-source and was originally written as a modification of the PiBakery tool, later modified and finished by Floris Bos (the original writer of the NOOBS tool and the PiServer tool).
They have already written a blog on this on their official website, you can also refer to that(here's the link) and many other bloggers have also written blogs on this.
Like Tom's hardware & one friend from our team has also written a blog about when it launched yesterday, which you can check here.
I have also got the news that they are in the alpha phase of building this tool for the Raspbian OS so it becomes a complete circle. Well, I feel really amazing that many people are involved and are improving things continuously.
I hope you enjoyed the blog. If you have any suggestions or anything you wanna tell me. Comment down below.


