How to Use Microbit : A Step by Step Guide
The article covers how to use micro:bit? And where it can be applied?

Geeks, today we are here with something different. You might have been familiar with the term Raspberry pi and Arduino, but have you heard about microbit? It has a lot of potential and capability you might have never thought of. We will be covering how to use microbit and where it can be applied.
My Personal opinion Is that It is better than buying an Arduino. The audience is separate for this board, it is basically designed for younger people. It is meant for people who want to start with embedded systems, coding, robotics, etc...
So now as we got some outline of what is a microbit actually. Let's move to what it actually is and deep dive into it.
What is a Microbit?
It is basically a pocket-sized computer. It is made by keeping the younger audience in mind, people who are new with coding, robotics, and embedded systems. The coding is easy and doesn't need a lot of writing. It's the same as scratch, but if you know to code you can try its javascript mode for more advanced features.
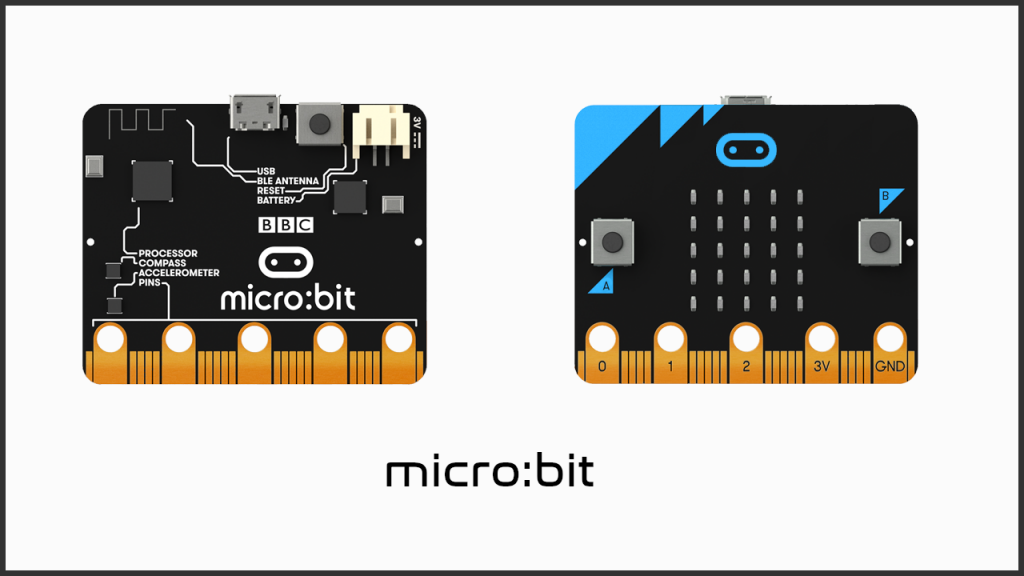
 1.0 Microbit Board[/caption]
Now after knowing what is a microbit let's move to specifications and features of microbit.
1.0 Microbit Board[/caption]
Now after knowing what is a microbit let's move to specifications and features of microbit.Specifications & Features
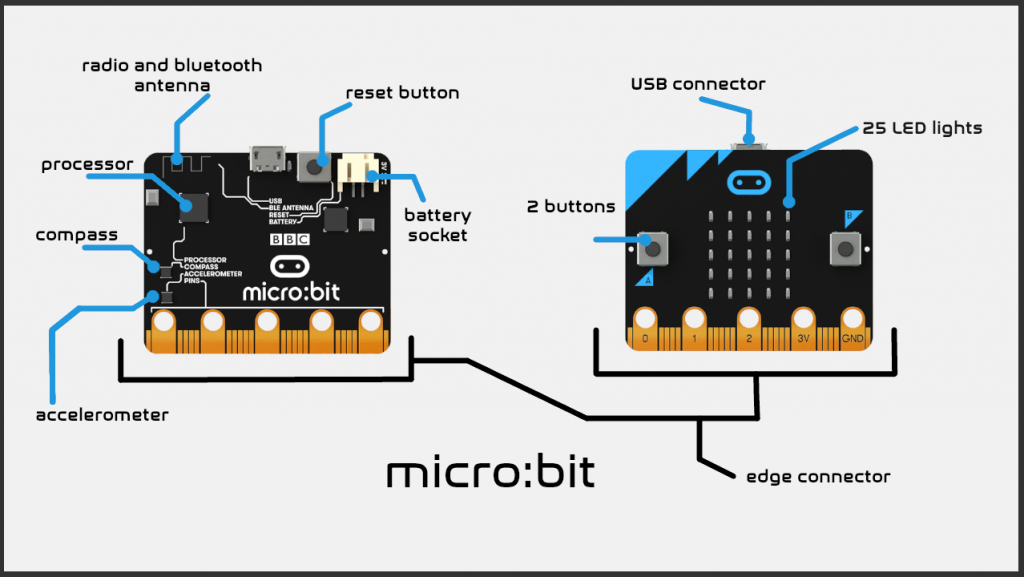
[caption id="attachment_667558" align="aligncenter" width="680"] 1.1 Micro bit Specifications[/caption]
- Nordic nRF51822 – 16 MHz 32-bit ARM Cortex-M0 microcontroller
- 256 KB flash memory
- 16 KB static ram
- 2.4 GHz Bluetooth low energy wireless networking.
- The ARM core has the capability to switch between 16 MHz or 32.768 kHz.
- NXP/Freescale KL26Z – 48 MHz ARM Cortex-M0+ core microcontroller, that includes a full-speed USB 2.0 On-The-Go (OTG) controller, used as a communication interface between USB and main Nordic microcontroller. This device also performs the voltage regulation from the USB supply (4.5-5.25V) down to the nominal 3.3 volts used by the rest of the PCB. When running on batteries this regulator is not used.
- NXP/Freescale MMA8652 – 3-axis accelerometer sensor via I²C-bus.
- NXP/Freescale MAG3110 – 3-axis magnetometer sensor via I²C-bus (to act as a compass and metal detector).
- MicroUSB connector
- battery connector
- 25-pin edge connector.
- Display consisting of 25 LEDs in a 5×5 array.
- Three tactile pushbuttons (two for applications, one for reset).
Some detailed information
I/O includes three-ring connectors (plus one power one ground) which can be used by connecting crocodile clips or 4 mm banana plugs as well as a 25-pin edge connector with two or three PWM outputs, six to 17 GPIO pins (depending on configuration), six analog inputs, serial I/O, SPI, and I²C. Unlike early prototypes, which had an integral battery, an external battery pack (AAA batteries) can be used to power the device as a standalone or wearable product.From dancing robots to banana keyboards, your micro: bit has all the features you need to code awesome stuff - the possibilities are endless!
The order of the large pins as follows: P0 P1 P2 3V GND labeled 0, 1, 2, 3V GND on the
There are two programmable buttons that can be used to control games or pause and skip songs on a playlist.
It has an accelerometer so it can detect motion and knows when you're on the move. The built-in compass knows which direction you're heading in and it can use a low energy Bluetooth connection to interact with other devices and the Internet. You can find more information on the hardware here.
As we now have knowledge about its specification and features lets now move to its connecting. So the specification & features of this board are pretty amazing, all of this in just one board and only half the size of credit card pretty amazing job done by BBC.
Connection
1. You can connect a battery directly included in the box of go kit or can either power it by USB cable through a 5v adapter or through PC directly.
2. On connection to a power source for the first time, it will load the default built-in code until a new code is flashed. For coding, you can use make code or either via the microbit app developed by Samsung.
3. You can connect alligators on the pins. or you can buy a slot for a microbit in order to take full control of every pin available. So this was some basic of how to connect a micro bit. Now let's move to its application part, where it can be practically we can see its practicality.
How to use Microbit and its Applications
You can go to makecode.microbit.org in order to code your micro bit. The below-mentioned examples are easy and can be easily understood by the colors of the blocks. They have explained the code on their website in a better way.Basic projects: You can make a Nametag of your and clip it to your shirt cool huh!, Smiley buttons which when pressed button A show smile face and when pressed B shows Sad face, Dice is when you shake the micro bit it will show a random number between 1 to 6, Love meter, etc...
- These are also Games you can code on a micro bit - Snap the dot, Karel the LED, crashy bird, etc...
- Radio games that you can play together via connecting with other microbit boards such as Mood radio,tele potato, hot or cold, etc...
- You can also make some fashion projects such as Step counter, watch, duct tape wallet, etc...
- There are some Music projects as well- hack your headphones, Banana keyboard, etc...
- It can work as a Soil moisture sensor, compass, Light sensing device as well and many other vast applications.
For detail about these applications please check this link.
My opinion about this board is very positive as it gives a lot of features which if we compare it to other boards don't.
Let's see some applications hands-on.
Name badge
[caption id="attachment_667560" align="aligncenter" width="680"] Fig 1.2 Name badge code[/caption]
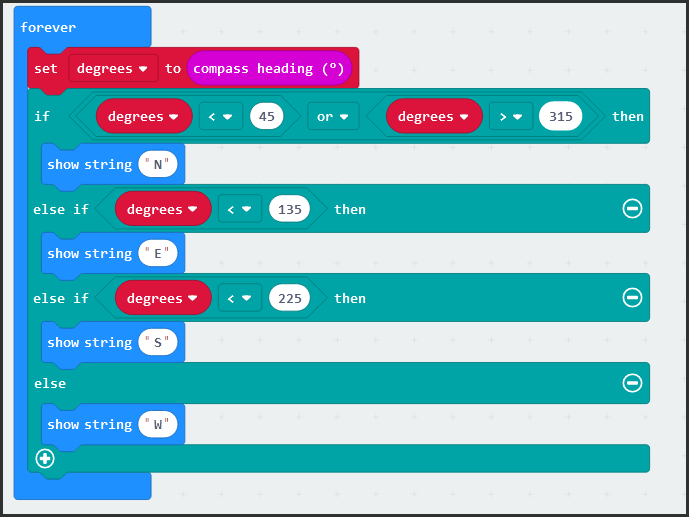
Compass
[caption id="attachment_667562" align="aligncenter" width="680"] 1.3 Compass code[/caption]
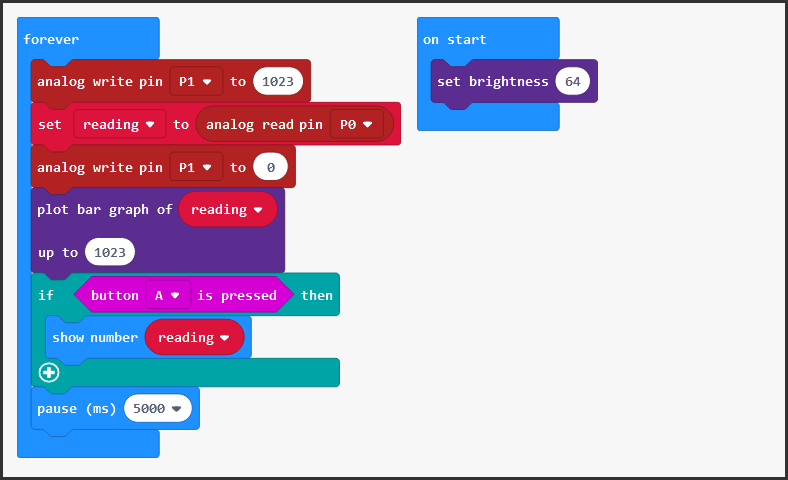
Soil Moisture
[caption id="attachment_667567" align="aligncenter" width="680"] 1.4 Soil moisture sensor code[/caption]
Selfie using Phone
This code comes preloaded into the app so you won't need a code for it. You can directly flash it via the micro bit app.
I will be showing the output in the video. You can just drag and drop to make the code.
So now as We checked its application and we performed some applications on our side. I would say it is a great board to begin things with. Now let's see it's advantages.
Advantages of Microbit
The main Advantage of a micro bit is, it comes with various sensors built-in so you don't have to purchase them individually.
The price is very pocket-friendly considering the sensors and the specification we are getting.
Coding made very easy, unlike other boards where complicated programming language requirements and understanding of deep code knowledge which takes a lot of effort. Coding is the same as scratch in microbit. You'll just need to drag and drop blocks.
It works on less power so its energy-efficient and as the go kit comes with a battery it makes it easy to carry and power it.
Size is half the credit card, so it makes it pocket-friendly.
Its pros are really awesome. Having so much in just a tiny board. Now let's come to the conclusion of this blog.
Conclusion
Microbit is a very good replacement for boards like Arduino and Raspberry as coding is very easy and as it comes with built-in sensors. This board's designed keeping rookies in mind who are starting with coding and embedded systems.
What are your thoughts on it? Did you found the blog informative? If you did let me know in the comments section.


