SmartElex Aryabhatta 8051 Development Board Interfacing with LED Tutorial
The article covers what is Aryabhatta 8051 development board, its pin-out, and interfacing a LED.

SmartElex Aryabhatta 8051 Development Board is an open-source electronics platform based on easy-to-use hardware and software. The main aim of this SmartElex Aryabhatta 8051 Development board is to provide the microcontroller so that it will help the beginners for developing the embedded projects. This board is a good start for beginners. The Aryabhatta 8051 Development Board AT89S52 with Onboard USB Programmer is very easy to use but also at the same time offering high functionality also and yet it is available at a price everyone can afford. So by considering all its benefits, we have decided to make a tutorial by using this board. In this tutorial, we are going to explain to you how to interface the led with Aryabhata Development Board AT89S52 and also about how to install the USBasp drivers, the procedure of programming the board using Keil software and finally the code burning procedure using progISP software.
We are sure that by using this tutorial all the queries of yours regarding this board will get clear and make the beginners expert in using this board.
With SmartElex’s Aryabhatta 8051 Development Board AT89S52 – on-board USB Programmer you can develop and prototype 40 pins 89S52 and 89s51 microcontrollers. The onboard programmer allows easy connection with PC using USB type B cable for Programming. The Operating Voltage is 9V to 15V DC.
If you are learning microcontrollers or want to quickly develop an embedded project based on standard 8051 core, then this board will help you quick start with the application by giving you access to everything required to run the AT89S52 microcontroller. With this board, you can develop and prototype with any of 8051 40 pin microcontrollers.
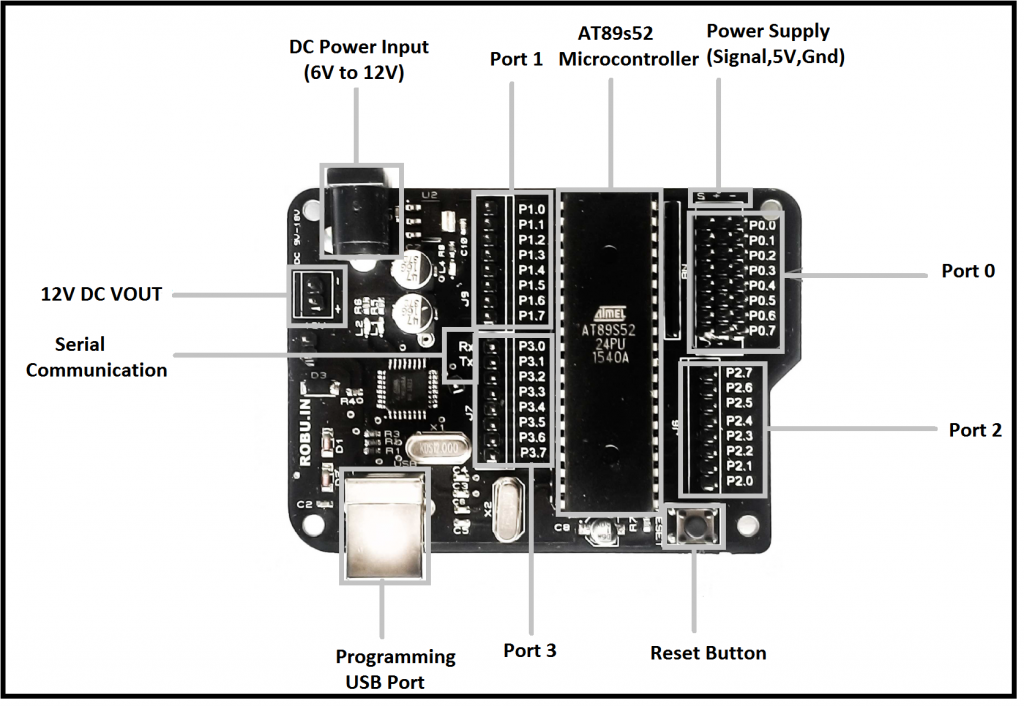
Pinout Diagram:
[caption id="attachment_636856" align="aligncenter" width="603"] Fig.1.0 Pinout Diagram of 8051 Aryabhatta Board[/caption]
For Windows 10, Disable Driver Signature before installing Drivers. For programming in SmartElex Aryabhatta 8051 Development board, you have to install the USBasp driver on your PC. You can refer to the below video link for installing it.
Features:
- Quartz crystal 11.0592 MHz.
- Onboard programmer.
- Reset button.
- Power plug-in jack.
- GND bus.
- VCC bus.
- Onboard 5V voltage regulator.
- Power Indicating LED.
- Onboard Regulated Power Supply 5V, 12V, GND.
- High-quality PCB FR4.
- External pull-up resistors for Port 0.
- Port extensions for all ports
Technical Specifications:
- Size: 85×62 mm.
- Supported Microcontroller: AT89SXXXX series.
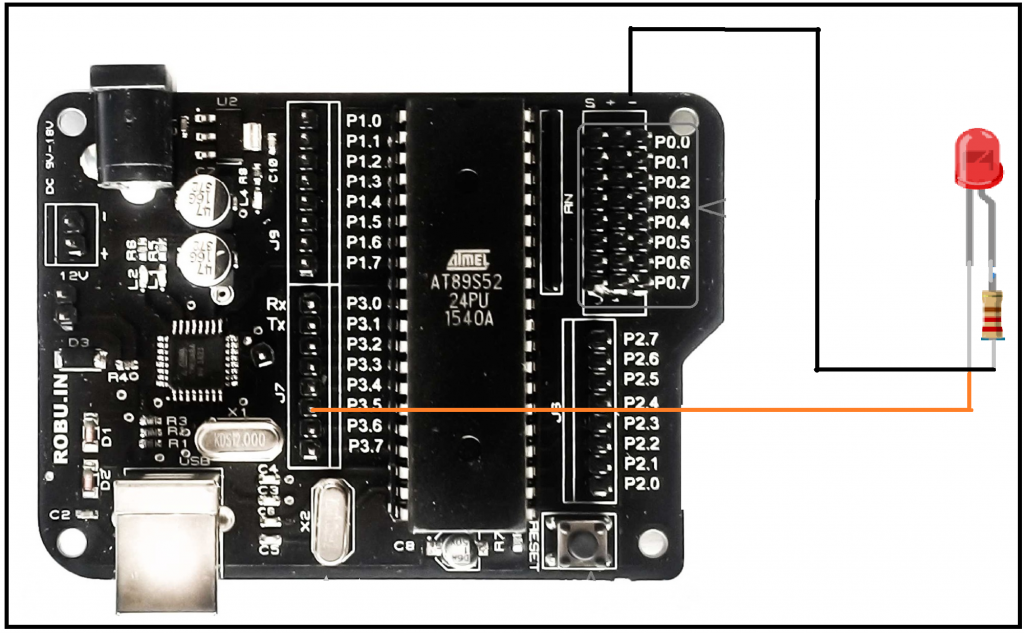
LED with Aryabhatta 8051 Board connection:
[caption id="attachment_636864" align="aligncenter" width="606"] Fig.1.1 Led Interfacing with Aryabhatta 8051 Board [/caption]
LED interfacing is the first thing, one would try to do while getting started with any microcontroller. So here in this tutorial, we are going to interface an LED with SmartElex Aryabhatta 8051 Development microcontroller and will write a C Program to blink the LED. We have used a very popular microcontroller AT89S52, of 8051 families, by ATMEL.
Hardware required:
- Aryabhatta 8051 board.
- LED.
- Resistor 1K.
- Breadboard.
- Connecting wires.
- USB cable.
Software used:
- Keil μ-vision IDE (for writing the code).
- ProgISP (For burning the code).
- USBasp drivers.
How to program Aryabhatta 8051 Board_using_Keil:
Step 1: Downloading Keil μVision IDE:

Keil provides a code limited (2K bytes) evaluation version for 8051 architecture (C51) which is sufficient for learning purposes.
The main limitations of the evaluation version are the following.
- 8051 compiler, assembler, linker, and debugger are limited to 2 Kbytes of object code
- Programs that generate more than 2 Kbytes of object code will not compile
- The debugger supports programs that are 2 Kbytes or smaller
- No hardware support for multiple DPTR registers is provided Keil uVision IDE (Evaluation Version) can be downloaded using this link. On Clicking the above link you will be redirected to the Keil Website Download section. Please click on the C51 icon to download 8051 development tools (above Figure) . and download your Windows Executable.
Step 2: Creating an 8051/8052 Project Using Keil Uvision IDE:
After you have installed the Keil uVision tools for 8051, Double click on the Keil icon on your Windows Desktop to launch the IDE. To create a new 8051 project using Keil IDE, Click on the ' Project ' item on the IDE Menu bar and select ' New uVision Project... 'as shown in the above image. Now create a folder to store your project and give a name to your project files (*.uvproj), for eg Test (Test.uvproj).
Step 3: Selecting an 8051 Device in Keil:

You will then be taken to the device selection dialog, where you can select the 8051 derivatives for which you want to develop software. Keil has support for a wide variety of 8051 derivatives on its IDE. The 8051 derivatives are organized according to their manufacturers. On selecting the particular microcontroller the Keil IDE also displays the features of the selected microcontroller on its left pane. You can Click OK to confirm your choice.
Step 4: Final step After selecting 8051 device:

After selecting your 8051 derivatives, You will get another dialog as shown Above. Asking to copy STARTUP.A51 Click ' Yes '.
How to Burn the code in Aryabhatta 8051 Board_using_ProgISP:
PROGISP is the software used to load the HEX file on to the target chip. KEIL μ-vision is the software to create a HEX file using C code or Assembly language. Download the software here : http://www.alselectro.com/files/8051_isp.zip The drivers for the ISP Programmer is found inside the Drivers folder of PROGISP.
Open the DEVICE Manager of your PC while connecting the ISP programmer to the USB port. If you get an exclamation mark against the device, Update driver & browse to the location of Drivers inside PROGISP folder you’ve downloaded.
Once the Drivers are installed you get the USBasp under Device manager. The setup is now ready to load the HEX file. We use the PROGISP application to load the HEX file on to the target IC. No installation is required for this software, it’s a standalone one.
Double click progisp.exe to open the application.
Step 1: Selection of 8051 controllers in ProgISP:
 The first step of the burning of the code is the selection of the microcontroller. As shown in the above image you have to first properly select the microcontroller which you are going to use in your project.
Ensure that the following buttons are Enabled :
- Verify Signature
- Chip Erase
- Program Flash
- Verify Flash
Step 2: After Controller selection checking of Program state:
After selecting the microcontroller you have to check the program state. The PRG ISP & USB ASP buttons should be bright. If it’s greyed out, then check the USB cable connection & the driver installation. The program state must be set to ISP mode as shown in the above image.
Step 3: Burn the code into the controller by selecting the load flash option:
After checking the program state, the next step is to select the hex file of the code by clicking on the Load flash option. when you click on the load flash option a new dialog box will get open as shown in the above image.you have to select the burning code from the location where you have saved your code. One thing makes sure that while selecting the code, the file must be in Hex form. once you select the code then click on the open option.
Here below is the Aryabhatta 8051 with led blinking code:#include<reg52.h> // special function register declarations
void Delay(void); // Function prototype declaration
// for the intended 8051 derivative
sbit LED = P3^5; // Defining LED pin
PORT3 = 0x00; //output port used for leds
int main (void)
{
while(1) // infinite loop
{
LED = 0; // LED ON
Delay();
LED = 1; // LED OFF
Delay();
}
}
void Delay(void)
{
int j;
int i;
for(i=0;i<10;i++)
{
for(j=0;j<10000;j++)
{
}
}
}
Step 4: After burning code, the final step is to upload the code into the controller by selecting the Auto option:
 The status bar at the bottom indicates the progress of the operation.
 Finally, the HEX is successfully loaded on to the target chip.
 If the PROGRAM FLASH button is not enabled, you get Flash Verify Error while fusing.
LED Blinking with Aryabhatta 8051 Board:


The Board is unable to detect 89S81 controller. Giving “Chip Enable Program Error” using ProgISP software. Tried many controllers 89S51 and 89C51. However, working fine with 89S52 and 89S52.
BEST BOARD